
Reaktor Tutorials
'How To Make A Simple Reaktor Sampler' Tutorial By Bytechop
‘How To Make A Simple Reaktor Sampler‘ Tutorial By Bytechop
With Reaktor it is also possible to build very creative sample based tools. Sampler-modules can be used for re-synthesis (Skanner) or mangling samples (S-Layer), sequence it and even simple playback (Massive). Reaktor offers the use of sample maps which holds all the samples that are used in your ensemble. The samples can be saved directly into the ensemble or linked to the original file-location on your hard-drive.
Before you start I recommend to read the Reaktor factory manuals, the module reference explains nearly all modules very well and better than I can 😉
I’m about to explain how to build a very simple sampler which uses one sampler module to playback 4 different samples at the same time.
This is also known as layering, mostly used for drum sounds but also great for all other purposes of sound design. S-Layer from Twisted Tools and my Bytechop Layersampler are good examples of such type of samplers. S-Layer is a real beast in comparison to my creation. At this point you should know I’m not a pro developer in Reaktor, so I hope this tutorial will give you a nice starting point.
Ok, lets start.
// 1 – The simple Sampler
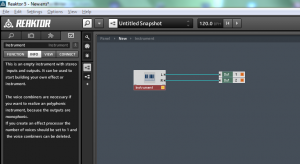
First you have to create a new ensemble with a empty instrument with 2 outputs which be connected to audio output 1+2. No need to change the default instrument settings. 4 voices are fine for what we need.
Open the instrument by double-clicking. Now setup a simple sampler. We will use the “sampler loop” loop module. To get it, right-click on the background of Reaktor and navigate trough the Build-In Modules > Sampler category or simply press Enter and search for it, its much quicker when you now the name for the most used modules.
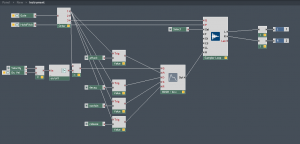
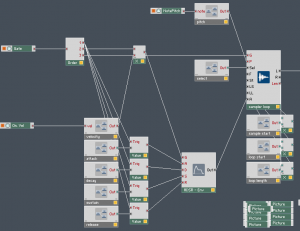
Setup the first structure to get this.
One of the most important things is to handle the gate-signal right to prevent unusual behavior of the sample playback. This is what the Order-module is for. The gate is the note on/off trigger. What we need is a one-by-one initialization.
The gate goes into the Order module and then via the 1st output into the trig input of the Value modules which are connected to the ADSR-Env module. Now the values from the knobs are sent to the ADSR module.
The 2nd output triggers the velocity value.
Maybe you are wondering why I use a Multiply module instead of the Value module. I do this to set the velocity to zero when Gate is also zero. The Velocity input value is sent to the ADSR-Env gate input, so when you stop pressing a key the gate input is then zero. Velocity values which comes in will be multiplied with a knob-value between 0…1, so you can change the value. The Switch-module disables the incoming velocity.
Before the signal goes into the output you need to merge the voices into one signal, for this use the ADD-module. When you enable debugging (the little bug icon on the left) and move the mouse cursor over the cables you can check how the signals are going trough the cables.
The 3rd output just send the gate signal to the Sampler Lopp gate input and starts the sample playback.
The knob values (min..max / default / num steps) should be set as following:
Attack -20..80 / 0 / 100
Decay 0..1 / 0.5 / 100
Sustain 0..80 / 80 / 80
Release 0..80 / 40 / 80
Velocity 0..1 / 0.5 / 100
Select 0..127 / 0 / 127
min max values depend on how much samples you like to load in the map you can load 128 samples max in one map (value 0..127)
When you load samples into the map use the Root value 60 for each.
Tip: If you use musical samples with different pitches you can change the Root to get a better result when the sounds playback together in the final ensemble.
// 2 – The 4 Voices
My focus on the Layersampler was to have one Sampler-module with just one map to get managing samples easy as can possible. Now with your sampler you able to play just one selected sample at time. Our goal is tho have 4 separate voices, so we need all the controls 4 times. So do a copy of it then setup the voice. For a better looking structure I recommend you to create macros for each control set.
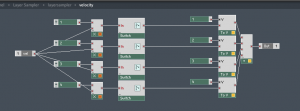
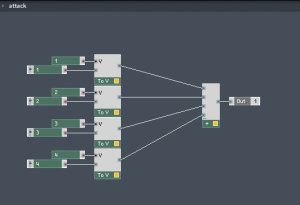
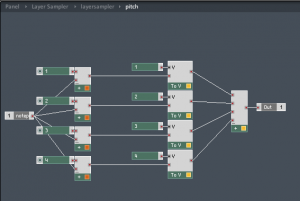
To select which voice should send a value to the Sampler Loop or ADSR-Env-module we use the “To Voice”-module. The V-input is for the Voice, right-click on it and then select Create Constant. Now you can set the voice numbers 1-4. The Velocity-macro should looks like the picture above (screenshots from the actual Bytechop Layersampler v1). In the final ensemble you are able to switch every voice on/off (and the swicth now makes sense *smile*).
Here is the Attack-macro
The Pitch-macro
As you can see, it is very easy to manage the voices.
You can use this with nearly every module, like amps, eq’s and so forth. When you like to create more than 4 voices, you have to change the instrument voice settings.
Here is the Layersampler structure, your’s should looks alike (the sampler loop settings are optional):
That’s all? Yes. 🙂
I hope you learned a bit from this and have great ideas to contribute to our user community. Maybe you have questions so check the NI Reaktor User Forums, there are a lot of friendly people who are willing to help you.
At this point thanks again to Salamanderanagram who has gave me the knowledge to build my first Layersampler.
You can download my Bytechop Layersampler v1 to play with, remix, mutate it and learn more from.
Download from the Reaktor user library here.
Helpful Links
A tutorial on sample maps by Peter Dines:
https://www.reaktortips.com/2008/01/pro-tip-sample-maps.html
Free Reaktor sample map generator – Download here
 YOUTUBE