
Reaktor Tutorials
Iterative Filters in Reaktor
THE TROUBLE WITH TANH
Adding non-linear elements to the filters introduced in the previous two tutorials (1 + 2) proves to be a pretty complicated task. Specifically, many filter designs have non-linearities within the feedback path, that are often modelled in the digital domain with tanh functions and polynomial expressions.
However, attempting to add these functions to the simple filters previously introduced results in either an overwhelming amount of math or many times will have no solution whatsoever, as far as I can tell.
Take, for example, the MS-20 filter from the previous tutorial – initially made by solving for y in the equation:

However, placing a tanh in the feedback path would mean replacing the ky values in the above equation with tanh (ky), leading to a problem with no solution (we cannot solve for y).
Similarly, adding polynomial shapers leaves us with equations that can be solved, but are extremely tedious and in my experience do not leave you with usable functions anyhow (IE the equations seem to have more than one possible solution).
This leaves us without shapers in our feedback, which kind of defeats the purpose of modelling an analog filter in the first place. There are a few different workarounds I am aware of for this problem, but let’s work on the easiest one first!
ITERATIVE FILTERS
I stumbled across the concept of iterative filters in the KVR forums, specifically in this thread here, so thanks to user Neotec for this concept.
The basic idea that he outlines is to make a filter with a unit delay in the feedback path, then to iterate through the filter several times each sample until a more or less constant feedback value is found. When the feedback is found to be constant, the output of the that filter iteration can be used as to feed the output of the filter and the unit delay in the feedback path. This basically allows the feedback to ‘catch up’ to the current time.
So, strange as it is, I modified my zero delay filter to use a delay instead! This actually saves us a substantial amount of math for each iteration of the filter, which means that the CPU hit of iterating the filter is not as bad as you might expect.
IMPLEMENTING ITERATION
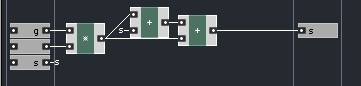
For reference, here is the initial filter:
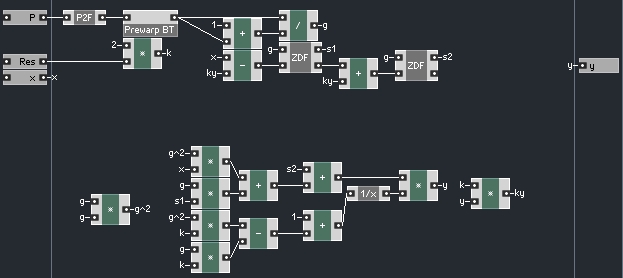
and the ZDF (Zero Delay Feedback) macro looks like this:
1 Pole Low Pass Zero Delay Feedback Filter
In this filter, we are calculating the output of the filter first, then using that value to calculate the state variables for the next iteration of the filter. In this tutorial, I’ll be modifying the structure so that we’ll simply use the feedback given to us from a unit delay holding the previous output.
This will enable us to add numerous non-linearities at will. The filter introduced in this tutorial can also handle frequency sweeps at high resonance more gracefully than the design from the previous tutorial. In general, the new filter will handle high resonance better than it’s predecessor: if carefully designed, it can allow for self oscillation, and it won’t head off into infinity if the maximum recommended resonance value is exceeded.
To implement iteration, we can strip out a substantial amount of math (all the calculations that went towards finding the value of y), and simply replace them with a new input that will supply the value of y.
The values of G, s1 and s2 need their own inputs to the filter as well, and s1 and s1 need outputs, as we will see eventually, leaving us with an overall filter structure that looks like so:
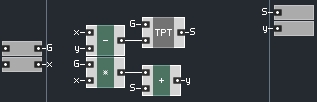
Changes have been made to the ZDF and TPT macros as well:
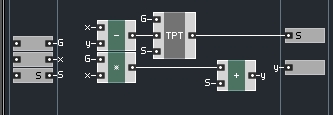
These changes are to accomodate the fact the S values are now coming from outside the TPT structure.
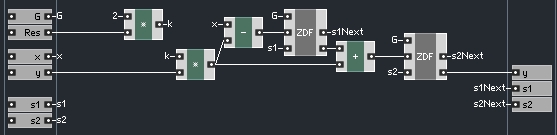
This whole structure just presented represents one iteration of our filter! Thus, we need to enclose this macro in a larger structure and have a different copy of it for each iteration.
A brief aside – Alternately, we could use an Iteration module from outside of Core to run our iterations for us, but I have found that this method is often slower than simply ‘unrolling the loop’ inside Core, which is as easy as copy/pasting a properly designed structure and linking them together.
Here is our filter, with an unrolled loop inside of Core:
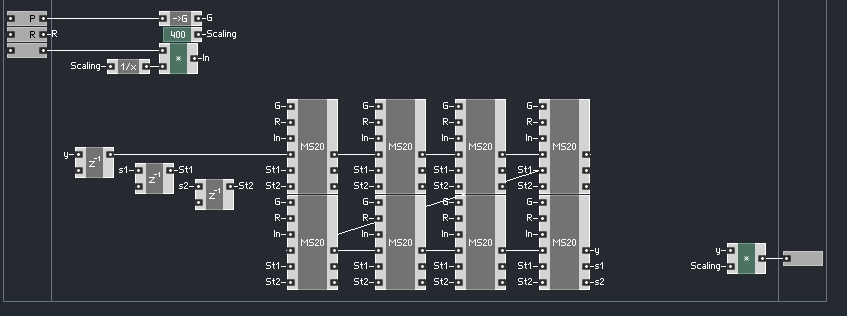
And now we see the purpose for the G, s1, and s2 inputs for each macro – this way, the G value only needs to be calculated once when it changes, and the s1 and s2 values are used from the last iteration. The ‘scaling’ factor was used because I was driving this filter with very extreme values (+- 350 as opposed to the usual +-1), which can be useful for testing frequency response.
Notice that rather than comparing the feedback values each time to see if they are changing as I outlined above, here I have merely iterated through the filter 8 times. I checked this filter a variety of different ways, from 1 to 8 iterations.
Obviously, with only one iteration, we are left with the classical frequency warp problem that we implemented zero delay feedback to avoid in the first place. With each added iteration, the closer to the zero delay version we achieve, in terms of frequency response.
By the time we reach 8 iterations, the two filters are nearly identical, except of course, that our new version takes quite a bit more CPU and doesn’t even do anything different yet!
Well, fortunately, we can now implement non-linear waveshapers into our feedback loop.
Here’s how:
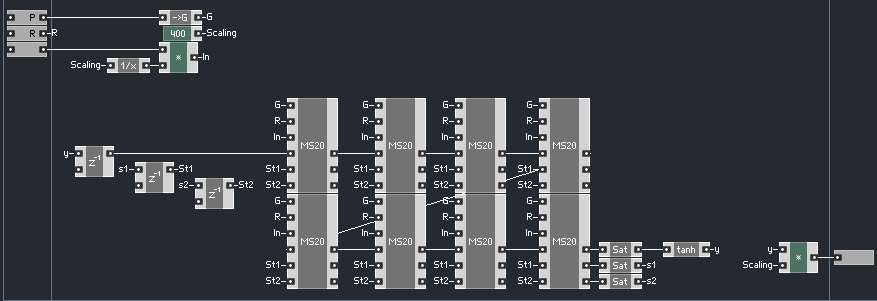
Now, I am fairly new to filter design, and have no idea what real non-linear feedback shaping does to a signal. So I simply added some basic known shaping functions – the effect seems subtle, however. I also read that some folks have had success saturating the s1 and s2 signals, so I tried that as well.
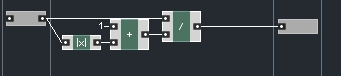
Here is the shaper function I used:
This section could probably use substantial improvement (such as oversampling, and a better shaping function), but we are now able to try whichever functions we like in the feedback path, while retaining the topology of the filter as before.
CONCLUSION
This filter can still be improved upon – I have not yet had time to make the loop exit once a suitable value is found, for example, which should save a substantial amount of CPU at lower resonance settings. It’s also likely that more iterations could be added to the loop for very extreme settings.
Further, the non-linearities I added are sort of milquetoast. While researching this project, I read a comment from Urs Heckman, designer of DIVA. I can’t find it now, but he said something to the effect of “filters that only have non-linearities in the feedback path are boring.” In another thread, he hints that DIVA uses a method that combines the zero delay feedback and the iterative approaches, but I have yet to discern what is meant by this.
In any event, this filter does exhibit very favorable behavior at extreme settings, so some of you may find it useful.
