Reaktor Tutorials
Introduction to Reaktor Core, Part II
Welcome to the second part of a series on programming in Reaktor Core. In this instalment, I’ll be covering event order in Core, as well as latches, which are the last type of Core signal we need to go over.
SIMULTANEOUS EVENTS
One of the great aspects of Core is the ability to utilize simultaneous events. Consider the following Reaktor Primary structure:
Notice that the inputs and outputs of this structure are event rate – the scenario I am about to describe does not occur with audio rate modules, to my knowledge. Now, any time an event arrives at the input to this macro, two events are sent to the output! The event travels to each input of the Add module separately – whichever port was connected first is processed first.
So, consider a situation where the previous input to this macro was a value of 5, and a new event has arrived with a value of 6. First the value of 6 travels to the Add module, gets added to the other input at the Add module, which is still equal to 5. Thus a value of 11 is sent to the output. Next, the event goes to the second input of the Add module, and sends a value of 12 to the output.
This situation can be quite frustrating – for one, it is quite inefficient, and it also creates unwanted events that can have unforeseen consequences further down the line. In Reaktor Primary you can fix such a situation like so:
Now the macro only outputs a single event per input received. This works, but it is kind of an annoying workaround that leads to code that is hard to decipher. It is more efficient in most cases than the first picture,since the modules coming after this macro are only sent one event instead of two. However, the Add module itself still gets processed twice, which is clearly unnecessary.
The great news is, Reaktor Core sidesteps this problem completely! In Core, there are two situations that allow you to take advantage of simultaneous event processing. The first is with the arrival of a new event. Any module that is triggered by a new event is processed at the same time.
This means that any situation where a module receives two inputs at the same time, the module will wait to receive both inputs before outputting a value. Hence, the following structure will only output a single event for each event received:
This has many benefits. Most importantly, it mostly removes the need for closely following event order that makes event programming in Primary so frustrating and unpredictable to the beginner. Obviously, it is a benefit that the add module is only processed once as well.
Simultaneous events are also used for audio processing, since audio and events are treated the same once inside Core. At every tick of the audio clock, each audio input to a core cell is read. All of these values are treated as events that have arrived simultaneously.
For example, if the input and output in the previous example were to be set to Audio instead of Event, the Add module would still only be calculated once. Of course, this is (as far as I understand) exactly the way it would work in Primary. What’s novel is that we can treat our event and audio programming identically.
LATCHES
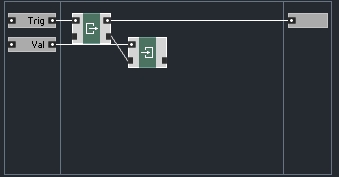
Latches are the last signal type we must cover. They are used to link together a class of modules that are used to store values. Data manipulation is one of Core’s greatest strengths – the Read and Write modules can be used in tandem to create something very similar to the Value module in Primary:
The value to be stored flows directly into the Write module, which stores a value. The incoming ‘Trig’ signal reads out the value we have stored. As you can see, the Read and Write modules are connected together via latch ports.
The latch connection tells Core that the Read and Write modules are operating on the same value (usually called a variable in programming parlance). Latches have another important function, which is to impose an event order on a structure.
For example, in the above picture, suppose both inputs are connected to the same signal. The output in this case will be identical to the input, since the input is first stored using the Write module, and then sent to the output when the Read module gets triggered. Now suppose we have another structure:
This structure is identical to the first, except that the Read module comes first this time, and the Write module follows. Since the Read module gets triggered first, the output is equal to the previous input. Once this value is sent, the current input is stored using the Write module.
While the first structure was almost identical in function to the Primary Value module, the second is very similar to the Primary Unit Delay module. In both cases, the only difference is that the Core structures are more flexible since are not required to operate at event or audio rate, but can be either depending on the situation.
These examples are very basic, obviously, but as we will see later on, using latches to control the order of events is very useful, especially because of the simultaneous nature of events in Core.
CONCLUSION
In the next tutorial, I will cover the use of arrays, which are an extension of the Latch signal type. I’ll also show the creation of various types of counters, which are an essential part of Core programming technique.
Have A Question Or Comment About This Tutorial?
Want to ask a question about this tutorial or perhaps you have something to add?
Click through to join our forum post about this tutorial and join the conversation!


 YOUTUBE