Reaktor Tutorials
Introduction to Reaktor Core, Part I
In this tutorial, I’ll start going over the basics of programming in Reaktor Core. Core has many advantages over Primary mode, including improved CPU efficiency for many tasks, more data types, better data handling and manipulation, better handling of event streams, and more.
The scope of this topic all but guarantees that this guide will be split into smaller sections. Let’s get started!
INTERFACING WITH PRIMARY
Since any Reaktor project must use Primary as a method to connect to audio ins and outs, and since panel elements such as knobs and switches only exist in Primary, it is necessary to interface any Core code inside a larger primary structure. There are two modules that allow this: the Audio Core Cell, and the Event Core Cell.
These modules behave very much like Primary macros, the difference being that the code contained within them is written in Core and not Primary. Event Core Cells can only use event rate inputs and outputs. Audio Core Cells can receive both audio and event inputs, but can only use audio rate outputs, which can occasionally be rather frustrating when you want a cell that can receive audio and output events.
Inputs to Audio Core Cells can be set to either event or audio rate in the FUNCTION tab of the properties:
Visually, event inputs are marked red as in Primary, and audio inputs are marked black. Core cells can be easily inserted inside a primary structure the same way any other module or macro would be.
While many tasks can be performed faster in Core than in Primary, there is some inefficiency caused by the need to translate from one to another. Take, for example, the following structure (which is not functionally useful, really, but just an illustration of how to use Core efficiently):
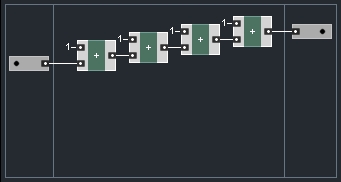
Here, a simple Audio Core Cell is repeated 4 times. However, in between each cell, there is a translation from Core to Primary, then the signal is immediately translated back to core. The result is that even this simple structure takes up 3.5% of my CPU.
The following method is substantially more efficient:
This setup takes less than 1% of my CPU, a very substantial difference for two functionally identical designs. The takeaway from this is that translations from Core to Primary should be avoided as much as possible. If you can, it is best to contain all Core code for a project within a single cell.
AUDIO AND EVENT INPUTS
Very briefly, it is important to cover the functional differences of audio and event inputs in Core. Event inputs are simple to understand – a new event is created when one arrives at the cell input. Audio inputs, on the other hand, create a new value for every tick of the sample clock, regardless of whether a new value has arrived or not.
In Reaktor, events happen in between the sample clocks. This means that you never have to worry about an event arriving in the middle of audio processing – it simply doesn’t work that way!
SIGNAL TYPES IN CORE
One of the great advantages of Core is that, once inside a core cell, audio and event signals can be treated identically. This means you don’t need to worry about mismatching signal types as you do in Primary, where many modules can only receive events, and audio rate modules are difficult to use with events as well to the point that it is generally not worth doing.
Even though audio values and events are treated the same, Core nevertheless has a few signal types. The signal type that a module receives at an input (or sends as an output) is determined visually:
Further, audio/event signals can be divided into float values (floats are used to represent fractional values in a digital system) and integers, or whole numbers. Since audio signals tend to range from -1 to 1, floats are the default signal type, but you can change a module from float to integer in the FUNCTION tab of the properties. There is a tutorial on the integer type here.
Most modules deal mainly with audio/event signals, which can be used in any number of ways. Booleans and latches are more pre-defined and work only with a few types of modules.
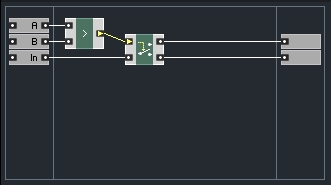
Only 5 modules use boolean signals, and only one of those five can receive a boolean as an input – the Router module. Simply put, boolean signals are used to control which output of a Router the input gets sent to. In the following picture, the signal is routed to output 1 if A is greater than zero, and routed to output 2 otherwise:
Latches will be covered in full in a later tutorial, but for now I’ll mention that they can be used to control the order of events inside of core, specifically relating to stored values. For example, if I want to read a stored value, add another value to it, and then store the value for later use, latches can help to control the order that the events happen in.
MODULES AND MACROS
One thing that really confused me as a new user of core several years ago is that the Built-In Modules can be quite obtuse – they don’t have their names written on them the way that Primary modules do, and looking at structures made up of entirely unnamed modules can be quite tough to decipher.
Fortunately, there are only 29 Built-In Modules in Core. The Expert Macro and Standard Macro menus are made up entirely out of these 29 module types. Further, several of these types have a function that is quite easy to determine, such as the Add and Merge modules.
In fact, as you get used to looking at Core structures, many of the graphics on the Built-In Modules become more clear, and actually do a decent job of describing the function of the module.
One of the most important step to take in Core is to learn to identify each of the Modules by sight.
CONCLUSION
This tutorial has only scratched the surface of Core. There are many more topics to cover, such as arrays, event ordering, and more. We’ll get to all of these topics soon, I promise!
Have A Question Or Comment About This Tutorial?
Want to ask a question about this tutorial or perhaps you have something to add?
Click through to join our forum post about this tutorial and join the conversation!
Visit: Intro to Core, Part I


 YOUTUBE