
Reaktor Tutorials
Interpolation in Reaktor
In this tutorial I’ll explain what interpolation is and show a few simple methods for interpolating between two data points, implemented in Reaktor Core.
Interpolation has many uses in DSP, among them creating envelope curves, high quality wavetable oscillators, and delay lines. This frequency detection algorithm uses interpolation to achieve much higher accuracy than a simple, non-interpolated structure.
INTERPOLATION
Interpolation is the process of using two or more data points to ‘read between’ those points in time.
In a wavetable synth for example, you might take 10,000 data points to represent a waveform and store them in an array. When playing the data back, it is inevitable that you will eventually want to look at a fractional value, for example, data point 5.4, in between the known values of 5 and 6.
There are many ways to solve this problem. Let’s check out some of them.
PIECEWISE INTERPOLATION
This is the easiest solution. In Core, it requires absolutely no extra programming whatsoever. Piecewise interpolation simply chooses the closest available data point to read. Keeping with the above example of trying to read from index 5.4 of an array, piecewise interpolation will simply round 5.4 to the nearest integer (5) and read out that value.
As you might imagine this is also the worst solution. It is only really acceptable if you choose to do massive oversampling of data points to begin with, which is not always possible.
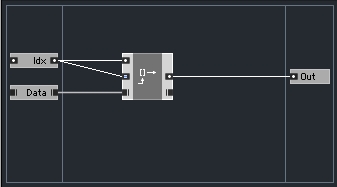
A Core version, like I said, requires no extra programming – simply run the float value into the integer Idx input of the Read[] macro like so:
LINEAR INTERPOLATION
Linear interpolation is what you might call the ‘obvious’ solution. You basically assume the unknown signal between the two known data points travels directly in a straight line from one point to the other. It requires some very basic math and can implemented easily in Reaktor:
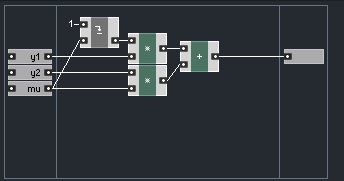
I based this macro on a piece of C++ code here. I’ll use this web page as a source for the next few types of interpolation. A forthcoming tutorial will explain the process of translating C or pseudo code into Reaktor structures – a very useful skill, and usually not too hard for small pieces of code like this.
Linear interpolation will substantially reduce aliasing from the piecewise version, but it is usually worse than other types of interpolation for that purpose. Nonetheless, it is still very CPU efficient and easy to implement so it is not a bad choice for many needs.
Typically, the data points being interpolated will be stored inside an array. So we can extend the structure by enclosing it like so:
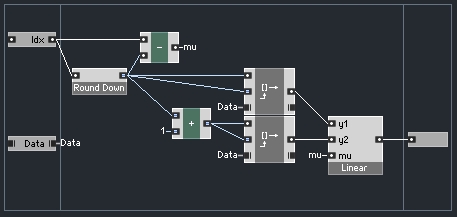
Where the ‘Data’ input is a Latch connection to the array, Idx is the location to read, and Round Down is a macro that looks like this inside:
This macro simply shaves off the decimal value and leaves the whole number behind. Later, we subtract the output of this macro from the incoming index to get the value for mu.
COSINE INTERPOLATION
This method is very similar to linear interpolation – instead of presuming the signal between the two points travels in a straight line, we presume it has a cosine shape.
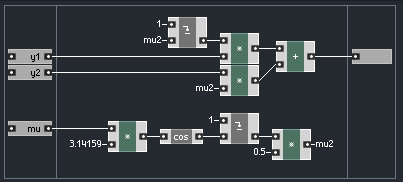
Cosine interpolation has the advantage of smoothing discontinuities in the waveform compared to linear, especially in the areas directly surrounding the data points. Of course, the trig functions cause it to run a little bit slower as well.
This macro can be wrapped inside the same structure as linear interpolation.
CUBIC INTERPOLATION
The last form of interpolation I’d like to cover today is cubic, or polynomial interpolation. Polynomial interpolation is a method of creating a function that passes through a number of data points.
Such a function takes the form (source: Wikipedia)
![]()
where x is the input, n+1 is the number of given data points, and the ‘a’ variables are coefficients that we must discover. I vaguely remember working with functions like this throughout much of high school math, wondering when I would ever use such a thing.
Cubic interpolation refers to using four data points, making the largest polynomial a cubic function, hence the name. The C code gives an easy way to find the coefficients, from there we simply calculate p(x). Implementing this in Reaktor takes a bit of math but it is not so hard:

Working from the C code, it is important to keep the order of events, which is pretty easy in Core.
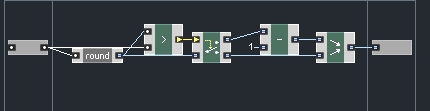
This structure can be enclosed like so to read from a given data array:
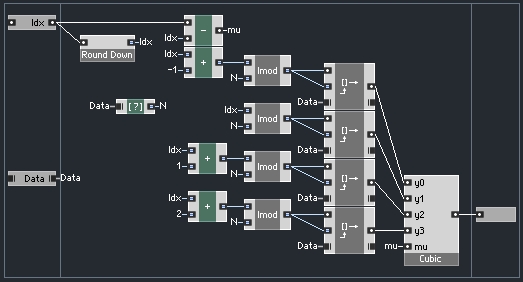
The website that this code is based off of remarks that the algorithm does not take into account the first and last data points. Here, I have decided to wrap around when the Index is less than zero or greater than the array size, using the modulo function. This is useful for a repeating wave such as in a wavetable oscillator. Technically, the previous versions should probably use an IMod macro to wrap indices as well.
Polynomial interpolation can be extended to use an indefinite number of data points. The more data points, however, the more memory reads and math functions are required. I find that 4 is a good trade-off between performance and efficiency.
CONCLUSION
Please feel free to give suggestions for future tutorials or to ask any questions about today’s in the comments.
I’ve included a download that includes all of the work from today. The piecewise, linear, and cosine options show a simple interpolation between two points: 0 and 1. The cubic option interpolates four points:0, 1, 0.25, and 0.5.
