
Reaktor Tutorials
How to Make a 909 Kick in Reaktor
While I will be using a very specific example, this tutorial also aims to familiarize the reader with appropriating work done in other formats for Reaktor. There is a wealth of information available online on how to make specific sounds, and translating them into Reaktor is often a fairly trivial task. Many times the hard work for a project has already been done for you by somebody else.
BLOCK DIAGRAMS
The diagram we’ll be working from today is from this Sound on Sound article, a part of a series on synthesis and sound design by Gordon Reid. I suggest you check them out! They are loaded with diagrams that look like the one I’ll be dissecting today.
Here’s the diagram:

Almost all of these boxes have direct counterparts in Reaktor. Once we identify what they are, it is a simple matter to add them in Reaktor and connect them together. Learning this skill is very useful in Reaktor, because there is often very little Reaktor-centric information on a given subject.
BUILDING BLOCKS
Starting from the left side, the Accent box is one that we can ignore – it is used to accentuate the velocity of certain drum hits in the 909 sequencer (we can get the same effect simply by changing the velocity of the incoming MIDI notes, if we desire).
The Trigger, however, can be modelled in Reaktor as a Selective Note Gate, found in the MIDI IN menu. We won’t be needing the Mixers connected to the Trigger, however, since we aren’t including the Accent input.
Ignoring these, we see that the Trigger is connected to the EG1, EG2, and EG3 modules, as well as the Pulse Generator. EG stands for Envelope Generator, and in this instance, we can use the DR Envelepe module from Reaktor – since we’re going for drum sounds, we don’t need attack or sustain parameters.
I chose to consolidate EG1 and EG2 together, since having two knobs that control the decay of our sound feels redundant, and confusing. I also added an overall Level knob to the envelope gate – by controlling the level of the gate, we also control the amp of the drum, at no CPU cost.
As it turns out, the Pulse Generator can be reasonably approximated with a DR Envelope in Reaktor as well. The Pulse Generator emulates the contact of the beater and the kick drum, and is simply a quick burst of energy (often called an impulse instead of a pulse). In fact, a DR envelope with Decay and Release values equal to 0 (1 millisecond each) works fine for this purpose.
The VCO is a Voltage Controlled Oscillator. The input to the VCO controls the frequency of the oscillator. While the oscillator itself generates a sawtooth, the waveshaper following it reshapes into a sine wave. We could emulate this in Reaktor, but it would be more complicated and less efficient than simply using a sine oscillator to begin with.
The VCO and the following Waveshaper can be emulated as a Sine Sync module. We need to re-start the oscillator on a new trigger to keep a consistent ‘click’ at the beginning of our kick drum sound. The sine oscillator itself may create a click if the phase is not set to 0 on a new trigger, leading to inconsistencies in the sound.
In fact, many implementations simply use the phase input of a Sine Sync module to get this sound. However, it is useful to have separate amp controls for our ‘click’ and VCO sounds, so I like using a separate module for the click, as we will do today.
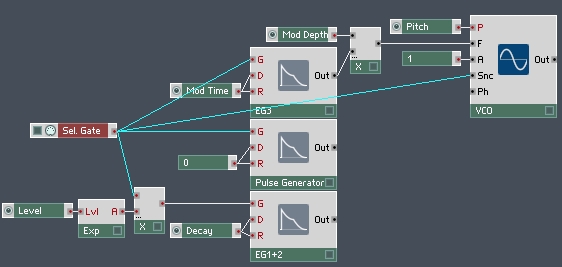
The Sine Sync module also has an input for frequency modulation, which is useful because, as I mentioned above, the EG3 input to the VCO controls the frequency. So we can use the F input of the Sine Sync to create this effect.
The last sound generator we need is the Noise Generator. This is quite simple – just use the Noise module from the Oscillator menu. I used a simple 2-Pole Filter to simulate the LPF (Low Pass Filter) in the diagram.
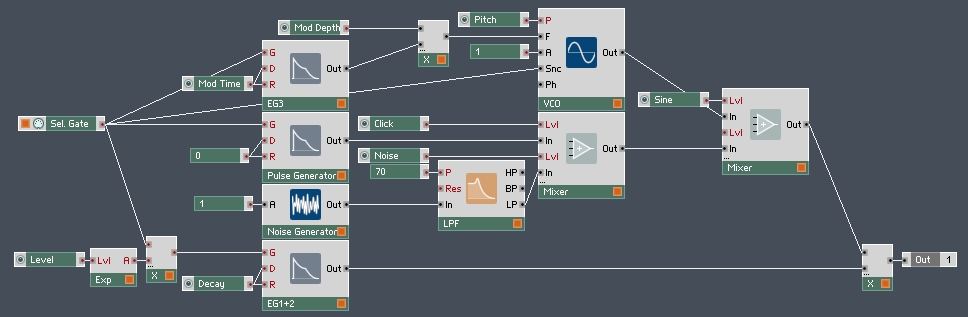
The Mixers of course can easily be replaced in Reaktor with the Amp/Mixer module.
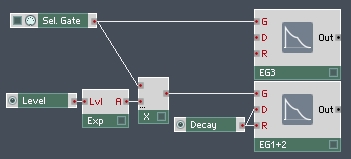
Now all that’s left is making EG1+2 control the overall amplitude:
Simple! This little structure actually packs quite a bit of punch. The Sound on Sound series contains many useful structures like this one and often they are very easy to implement.
I uploaded my own work from today here, with a few sounds programmed in as snapshots. While kick drums are obviously the easiest sound to achieve, it is also possible to get some other good sounds out of it as well.
If you have any questions about this tutorial or requests for a future tutorial, please post them in the comments.
