
Reaktor Tutorials
Building FX, Part VI - Bitcrushing + Rate Reduction
HOW BITCRUSHING WORKS
Since bit-depth is a poorly understood subject for those who have never programmed in text-based languages such as C++, I think it merits a brief discussion here.
Referring to a system by the number of bits it has is a way of describing how many numerical values it can represent. The formula for this is simply
![]()
Where ‘n’ is the number of bits. For example, an 8 bit system can represent 2^8 = 256 values.
Digital audio is stored as a series of numbers. Since no computer can accurately represent every value, the number of bits a system has simply ends up defining how closely we can represent a given number.
Some numbers, such as 0.1, simply cannot be accurately defined by modern computers, regardless of bit-depth. However, since a 32-bit system has a much wider range of values it can represent, it will do a better job, than say, an 8-bit system.
For this reason (and others!), modern computers do a much better job processing and playing back audio than their predecessors did. However, the ‘quatization noise’ (IE round-off error) of old systems adds a type of distortion that is sometimes sought after. So sometimes, despite the fact that Reaktor is a 32-bit system (and 64-bit inside core), you want to emulate the dirty distortion of older hardware.
For example, the Roland TR-909 is a 6-bit machine, and the Nintendo NES is an 8-bit machine. To get a similar sound, it is sometimes necessary to emulate a lower bit-depth.
BITCRUSHING IN REAKTOR
In Reaktor and other digital applications, audio is represented by numbers ranging from -1 to 1. To bitcrush a signal, we want to make sure that signal can only have a certain number of values, evenly distributed between -1 and 1.
For example, if we want to emulate a 6-bit system, we can say that we want there to be 2^6 = 64 possible values between -1 and 1. We can achieve this in Reaktor pretty easily:

The ‘Bits’ input is controlled by a knob ranging from 1 to 16. So, if Bits is equal to 6, first we subtract 1 and then use that as the exponential value of the Power module, which outputs a value of 32. The reason we want this to equal 32 (whereas, like I mentioned above, we want 64 possible values) is that the presumed range of the incoming audio is 2 (from -1 to 1), so we have 32 possible values from 0 to 1, and another 32 from -1 to 0, for a total of 64. For this reason, we end up with a step size of 1/32.
Next, we simply use a Quantize module to round to the closest nearest multiple of 1/32. Done!
If you perform this operation on a signal and take the FFT to look at the spectrum before and after bitcrushing, you will notice that bitcrushing causes a substantial amount of aliasing. Well, there are some ways around this, but they are pretty far beyond the scope of this tutorial unfortunately, and require special filters.

Spectrum of a sine wave
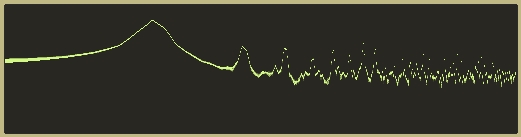
The same sine wave, after bitcrushing
Fortunately, with bit-crushing, you’re often attempting to add aliasing to your sound (it’s caused by the round-off error that we just forced the sound to have, after all). A lot of the ‘grit’ of a bitcrusher effect is caused by the aliasing. Further, we are attempting to emulate poor quality digital systems of days gone by, so some aliasing should probably be present anyway.
SAMPLE RATE REDUCTION
Reducing the sample rate is an option that is often bundled in with a bitcrusher effect. Sample rate reduction can be achieved pretty easily in Reaktor, as long as the new sample rate is divisible by the original sampling rate.
For instance, if we have a default sampling rate of 44.1 kHz, we can cut the sampling rate to 1/4 of the original rate (11.025 kHz). To do this, we simply take a value to send to the output every 4 sampling periods. This effectively cuts the sampling rate, and can easily be achieved with an A to E Perm module (see below for a picture).
There is one problem with this technique – now that we’ve changed the sampling rate, we’ve changed the Nyquist limit along with it (for a discussion of the Nyquist limit and it’s relevance, please check out the first part of the anti-aliasing tutorials). So, in our example of cutting the sampling rate to 11.025 kHz, the highest frequency that can be represented becomes a little over 5 kHz. Since the original signal had frequencies as high as 22.05 kHz, this can be a problem.
So, what we need to do is to cut out all frequencies above this limit before cutting the sample rate. Technically speaking, this requires a very powerful (and CPU intensive) filter, however, we’ll just use a Primary Low Pass filter to try to cut any frequencies above the Nyquist. Alternately, since the idea of sample reduction is to distort a signal and create a low quality effect, you might just ignore the aliasing as we did with the bitcrusher.
Here’s a finished version:
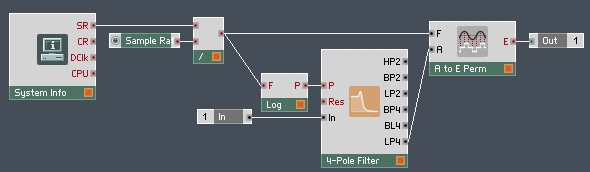
This is interesting in that we end up sending an event signal to the audio output – but don’t worry, it works just fine. The A to E Perm module sends out events at a rate specified by the user. Each new event occurs on our new sampling period, and we use it to take a sample of the incoming audio. Simple!
CONCLUSION
Today we covered the most basic of bitcrushing and sample reduction effects. In a future installment, I’ll go over the popular OTO Biscuit method of bitcrushing, which is a lot more innovative than the one we covered today (we will have to use Core for this, it is possible in Primary mode, but horribly inefficient).
You can download a copy of today’s work here.
If there are any effect types you would like to see covered in a future tutorial or if you have any questions about today’s tutorial, please let me know in the comments!
