
Absynth Tutorials
Creating Glitchy Sequenced Sounds (NI ABSYNTH SOUND DESIGN TUTORIAL SERIES)
In todays tutorial we will look into how to create sequenced groovy sounds in Absynth. This is a bit more experimental tutorial and rather than making one specific sound we will look into several different techniques and possibilities within Absynth. This will give you the idea what can be done and then it’s up to you how you will use and incorporate this technique in your music production.
We know than enevelope in Absynth can be looped in two different ways.
When the envelope is in the re-trigger mode it will loop as long the key is being held. The region of the loop is set with re-trigger parameter in time units.
When the envelope is in the Loop mode it will also loop as long the note is being held but the loop region is set with the red marker which indicates the start point of release region of the envelope (the green part).
By superimposing these looping envelopes in these two (and also other) different modes you can create amazing syncopated tempo synced grooves and evolving rhythmic sounds.
Each channel of in the Absynth will serve as a separate sequenced “drum track”. Have in mind that most of the time these sounds on separate drum channel are quite dull on it’s own but when you layer them together they can create amazing interlocking rhythms which would be very hard to make with sampler or drum synth since it would require a lot midi editing, automation not to mention sound programming in the first place. In Absynth we can do all that just with using tempo synced envelopes and one really long midi note (:
This tutorial would be very hard for me to to do and also for you to follow in a classic step by step fashion since the tinniest difference in the shape and the length in the envelope would result in quite different sound.
So please concentrate more on different techniques used in this tutorial and I’ll provide you with few patches in the end of tutorial which you can tweak further.
Creating a Kick Drum
First let’s look into creating a kick drum. We will use simple sine wave oscillator with a pitch sweep.
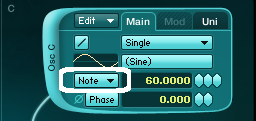
As you can see oscillator C is set to note mode where you set the fixed frequency in midi note values (the pitch of the note doesn’t affect the oscillator’s frequency).
Here are two looped envelopes. The first is for kick’s amplitude and the second for kick’s pitch sweep. Bot are synced and set to re-trigger mode with retrigger value set to 1 which equals 1/4 of a bar so this results in a classic dance kick pattern.
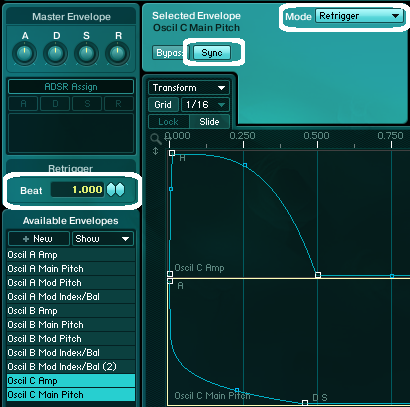
You can adjust the slopes of these two envelopes to alter the kick amplitude, length and thump while keeping everything in perfect sync.
I have also added clap sound and offbeat hi-hat sound for a rhythmic backbone.
[audio:https://www.absynthtutorials.com/wp-content/uploads/2012/06/Kick-Sample.mp3|titles=Kick Sample]Creating a glitchy sequence
Now to the sequenced sounds part.
We won’t be creating classic drum sounds (although we could) but we will look into more experimental and glitchy sounds. Have in mind that the possiblities are virtually endless and often changing parameter for even tinniest bit results in completely different sounds.
The simplest way to create such sounds is to use simple waveforms, then create a rhytmic looped envelopes, one for the amplitude and another for pitch sweep (like with kick sound, but we have much more freedom here) and then inject some enharmonic frequency content. We can do that by using a noise or ringmodulation, waveshaping and frequency shifting.
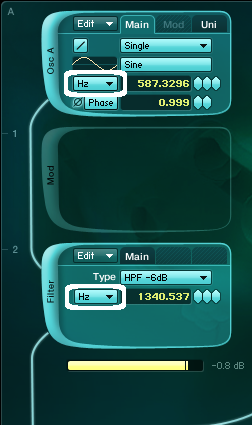
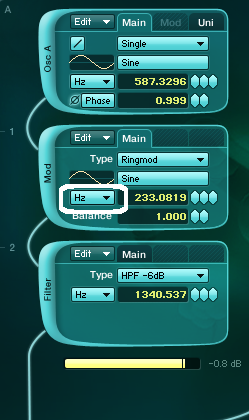
The oscillator A is again set to fixed frequency this time in hertz value.
I’ve also added HPF filter in the end to filter out the low frequencies.
Amplitude and pitch envelopes are both set to loop mode meaning they are looping trough the blue part of the envelope till the red marker. The looping regions are different in length so the rhythm changes with every cycle leading to some cool syncopated grooves.
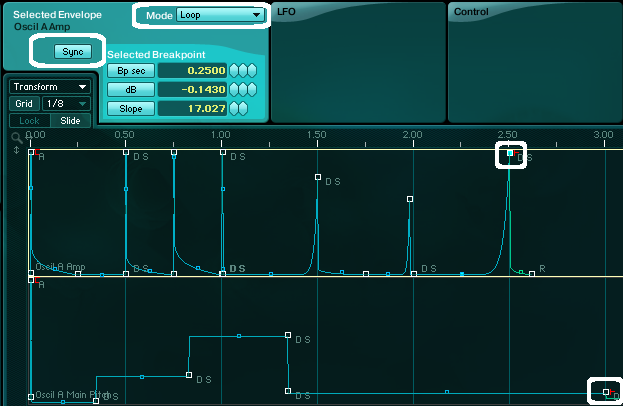
Here how that sounds like. Second sample is with noise waveform for Osc A instead of a sine.
[audio:https://www.absynthtutorials.com/wp-content/uploads/2012/06/Osc-A-Sample.mp3|titles=Osc A Sample] [audio:https://www.absynthtutorials.com/wp-content/uploads/2012/06/Osc-A-Noise-Sample.mp3|titles=Osc A Noise Sample]To take this even further let’s assign LFO volume modulation for channel A. As you can see the envelope rate is set to non-integer number in beat mode. So the volume of channel A will again be different with every new cycle leading again to some semi random modulation.
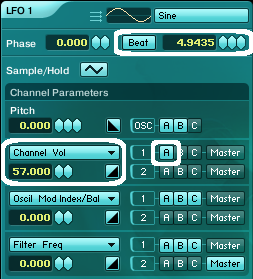
Now we can also use ring modulator to create some additional non-harmonic sidebands in our sound. I have set the ringmodulator to fixed frequency in hertz (to the frequency offset effect is constant). Experiment with different waveforms to get different more or less noisy effects.
Creating Noise Sequence
Now let’s create some noise sequence.
For type of sound we want complex waveform with little or no harmonic content.
The best for this are in this case oscillators in double and ringmod modes since they provide not only the inharmonic content but also possibility to modulate the sound in a very complex manner.
![]()
These are setting for Osc B. As you can see I’ve also used voice spread so the noise part will be more in the background of the sound and not so intrusive.
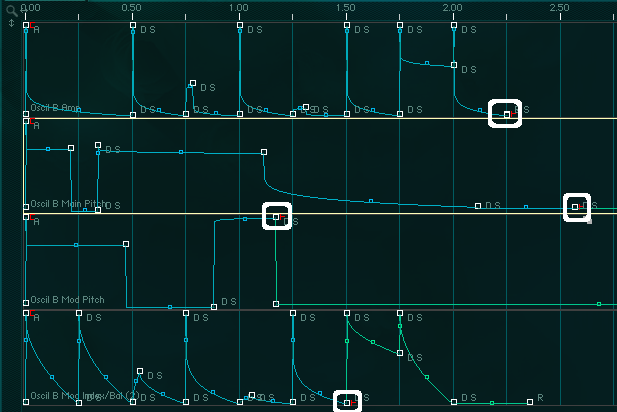
Here you can see the envelopes for Osc B amplitude, Osc B Main Pitch, Osc B Mod Pitch and Osc B balance amount.
All envelope are set to loop mode but with different loop regions (marked in the picture) resulting in a very complex ever changing rhythmic modulations.
I’ve also used Allpass filter and waveshaper effect to create some additional variations in the sound.
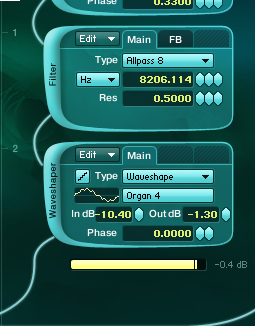
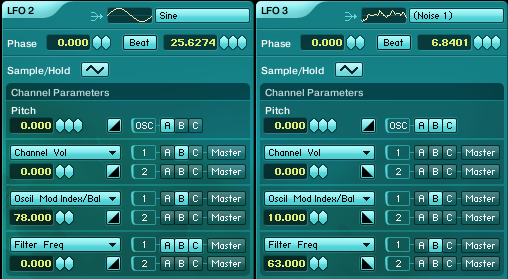
I have also assigned LFO2 and LFO3 to modulate filter B frequency and Osc B balance amount. Note that LFO3 is set to noise waveform resulting in a random modulation.
Now try to experiment with different waveforms, different oscillator types, envelopes and everything else (:
[audio:https://www.absynthtutorials.com/wp-content/uploads/2012/06/Variation-1.mp3|titles=Variation 1] [audio:https://www.absynthtutorials.com/wp-content/uploads/2012/06/Variation-2.mp3|titles=Variation 2]Here I have also added some additional percussion to tighten up the groove:
[audio:https://www.absynthtutorials.com/wp-content/uploads/2012/06/Variation-3-Additional-Percussion.mp3|titles=Variation 3 Additional Percussion] [audio:https://www.absynthtutorials.com/wp-content/uploads/2012/06/Variation-4-Additional-Percussion.mp3|titles=Variation 4 Additional Percussion]There are no rules and I really really mean that. Here are few patches and you can take it from here.
As usual here are also more extreme variations of this patch. One instance of Absynth with same percussion, clap and hi-hat sounds as before. Also added simple offbeat bass sound in the background for some additional groove. No other effects except some EQ for subs and limiter on master track for loudness were used.
[audio:https://www.absynthtutorials.com/wp-content/uploads/2012/06/Extreme-Variations.mp3|titles=Extreme Variations]
These sounds probably won’t serve as your main drum set in your song but you can filter them and use them for the background glitchy sequences or you could use them in the beginning of your song or breakdowns, you could record these sounds, chop them and load them in your favorite sampler.
Experiment as much as you can and you will be greatly rewarded in Absynth.
Till next time!
Tonko
