
Absynth Tutorials
Creating A Pad Sound (NI ABSYNTH SOUND DESIGN TUTORIAL SERIES)
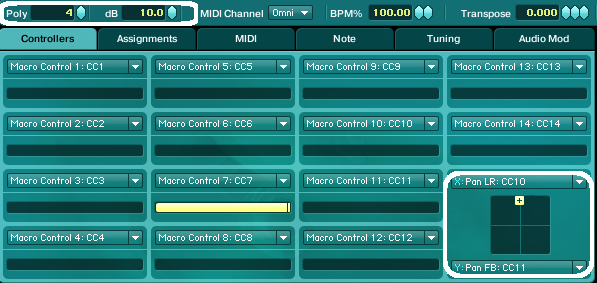
Let’s first set voices of the whole patch to 4, raise volume for 10dB.
Set stereo spread (Pan FB parameter) to full amount. This is very important since it helps to fit dense pad sounds into the mix much more easily.
Let’s create simple drone sound first. The fastest way of doing this is to use sample.
Samples are great for creating pad and ambience sounds since they provide us with all kinds of different complex textures which can be then combined with basic waveforms used as a harmonic background.
Oscillator A Settings
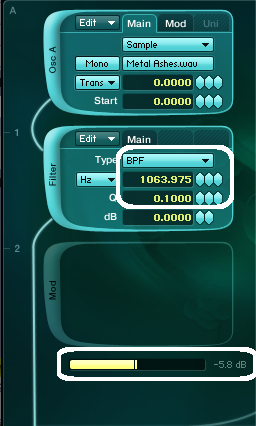
Enable Osc A, choose sample mode and select Metal Ashes sample from the Synth folder in the Absynth sample library.

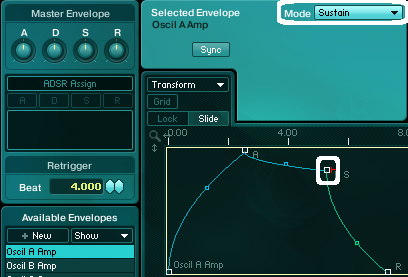
Set the Osc A amplitude envelope to sustain mode. This will ensure that the envelope will be sustained at the red marker as long the key is being held. After it is released is will proceed to release segment of the envelope (the green part).
Set envelope to something like this:
Master Effect Settings
Now let’s add master effect. Normally you would do this in the end but because these are some highly unique effects which have quite an impact to the timbre of the sound I normally do this right in the beginning to determine the overall character of the sound.
I’ve chosen Pipe effect which is resonator effect (it emulates characteristics of resonating bodies). It can be used to add everything from subtle to extreme movement to the sound, flanging, pitch shifting etc. This time we will use it to add subtle but very important movement to the sound and also effect similar to reverb.
Set the Pipe effect to something like this.
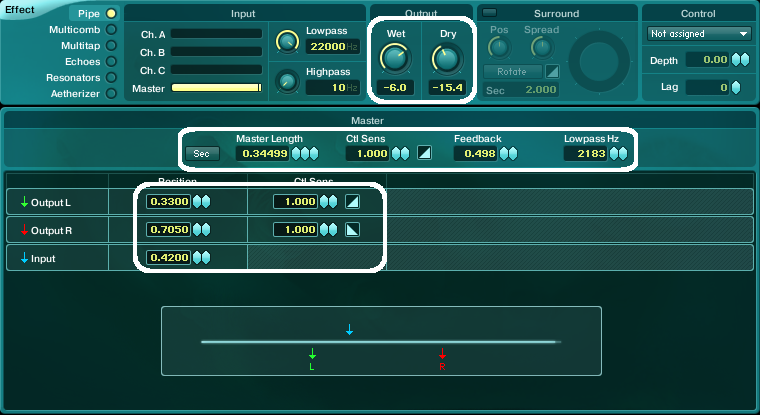
To achieve movement we will modulate Pipe effect time with LFO2 but with very small amount to give it almost unnoticeable movement to the sound. Often small changes are very important since they prevent the sound being too sterile and cold.
It is very important in Absynth (and also other synths) to inject such small movements and dynamics to the sound since this is one of the main reasons we find analogue sound so full and interesting since in analogue synths the are all kinds of fluctuations in the voltages resulting in what we refer to as more natural and warmer sound.
Enable LFO2 and set it like this:

I’ve chosen Additive 1 waveform because it is a bit more complex than simple sine waveform (resulting in small random fluctuations in the modulation signal) and such rate value so the LFO2 will cycle trough uneven number of beats to get even more random movement.
Waveshaper Settings
Now lets also add waveshaper just to get a bit more defined sound.
Set the input to -6dB so the distortion doesn’t get to too hot.

Filter A settings
Enable filter A and set it to bandpass.
Set the frequency to 1063Hz, resonance to 0.0300 and channel A mixer to -5.8dB.
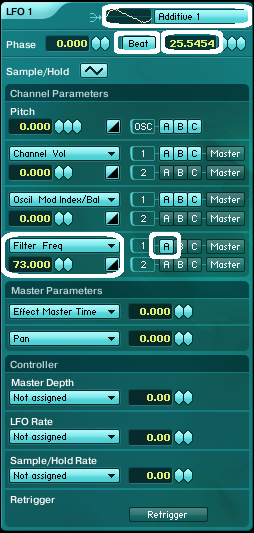
To add some small variations to the cutoff frequency of the filter A we will use LFO1.
Enable LFO1 and set to something similar to LFO2. But set the rate to a bit different value so the modulations won’t be completely synchronized between each other.
Set the modulation amount for filter A frequency to 73 or so.
Oscillator B Settings
Now let’s add another oscillator.
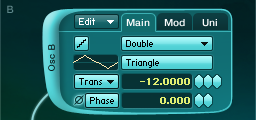
Enable oscillator B and set it to Double mode.
Choose triangle wave for Main Osc A waveform and transpose it for -12 semitones.
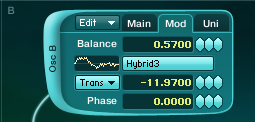
For the Mod Osc choose waveform Hybrid3, transpose it for 11.970 and set mix Balance to 0.570.
Set amplitude envelope of Osc B also to sustain mode with a bit longer release part.

Filter B Settings
For the filter B we will use Notch filter which is great for adding movement to the sound without changing it’s frequency content to drastically.
Set frequency to 2530Hz or so. So this filter will cut a “hole” around cutoff frequency and with bandwidth parameter we determine how much we want to cut around this centre frequency. I’ve set it to quite high setting 4,900. Also set resonance to 2.600.
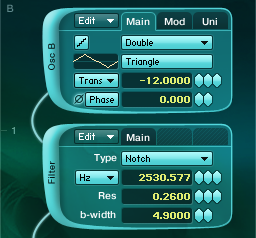
We will also modulate the frequency of this Notch filter with LFO1 like we did for filter A. Again this will add subtle but very important movement to the sound.

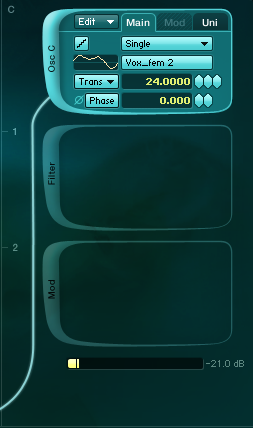
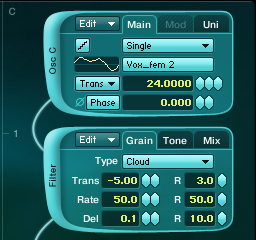
Oscillator C Settings
Now we will add some high frequency content to the sound with Osc C.
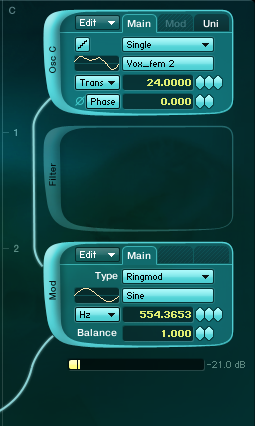
Choose Vox_fem2 waveform for Osc C and set the transpose parameter to 24 semitones.
Set the volume of channel C to -21dB.
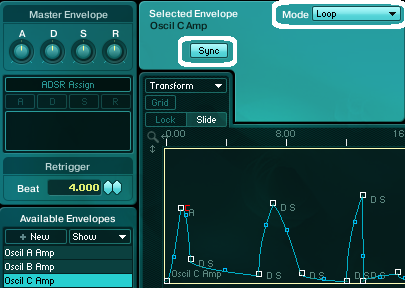
Let’s set amplitude envelope C to something like this. Be sure to enable the loop mode and I’ve also enabled sync mode although this is not necessary.
With multiple played notes this will create complex movement within the sound.
This is a basic pad sound.
[audio:https://www.absynthtutorials.com/wp-content/uploads/2012/06/Oscillator-C.mp3|titles=Oscillator C]If we want to take this further here are few useful tricks:
Amplitude Modulation
If you want for instance more undefined and scattered sound to keep it more in the background of the mix we could add random movements to the amplitude of any channel which will result in a random tremolo effect.
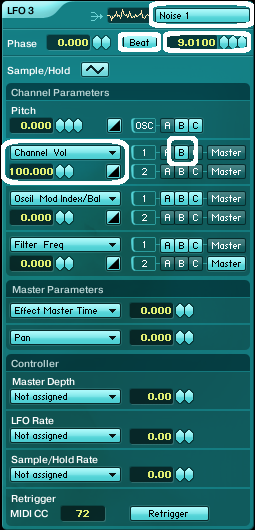
Enable LFO3 and set it to beat mode.
Set rate to 9.100 and waveform to Noise 1.
Set Channel Volume modulation amount to 100 and choose channel B as a modulation target.
As you can hear this makes sound more wide and scattered also because of the Pipe effect.
[audio:https://www.absynthtutorials.com/wp-content/uploads/2012/06/Oscillator-C-Amplitude-Modulation.mp3|titles=Oscillator C Amplitude Modulation]Cloud Filter
We could also use cloud filter for oscillator C. This can create some great more cinematic soundscape sounds.
Set Cloud filter C to something like this.
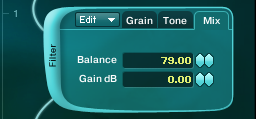
Also set balance amount to 79 in the Mix tab of the cloud filter .
Ringmod Effect
If we want more dissonant and darker sounds we can use Ringmod effect.
Enable ringmod C and set it to Hz mode so the frequency of the modulating oscillator will be constant. Set it to 555 and balance to 1.00 for extreme dissonant effect.
Cloud Master Filter
Now copy the Cloud filter on channel C and paste it to the master filter slot. Turn off the Cloud Filter on channel C.

Play with different transpose and random parameters, with lowest transpose settings you can achieve some great sub bass drones we often hear in movies.
[audio:https://www.absynthtutorials.com/wp-content/uploads/2012/06/Cloud-Filter-24-Transpose.mp3|titles=Cloud Filter -24 Transpose]The possibilities are literally endless with Absynth. Try to change only master effect to Aetherizer for example and you will end up somewhere completely different. Absynth is one of the best synths around for this type of sounds so we will be back exploring these potentials with another pad tutorial soon. Till next time!
