
Reaktor Tutorials
How To Build A Synth In Reaktor - A beginners guide
Welcome! This tutorial is the first of a series that will teach the absolute beginner the basics of building a subtractive synth in Reaktor.
No prior use or understanding of the Reaktor environment is assumed, and I will do my best to explain every single aspect of the synth from the ground up.
This first tutorial will focus on the very basic aspects of building in Reaktor, and creating the bare bones of a synth structure. As such the end product will not be very complex nor will it be very musical – building a good synth is a lot of work!
However, in future tutorials this project will be expanded into a full-blown synth complete with it’s own customized waveforms and filters, built from the ground up. We have a lot of ground to cover between now and then so let’s get down to it.
To start out, let’s quickly cover the basics of each component of a subtractive synth, and make a basic macro for each in Reaktor.
This first How To Build A Synth In Reaktor tutorial assumes that the reader has not built anything in Reaktor yet.
By necessity, I’m going to cover a lot of very basic building stuff to start out, so bear with me, I’ll pick up the pace as soon as possible!
OSCILLATORS
First, we’re going to build a very basic Oscillator macro.
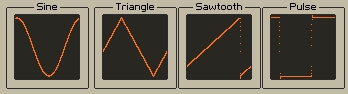
An OSCILLATOR is a basic piece of any synthesizer that makes a waveform that repeats at a given frequency (usually determined by the note pitch of incoming MIDI notes).
The most common types are sine wave, triangle wave, sawtooth and square waves (also called pulse waves).
These waveforms make up the sound sources of most synthesizers, while the other modules we’ll discuss today shape the sound of the oscillators in various ways.
With that in mind, let’s put together an extremely quick oscillator macro in Reaktor.
If you haven’t already, open Reaktor and create a new ensemble.
Since the Reaktor environment is often used simply to open projects created by others, a few options should be switched on before you start building your own projects. First off, make sure the ‘Edit Mode’ box is on. If you haven’t turned on Wire Debugging, you can do so by pressing CTRL + B, this option will allow you to hover over any Reaktor wire and see the value of that signal.
Further, I would suggest turning on the ‘Show Side Pane’ option, as it will give you easy access to many parameters, and the ‘Show Info Hints’ button, which will provide you with a lot of helpful information while programming.
All of these options can be found at the top of the Reaktor Interface:
![]()
Now that those are set, you should have a project that looks like this:
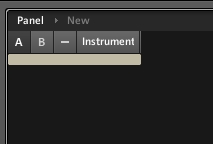
This is the front panel of your Reaktor instrument, empty since nothing has been added to it yet.
The navigator at the top of the picture can be used to quickly traverse between the panel and the structure of the ensemble.
We can also navigate to the structure view of the project by double clicking on any empty area in the beige box marked “Instrument”.
You should now see the structure of the Instrument:
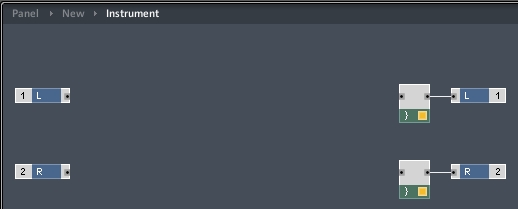
Not much going on here yet!
Let’s start adding some stuff. To add a module in a Reaktor structure, simply right click, choose the proper menu, and then pick a module to add.
Let’s start by adding a sine wave: Built-In Module -> Oscillator -> Sine.
In Reaktor, each module can have inputs and outputs that can be connected to other modules (Inputs appear on the left hand side of the module, outputs on the right). Here, you’ll note that the Sine Oscillator module has two inputs, P and A, and one output, simply named Out.
Assuming you turned on the ‘Show Info Hints’ option, you can get information about how to use the inputs and outputs of a given module properly by hovering over them with the mouse.
In this case, you’ll see that P stands for Pitch, and A stands for Amplitude.
Now that we’ve added our first module, let’s get some noise out of it, if only to understand a little better how things work in Reaktor.
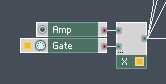
To get a sound out of the Sine module, we need to supply it with an amplitude and a pitch. Let’s add two more modules: Built-In Module -> MIDI In -> Note Pitch, and Built-In Module -> MIDI In -> Gate. Now we want to connect the Note Pitch module to the ‘P’ input of the Sine module. To do so, left-click on the output of the Note Pitch module and drag the wire that appears over to the ‘P’ input. Next, connect the Gate module to the ‘A’ input in the same way.
Now the pitch and amplitude of the Sine module are controlled by incoming MIDI signals. Now connect the output of the Sine module to the input of each of the the Voice Combiner modules that are in turn connected to your speakers.
Finally, drag and drop the modules to align them so your code doesn’t look like a mess, and you’ll end up with something that looks like this:

There is an indicator box on most Reaktor modules that shows whether that module is currently active or not.
Inactive elements are generally not connected to the rest of the structure properly, or are turned off with a switch as explained below.
When you connect the structure you’ve made to the Voice Combiners, those boxes should light up like so:

Off(left) and on.
If you’ve followed the instructions correctly, at this point you should be able to play a MIDI note and hear the sine wave play at the corresponding pitch.
If you don’t have a MIDI controller connected to Reaktor you can simulate one using your computer’s keyboard. For example, pressing the letter ‘q’ will play a middle C.
Once you’ve played a few notes, you might be noticing that a loud click sounds everytime you release a key. We’ll fix that in the next section (Envelopes), but for now let’s focus on making an oscillator macro that allows the user a little more flexibility rather than simply playing a sine wave.
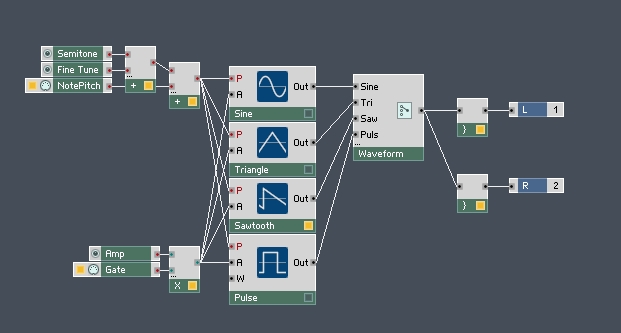
To do that, add three more modules from the Built-in Module -> Oscillator menu: Sawtooth, Triangle, and Pulse. Like before, connect the ‘P’ inputs of all three new modules to the output of the Note Pitch module, and connect the A inputs to the MIDI Gate Module. For now we can ignore the ‘W’ input of the Pulse module.
Now we have all 4 of the most basic wave types I mentioned above, but we need to give the user a way to choose which one is active.
The easiest way to do this is to use a Switch module. Add a Switch, which can be found under the Built-in Module -> Panel menu.
We need to configure the Switch to accept 4 inputs, one for each wave type. Click on the Switch module, which calls up it’s properties on the left hand side of the screen (assuming the ‘Show Side Pane’ option is on).
The properties box has 4 tabs: FUNCTION, INFO, VIEW, CONNECT. Click on the FUNCTION tab, locate the Min. Num Ports paramter, and change it to 4.
You’ll notice that the Switch module has 4 inputs now. Connect the Sine, Sawtooth, Triangle, and Pulse module outputs to the inputs, and rename the inputs to their corresponding wavetype by double-clicking on them, then connect the output of the Switch into the input of the Voice Combiners.
Finally, open the VIEW tab of the Switch properties, find the style type, and change it to menu.
You may have noticed that all of the modules now have their indicators turned off, and are inactive. This is because the Switch module defaults to be off, and thus none of the oscillators are considered to be active.
To fix this, click on “Panel” in the navigator to return to the panel view.
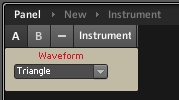
Choose a waveform from the new menu and, like before, you can play that waveform. Using a Switch module in this way allows us to save CPU by turning off the oscillators that aren’t being used (if you look in the structure, only the chosen waveform is active, the indicator boxes turn off for the other modules).
Now let’s use the navigator to go back to the structure view and add a few more options to our oscillator controls – something to adjust the tuning, and a volume control as well. We’re going to use three Knobs for these controls, you can find them under the Built-in Module -> Panel menu.
After you’ve added the 3 knobs, name them Semitone, Fine Tune, and Amp.
The Knobs by default have a value from 0 to 1, which is fine for the Amp control (for now, we’ll improve upon it in a future tutorial).
However, we need to change the values of the SemiTone and Fine Tune Knobs. Semitone should have a value ranging from a mininum of -36 to a max. of 36 with the stepsize set to 1 (Num. Steps = 72). You can change these values in the FUNCTION tab in the module’s properties. Next, Fine Tune should have a value from -0.5 to 0.5, with 100 steps (Stepsize = 0.01).
Finally, let’s connect the Knobs to the rest of the structure so that they actually do something when rotated.
Add a Built-in Module -> Math -> Multiply module, and connect it like so:
This allows the user to control the volume of the oscillator.
Next find the Add module (also under the Math menu) and place two of them in the structure. Add the Semitone + Fine Tune knobs together, then add the result to the Note Pitch module. Once everything is arranged neatly for clarity, it should look something like this:
Now, we’ve added several Panel elements, but haven’t arranged them on the panel in any way. Using the navigator to return to the panel, we find it is a mess, with all of the new knobs stacked on top of each other!
To rearrange the panel elements, click on the ‘Edit Panel’ button or press CTRL+P. Now you can drag and drop elements and rearrange them nicely. When you’re done, turn ‘Edit Panel’ off, and you can use the knobs again.
Finally, let’s return to the structure view using the navigator and finish up our oscillator by moving it into a Macro and preparing it to be part of a larger project.
Using Macros allows you to represent a substantial amount of Reaktor code with a single module, allowing you to save screen space and reduce clutter, while keeping the code clean.
Add a Macro to the structure (you can find one under the Macro menu). Choose the _New – 1in1out option, which will create a Macro with one input and one output. Once you have it added to the structure, double click on it’s body and you can see the structure of the macro.
For now, it is empty save for the Input and Output modules. To return to parent structure, simply double click on any empty space. Now select all of the structure we have built (except the Macro) by drawing a box around it and cut it (CTRL + X), then return to the Macro structure and paste it there. Connect the output of the switch to the Output module, delete the MIDI Gate (replacing it with the Input module, which should be renamed ‘A’, since it will control the amplitude of the oscillator), then connect the output of the Macro the voice Combiner in the Intrument structure.
The Macro should be renamed “Oscillator”, and the macro and instrument structures should look like so:
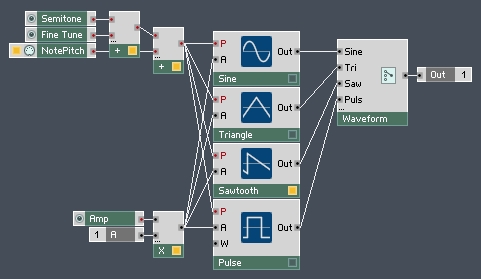
Oscillator Macro
Ensemble Structure
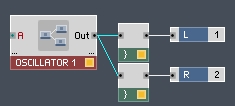
For now, the structure is back to being silent until we add something to control the amp of the macro. For now if you want it to still make noise, you can attack a MIDI Gate that feeds into the ‘A’ input of the Oscillator Macro.
Okay, I hope that wasn’t tortuously slow for all of you – we’ve already covered how to add elements, know when they are active, connect them, rearrange them, cut/paste them, edit their properties, create re-usable macros, and navigate through Reaktor structures.
For the rest of the tutorial I will simply explain the purpose of the modules and give their structures with a quick explanation of how they work and interact with each other (they will be fairly self-explanatory, I hope).
ENVELOPES
An envelope is generally used to control the amplitude of one or more oscillators. For the purpose of this tutorial, a very simple one will do:
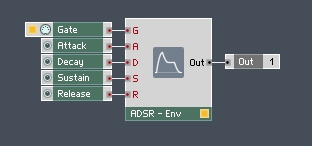
I made this structure inside a new macro.
We’ve already added a gate module, and you can find the ADSR Envelope module in the Built-in Module -> LFO, Envelope menu. To add the knobs, instead of using the menu like we have been doing, simply right click on the A, D, S, and R inputs of the envelope and select “Create Control.”
This will create a knob to control the parameter, with sensible Min and Max values already set. They will even be named properly! I prefer to use this method to add controls.
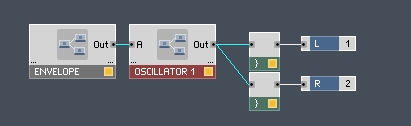
To finish adding the envelope to the project, simply connect the output of the new macro we’ve made to the A input of the Oscillator macro we made previously. The ensemble structure should now look like this:
We will return to the envelope macro in future tutorials and add some bells and whistles. For now, return to the panel view and re-arrange the new knobs so they look orderly and let’s move on.
MIXERS
Synthesizers generally have more than one oscillator, in order to create bigger, wider, more complex sounds.
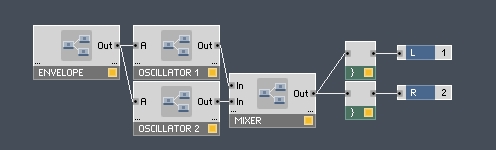
Our synth will be no exception. To copy the Oscillator macro, you can select it with your mouse and then press CTRL+D (duplicate). When you duplicate an object, it also duplicates all of the connections that have been made to that module, a feature that can be very useful.
Now we have two sound sources, and we need to mix them together into a single audio signal.
A very easy way to do this that uses only a single knob looks like this:
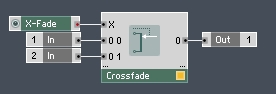
Again, I created a new macro. You can find the Crossfade module in the Built-in Module -> Signal Path menu. As above, you can add the knob by right-clicking on the ‘X’ input. Now you can attach the oscillators into the inputs so the ensemble structure looks like this:
As always, return to the panel view, rearrange the new panel elements, and play a few notes to make sure everything’s working.
FILTERS
The last macro we’ll make today is a filter.
A filter shapes the sound of an oscillator by boosting or attenuating certain frequencies. Using the built-in filters in Reaktor, I made a quick macro:
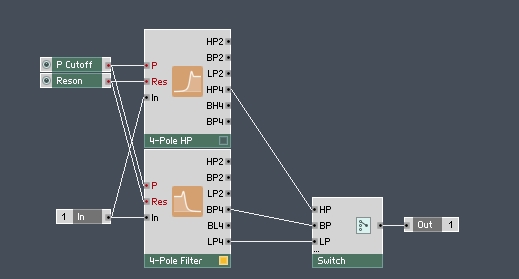
Similar to the structure of the Oscillator structure above, this macro allows you to choose one of 3 filter types.
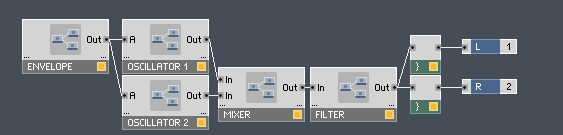
The filters have their own menu, Built-in Module -> Filter, where you can find the necessary modules to replicate this structure. You should by now understand how to add the new macro to the end of the audio processing chain, leaving us with this:
CONCLUSION
Despite being way longer than I originally intended, there was only space in this tutorial to create a very basic synth.
I have focused on making structures that are easy to build, to explain and to understand, rather than ones that are optimal sound-wise. As such, there are countless improvements that can be made to the structure.
Next time in the How To Build A Synth In Reaktor series, I’ll go over each of the modules and make some basic upgrades that will greatly improve the quality, and we’ll start working on a new module (a Low Frequency Oscillator) to add some more capability.
You can download my copy of today’s synth here, in case there were any parts of the tutorial that were unclear.
I hope you enjoyed this tutorial – leave a comment!
