
Reaktor Tutorials
Optimization in Reaktor Core
OPTIONAL CLOCKING
Many audio structures use the SR.C (Sampling Rate Clock) to run. A good example would be a slightly modified phase accumulator from the Core Oscillator tutorials:
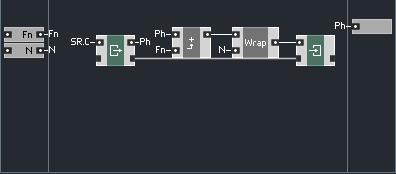
Without the SR.C clocking the read module for every sample tick, this Core cell does nothing – the addition macro being used is from the Expert Macro -> Modulation menu, and it only outputs a value when it receives an event to it’s top input .
If you build carefully, it’s not too hard to develop macros that rely upon an SR.C in this way. You can then extend the design like so:
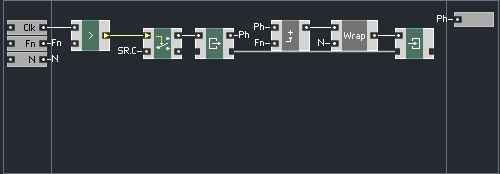
Now, you can send a value to the Clk input of the macro to turn the off the phase accumulator – and the rest of the oscillator, if you design it carefully. This simple trick can be used to drastically reduce the CPU of components that are not currently in use. It is the only way to turn off modules in Reaktor without causing a Global Reset Event (GRE). For more on GREs, check here.
Many of my free ensembles utilize this technique, such as Modulator.
FAST ROUTING
The Compare and Router modules in Core are a little less intuitive than the Distributor or Router modules from Primary, but they can be used to create similar structures. Say you want to send a signal to one of 4 outputs. There are several ways to build such a structure:
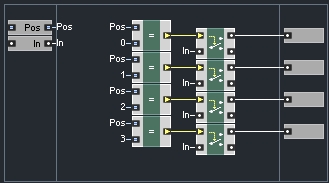
This is a terribly inefficient way to do things. Through testing, I’ve become confident that the value of a Compare module is only calculated when an input arrives at a connected Router. In the case of the above picture, we end up calculating all 4 Compare modules regardless of what value is sent to the position input.
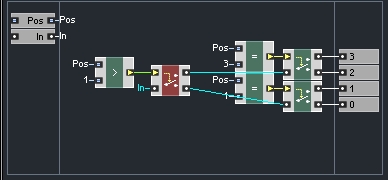
A very simple, but still flawed, improvement might look something like this:
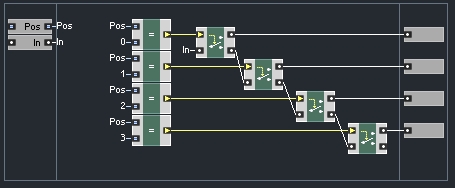
Here, if Pos = 0, only 1 Compare module will be used, which is nice, but if Pos = 3, we are back to calculating all 4 Compares. This means our structure will vary in efficiency based on the position of this distributor, which is undesirable. It might be a defensible choice if Pos = 0 in almost all cases, but I prefer another method, known as a tree router:
In this structure, we never have to test the value of more than two Compare modules, regardless of the value of Pos. It beats or ties the second structure in speed for three out of four cases.
For structures with more outputs the differences become more pronounced. For example, a tree router with 8 outputs only requires three Compare modules be calculated on each input:
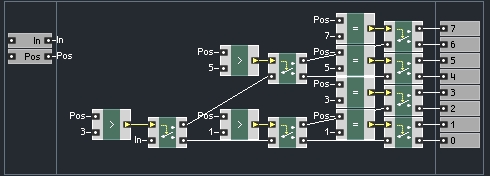
This structure would beat or tie an extended version of the second type of router I showed in six out of eight cases. Using tree routers in combination with the optional clocking method discussed above, you can send a clock signal to one of 8 macros, allowing for very powerful Core cells that choose which macro to use on the fly. An ensemble that uses this technique is Optimus Prime.
KNOW YOUR MATH AND DATA TYPES
Avoid converting between data types and check out this tutorial on using the integer type, and bit operators.
According to the Core manual, integer multiplication, integer division, and float division use more CPU than addition or subtraction of either type, or float multiplication. Another simple tip offered by the manual is to never divide a float by a constant value when you can just as easily multiply by it’s reciprocal:
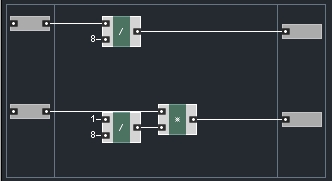
The bottom half runs faster
In this instance the division only gets calculated once during initialization – this helps avoid a float division at all other times. Even if the ‘constant’ value is actually a knob, it’s still probably faster to take the reciprocal of the knob once when it’s turned and do multiplication the rest of the time.
Along the same lines, I often see (and occasionally, create) code similar to this:
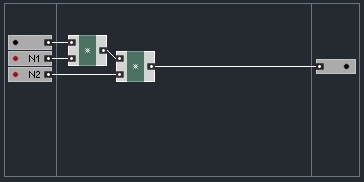
Since N1 and N2 are both events, it is likely that neither of them arrives too often. Thus, it would be more efficient to rearrange the multiplications like so:
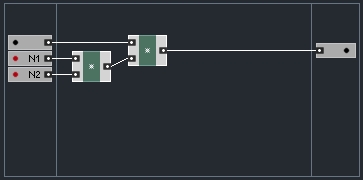
This way, only one multiplication is calculated on a typical tick of the SR.C, instead of two. These are simple examples, but you get the idea.
It is important to know your algebra when rearranging equations – I find that WolframAlpha.com is an excellent resource to check if you are unsure of yourself.
STORING EXPENSIVE CALCULATIONS IN A TABLE
Occasionally, there is a equation that I would like to implement that is simply too expensive to be worth it. Functions requiring lots of exponential or logarithmic modules often fall into this category. In this cases, I often find it useful to calculate a table of values at start up and simply read from it rather than calculating expensive routines on the fly.
Reading from memory is often a fairly slow operation, so this should only be done to replace very expensive structures.
TESTING YOUR OPTIMIZATIONS
You should never attempt to optimize anything without testing to see if what you are doing actually works. There is a simple method that I find very effective, but you have to be careful.
I do my testing with an Audio Core Cell, which makes more sense than using an Event Cell, for several reasons – first off, events do not often need to be optimized (unless they are created by an Iteration module), the whole point of them is that they usually do not happen very often. Secondly, testing at audio rate substantially increases the load on the macro you are trying to test, and gives a better idea of how fast your structure works.
Next, I increase the numbe of voices in the instrument that I’m working in. This can be very helpful – testing with 4 or less voices is often not very helpful as any changes you make will be hard to notice, CPU-wise.
Giving the instrument a huge number of voices (depending on the complexity of the structure you are building) such as 64 or 128 can help improve testing dramatically. This way, small changes in the structure can lead to big changes in CPU usage, giving a clear indiciation of which method is more efficient.
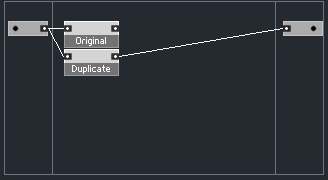
It makes sense to duplicate the structure you want to work with, then you can simply edit one of them and test them against each other for speed:
An issue I have had with this method is making sure you get an accurate CPU reading from Reaktor. Recently I was working on optimizing a structure and the CPU used with 128 voices kept jumping from 13% and 16%, but I couldn’t figure out why. I had debug mode on, which can increase the CPU load of a structure, especially inside of Core.
So I would be on the panel, the CPU would read 13%, then I would move to the structure, and the CPU would jump to 16%. However, upon returning to the panel view, the CPU would stay put at 16%, even if the structure was not changed. I finally realized that if I left Core and went to the Primary level of the structure prior to going back to the panel, I got a more accurate reading of the CPU usage.
Just something to keep in mind, because it can be fairly frustrating if you don’t know it’s happening.
CONCLUSION
Using these techniques can greatly improve the efficiency of your Core structures, which in turn can have a very real effect on what is possible and what is not with Reaktor. If there are any questions about today’s tutorial, please let me know in the comments and I will do my best to answer.
