
Reaktor Tutorials
How to Build a Synth in Reaktor (Part V) - Tremolo and Glide
PITCH GLIDE
Glide is a common control used in monophonic synths. It allows a user to slide between notes over a period of time instead of immediately changing the pitch on a new MIDI note.
I like to implement glide as a function of time: If a new note is received while another note is already playing in Mono Unison mode, the value glides from the previous note to the new note over a period of time controlled by the user. If no other note is playing, simply jump to the new note.
I built the following macro that meets these specifications:
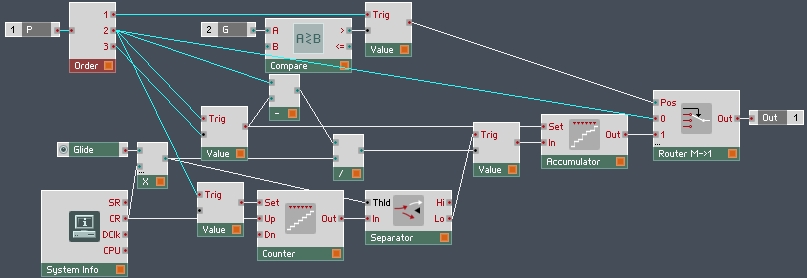
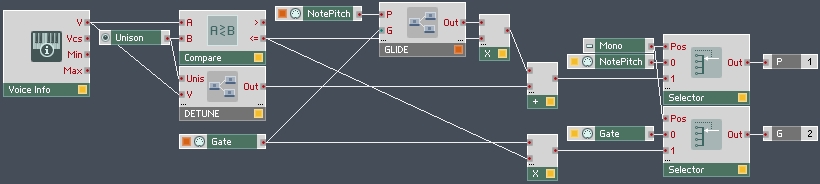
Since there’s a lot of wires connected to the Order module, I highlighted it so you can see all of the connections easier.
As usual, let’s go over the structure here. This is probably the most complex structure we’ve built so far, and as I always do with structures like this, let’s examine it in smaller pieces.
First off, it’s important to note the order of events when a new MIDI note is pressed: Any Note Pitch modules in your code will fire an event first, then any MIDI Gate modules will fire next.

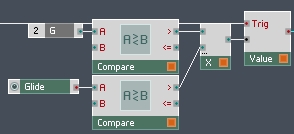
So this piece of code simply stores the last available Gate value. If no notes were pressed prior to the new MIDI note, the Router Pos input will be equal to 0, otherwise, it will be equal to 1.
Using this code to control the Router allows us to simply bypass the glide function if it is not needed – we simply send the pitch value to the ‘0’ input of the Router in that case.
The Order module – which we have not used yet – has a very simple function: when it receives an event, it outputs that event first from output 1, then from outputs 2 + 3 in order. This is important, because ordinarily in Reaktor we have no way of knowing which events will be processed first.
For example, if we removed the Order Module from this structure, we would have no guarantee that the Router Pos would be set when the Pitch value went to the ‘0’ input of the Router.
Therefore, when working with events, it is always important to think about the order of events and to make sure to use an Order Module when necessary.
Okay, so that’s the boring part of the code, what about the rest?
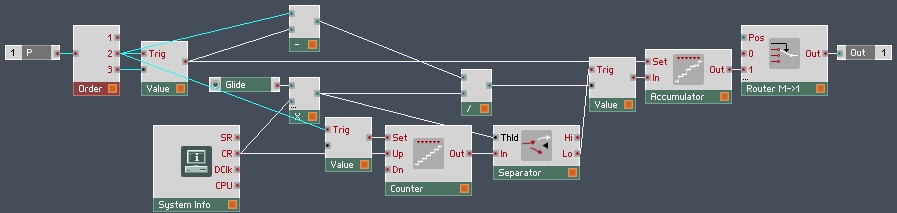
Here’s the action! Once again, I’ve highlighted the Order module to make it slightly easier to read.
Note how the Value module attached directly to the Order module works – first it triggers the old Pitch value, then it stores the new value. This means it always outputs the previously received Pitch value.
The previous Pitch value is important to us for a few reasons. First, we start gliding from that pitch, and with that in mind, we set the Accumulator module to start at that value. Second, we can subtract the previous pitch from the current pitch to figure out how far we are gliding.
Okay, so now we have the Accumulator module set play the previous pitch, we need to send it values to the ‘In’ input. Each value sent to the ‘In’ input gets added to the total, then the total gets sent out, to all of the Pitch inputs in the entire ensemble.
Like I said above, when we subtract the previous value from the current one, we know how far we need to glide. Next, we want to know how long to take to glide that distance. We accomplish this with the Glide knob and the System Info macro.
Here’s a version of that structure with all of the surrounding clutter removed and rearranged for the sake of clarity:
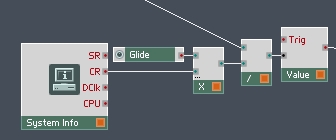
The ‘CR’ output of the System Info macro is quite useful. Not only does it give us the speed of the Event Clock in Hz, it also is an event clock itself, that we can use to run our glide macro (Since the Pitch inputs of all of the oscillators we are using only accept events, we will need to operate at event rate).
By default, the Control Rate (IE, Event Clock) in Reaktor runs at 400 Hz. Thus, 400 times a second, the ‘CR’ output sends a value of 400 out. Multiplying by Glide, a value from 0 to 1, gives us a range of how many events we want to use to glide from the previous pitch to the current one. When Glide = 1, it takes 400 events, or 1 second to make the transition.
When we divide the difference in Pitch values over the number of events, we wind up with a value to increase the accumulator by. We store this value in a Value module for further use.
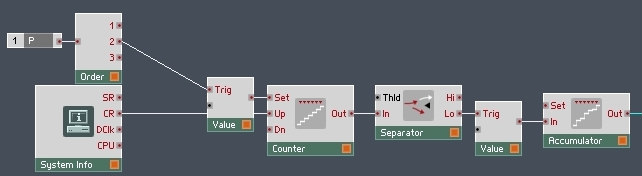
Finally, the ‘CR’ output also gets sent to a Counter module. Again, I’ve removed much of the surrounding code for the sake of clarity, refer to the top picture to see the whole structure in context.
The Counter is very similar to the Accumulator module – it increases by 1 each time it receives a positive event at the ‘Up’ input. It also gets set to 0 on a new Pitch value, so the output of the Counter module is the number of events that have been fired since the last Pitch value came in.
We already know exactly how many events we want to fire, having calculated it by multiplying the Control Rate by the Glide knob. The Separator module is used to only allow events below the threshold thru. Those events then trigger the Value module which in turn feeds the Accumulator module.
Finally, after all of that, I noticed an error in our code! You may have noticed that if the Glide knob is equal to 0, we end up dividing by 0 and creating some problems. Well, fortunately, this problem is easy to fix. Simply check if Glide is greater than 0, and multiply it by the Gate > 0 module like so:
You can wire the GLIDE macro into the PITCH GATE macro like so:
Whew! Well, that was far more complicated to explain that it was to build, which is how Reaktor gets with more complicated subject material. By now I hope you are able to find the modules that I am using on your own and to get an idea of how they work.
TREMOLO
Now let’s add a tremolo effect to our synth. Tremolo is achieved by using an LFO to modulate the pitch of an oscillator. I made some very simple changes to the synth to do this. First, I added some code to the LFO module after the Type switch:
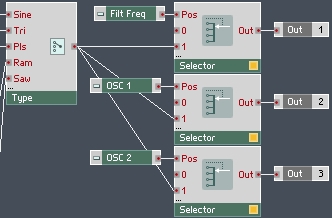
This should be very self-explanatory, it adds 3 buttons which control whether the LFO modulates a given parameter. When the buttons are off, the LFO is not sent thru the Selector.
I also replaced the constant value of the LFO ‘A’ inputs with a knob (Range) which goes from 1-24. You can remove the LFO Mod knob in the FILTER macro as you do this as well.
The new Range knob is very useful – it allows us to control the LFO depth for modulating the filter cutoff and the oscillator pitch with a single knob.
To finish off adding tremolo, I created an extra input to each OSCILLATOR macro that accepts the LFO input and adds it to the pitch of the oscillator. And done!
CONCLUSION
In the next tutorial I will continue to work on the PITCH GATE macro, and possibly update some other parts of the synth as well. If you have any topics you’d like to see covered please let me know.
If you have any questions about how I did this or that, please consult my copy of this week’s work, which you can here
