
Drums, FM8 Tutorials
Drum Synthesis with FM8: Drum Sequencing with Arpeggiator
This is a fourth tutorial in Drum Synthesis with FM8 tutorial series.
Today we will look into simple drum sequencing with FM8 great arpeggiator. This technique is great for producing dynamic sequences and drum articulations without all that tedious editing and drawing notes in piano roll editor.
The technique behind it is very simple.
Download the hand drum sound we have made in previous tutorial here.
Go to the Arpeggiator page of the FM8 synth.
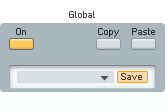
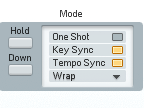
Global And Mode Windows
First, set global On button which will activate the arpeggiator.
In the Mode window activate the Key Sync button. This will force the arpeggiator to restart with every new note played on your keyboard or in your sequencer.
Next, turn on the tempo sync button. If on, the arpeggiator will be locked to your host tempo. If off, you can choose the desired BPM in the tempo window on the right,
The first row in the arpeggiator triggers the note. You can determine the number of steps trough which arpeggiator will cycle via dragging the marker above the step number display.
In the patch it is already set to 16 steps.

Tie Parameter
The second row represents the Tie parameter . With an activated Tie on a certain step, the last note is played legato to tie it to the one with the Tie parameter on.
![]()
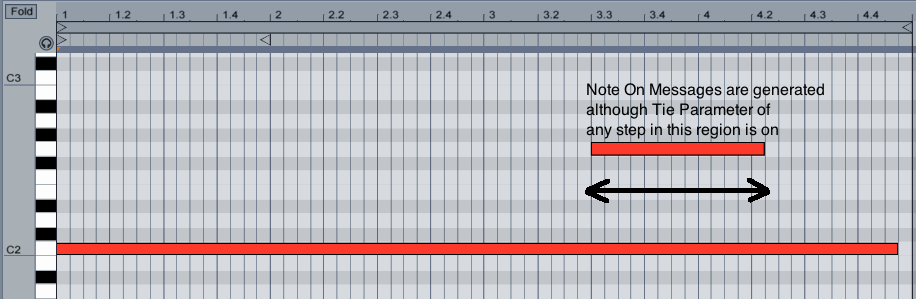
If there is the same note played no new Note on message is generated but if there is another note played the new Note On message is generated although the Tie parameter of that certain step is on.
This is very useful in this case since we can get some variations just by adding additional notes to our midi sequence.
So for example in our current patch although we would be cycling trough the same 16 steps in our arpeggiator over and over again by throwing in occasional additional notes we could effectively create some very useful variations.
So Tie parameter would generate new notes only if two or more notes are played at the same time like in the picture below. Otherwise it would choke the notes with Tie parameter on.
Tempo Window
In the Tempo window you can set the tempo of the arpeggiator (only works if arpeggiator is not locked to the host tempo).
I have set the resolution of a single step in arpeggiator to 1/16 of a bar.
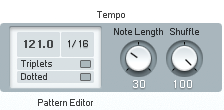
You can also change the note length with the Note Length dial.
With Shuffle dialled in, every second step is shifted forward or backward in timing. At Shuffle = 0 (default) these off-steps are exactly in the middle and the result is the usual mechanically precise timing. With Shuffle = 33 you get a triplet timing 2/3 to 1/3.
Expression Window
The next very important parameter is Accent parameter.
With the Accent row you can boost the velocity of individual steps. The amount of Accent is controlled by the Accent dial.
If you look at the Expression window of the FM8 arpeggiator you can see one button named Vel and two other dials: Velocity and Accent.
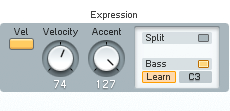
The Vel switch activates fixed velocity mode.
When on, all notes are played at constant velocity (determined by the Velocity dial), otherwise at the velocity with which they were pressed.
The Velocity dial determines the Velocity of produced notes when the Vel switch is on and the Arpeggiator produces only fixed velocities.
The Accent dial on the other hand controls the amount of velocity boost given to accented steps via the Accent dial.
So if on a certain step in the FM8 arpeggiator has Accent button on the velocity set with Accent dial will be used otherwise it will play the steps at the velocity set with Velocity dial in the Expression window.
![]()
This is again very useful to accent certain steps as the real drummer would.
Note Order
The Note Order row determines which of the pressed note will be played.
The number of multiple pressed note is based on the pitch of the notes. Notes are being counted either from lowest to highest or the other way around (depending on the Down switch found in the mode Window of the FM8 arpeggiator).
If there are for example just two notes played and the number in the note order note is 8 it just wraps around these two notes counting it again and again until it counts to eight and the it uses the last counted note.
Just try randomizing this parameter and listen to what it does when multiple notes are played in your sequencer.
![]()
The next row offsets the current note either up or down for an octave or two octaves. This will ad some pitch variation to our sequence.
Note that changing the pitch with octave row has the same effect on Tie parameter as we discussed above.
![]()
The next Transpose row offsets the current note for a chosen amount in semitone. But leave it as it is for now. Note that changing the pitch with Transpose row has the same effect on Tie parameter as we discussed above.
Velocity and Accent Settings
Lets play with velocity and accent parameters. Set the velocity dial to zero, and accent to 104.
[audio:https://www.fm8tutorials.com/wp-content/uploads/2012/04/Arpeggiator-Sample-1.mp3|titles=Arpeggiator Sample 1]As you can hear only accented notes are played.
Now set the velocity to 23.
[audio:https://www.fm8tutorials.com/wp-content/uploads/2012/04/Arpeggiator-Sample-2.mp3|titles=Arpeggiator Sample 2]You can clearly hear the louder accented notes played against more silent one in the background.
Lets set the Velocity dial to 77.
[audio:https://www.fm8tutorials.com/wp-content/uploads/2012/04/Arpeggiator-Sample-3.mp3|titles=Arpeggiator Sample 3]Now you can hear only subtle movement in dynamics of our sequence. You can try automating velocity parameter (or maybe even accent parameter) so you can create variations in dynamics on the fly.
[audio:https://www.fm8tutorials.com/wp-content/uploads/2012/04/Arpeggiator-Sample-Automated.mp3|titles=Arpeggiator Sample Automated]Using Split Parameters
Another very useful thing to do is to use the split parameters in the Expression window of the FM8 arpeggiator.
With active Split button, one part of the keyboard is arpeggiated, the rest plays normally.
Set the split point in the Note field below the Split button or press the Learn button and hit a MIDI key.
An active Bass button causes the notes below the split point to be arpeggiated. With inactive Bass option the notes above the split point are arpeggiated.
This can be very useful when sequencing drums since you can create some additional independent drum hits and drum rolls.
Set the split parameters like this.
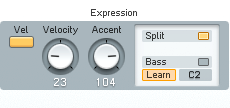
Now we can draw some additional notes below the C2 note to spice up our sequence.
Note that velocity of our notes below the C2 affects the sound normally like it would with the arpeggiator section of the FM8 synth turned off.
[audio:https://www.fm8tutorials.com/wp-content/uploads/2012/04/Arpeggiator-Sample-AdditionalNotes.mp3|titles=Arpeggiator Sample AdditionalNotes]You should experiment a bit with FM8 arpeggiator. It can produce some really cool sequences which would be very hard to create by just drawing notes in your DAW piano roll editor.
If you have any questions or comments, please leave them below.
