$0.00 0

YOUR CART
Checkout

SUBTOTAL
DISCOUNT
VAT
TOTAL
Checkout
Banner
Designing gated synth in FM8 is something of a small challenge, because there is no gate feature...

FM8 Tutorials

Designing Gated Synths in FM8

Designing gated synth in FM8 is something of a small challenge, because there is no gate feature in the program. There is however an extremely advanced flexible envelope system to help you and this tutorial will show you one way to use it for such as task.

Gating is an interesting topic to discuss in music production. It has many uses and a lot of people underestimate the power and usefulness it brings to the party. It is much like compression in this sense. At its most basic, a gate is a device which mutes a signal whenever its level falls below a threshold set by the user. Taking this idea and applying it to the envelopes found within FM8 is how you can achieve the same kind of effects. Designing gated synths in FM8 is quite intuitive once you become comfortable with programming your own patterns. Of course, once you find one you like, you should save it as a preset! No reason to recreate the wheel every time you want to go for a ride, if you know what I mean.

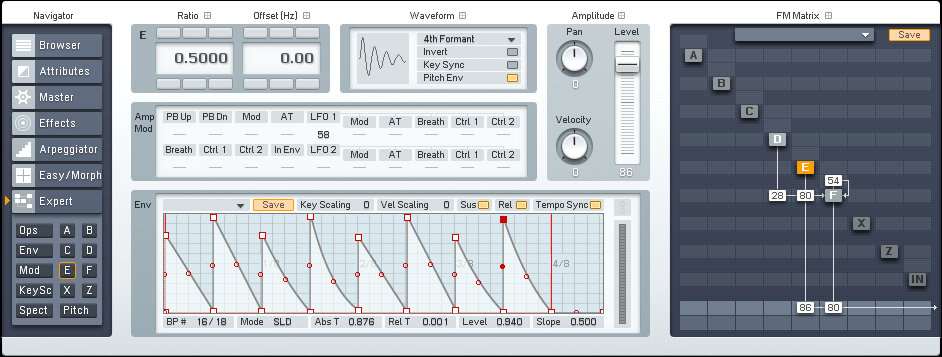
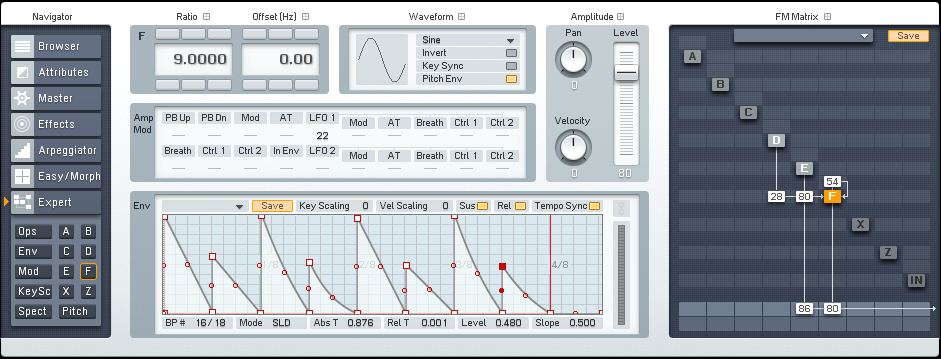
Let’s start with making a simple synth in the Expert Ops window. The FM Matrix gives us everything we need to get the foundation set, including the rhythmic characteristic of a gated synth. As you can see in the image below (don’t forget to click on the image to enlarge it if you cannot make out details) Operator F has some feedback happening, as well as modulation fro two other operators. Operator E is also routed to the output, for added interest. You can also see that the envelope for Operator F has a very dramatic pattern programmed.

Designing Gated Synths in FM8 Tutorial by OhmLab 1

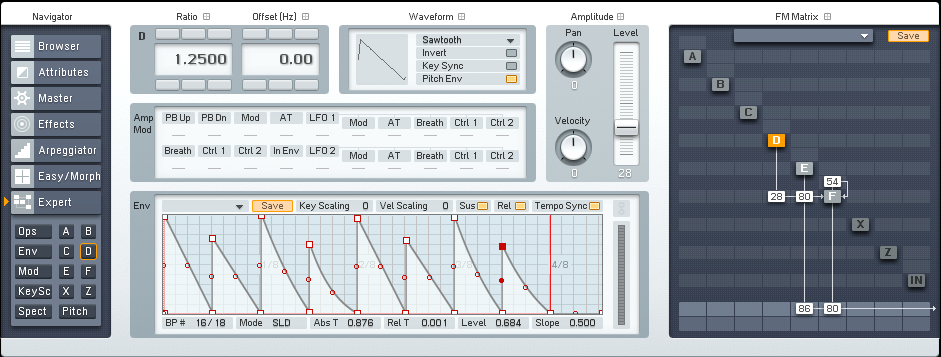
Now let’s look at the other envelopes. Each of the three operator’s envelopes varies a bit. But the main structure is the same. And, as you can hear when you play a note and hold it, this is having the same kind of effect that a gate can have on a synth. But this approach gives you seemingly infinite control over the smallest of details in how your sounds are delivered.

Designing Gated Synths in FM8 Tutorial by OhmLab 2
Designing Gated Synths in FM8 Tutorial by OhmLab 3

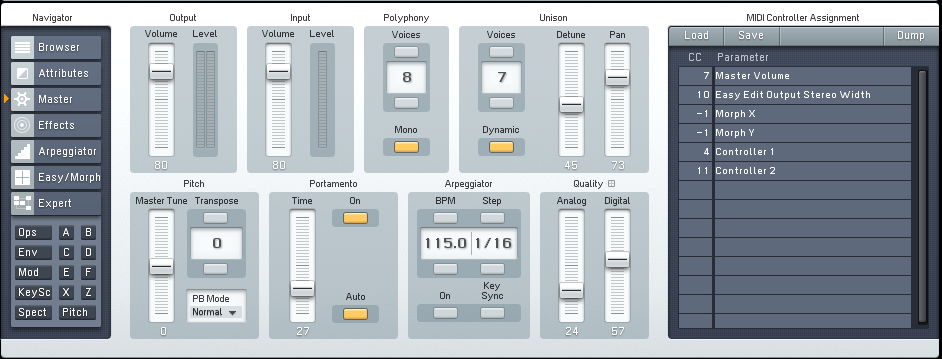
Let’s jump into the Master window real quick. Here you can turn up the number of Unison voices and utilize the Pan, Detune, Analog and Digital Quality parameters to better shape your sound. Also worth noting, I have set the synth to run in mono mode, which allows for only one note to be played at a time and is nicer for using the portamento feature. This lets you glide between notes.

Designing Gated Synths in FM8 Tutorial by OhmLab 4

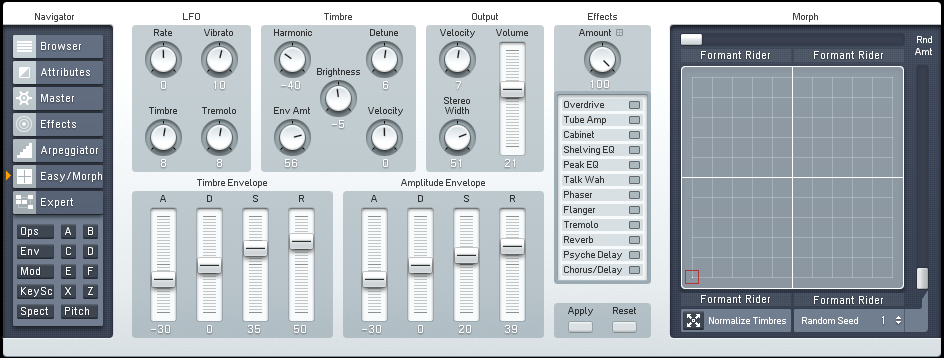
The last step in this lesson is to set up the Easy/Morph window. This is where the main amp envelope and the timbre envelope are applied to the sound and you can also access LFO controls, too. Designing Gated Synths in FM8 Tutorial by OhmLab 5
Below is a sample of the sound just made in this tutorial playing along side some simple drums to give you an idea of how it may sound in a mix.

[audio:https://www.fm8tutorials.com/wp-content/uploads/2012/09/Gated-Synth.mp3|titles=Gated Synth]

Do you have tutorial requests? Let us know by send us a message today. Thanks for stopping by!

Cheers,
OhmLab
RELATED COURSES

Functional Sound Design - FM Synthesis

ADSR Courses

Add to cart

Advanced Sound Design Techniques

ADSR Courses

Add to cart

Dubstep Bass Design In FM8

ADSR Courses

Add to cart

FM8 Expert Panel Explained

ADSR Courses

Add to cart
Waveform Loaded
Waveform Played
×
PLAYLIST
Clear all
WISHLISTS
Create an account to use wishlists
×
SAVE TUTORIALS
Create an account to save tutorials
×
FOLLOW YOUR FAVORITES
Follow your favourite labels, formats and genre's and ADSR will show what's new in those on your next visit.
×
  • Create product wishlist
  • Save your favorite tutorials
  • Regular discounts and exclusives
  • Never miss a sound! Follow your favorite labels.
Sign up to My ADSR to ensure you're ahead of the pack. Save your favorite content and be notified of new content. You'll never miss a thing!
Create your account now!
CREATE ACCOUNT
Sign up to My ADSR to ensure you're ahead of the pack. Save your favorite content and be notified of new content. You'll never miss a thing!
  • Get days all ADSR courses free
  • Create product wishlist
  • Save your favorite tutorials
  • Regular discounts and exclusives
Create your account now!
SIGN IN
adsrsounds.com login Video streaming login
Remember me
Forgot your password?
DON'T HAVE AN ADSR ACCOUNT?
Create your account
FORGOT PASSWORD

Send info
  1. Enter your email address
  2. Click "Send info"
  3. Check your inbox for an activation link
  4. Visit activation link and enter set new password
Sign in
DON'T HAVE AN ADSR ACCOUNT?
Create your account
IMPORTANT: Is this product compatible with your system? Please check the product system requirements tab before purchasing. To proceed with this purchase you must check the box to confirm you have checked the requirements.


I have read the system requirements and agree to the return policy. I understand that refunds will not be given due to limitation of my software or operating system.

I don't agree
, you have loyalty credit available. To redeem click the button to claim !
Claim
Claim your free sounds

For every $5 you spend on ADSR receive 1 free credit for Sample Manager.

Even better, we have back-dated this so any purchases you made since 2017 have also been credited to your account!

Click the button below to claim your free credit.

Get my free credits
Loyalty credits
1Every purchase you make on ADSR* now earns you 1 loyalty credit for every $5 spent
2Once you make a purchase your credits are added to your account
3Credits can be redeemed in ADSR Sample Manager to download individual loops and samples
4To redeem simply download ADSR Sample Manager and/or log into Sample Manager with your ADSR login details
5Credits will have been automatically added to your account
6Loyalty credits expire 30 days after initial purchase
* Not including video subscriptions