
Absynth Tutorials
Synthesizing Choir Sounds with NI Absynth - Absynth Tutorials
First let’s set up the basics.
We must use a waveform which is rich in harmonics, so the most obvious choice is the saw wave.
Also set polyphony of the Absynth patch to 8.
![]()
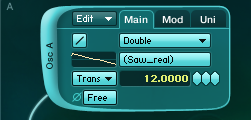
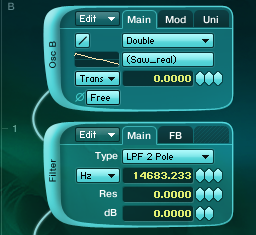
Enable Osc A and set it to Double mode.
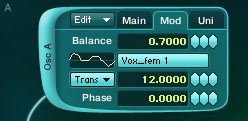
Transpose both oscillators to +12 semitones.
For the Main Osc A choose Saw Real waveform.
For the Mod Osc A choose Vox_Fem 1 waveform.
This will give the sound vocal like quality.
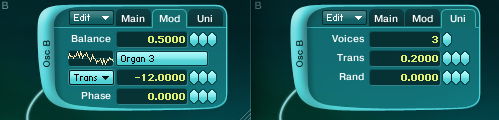
Set the Balance between these two oscillators to 0.500.
To spread out the sound set voices of the oscillator Uni tab to 3 and detune them for 0.2 semitone.

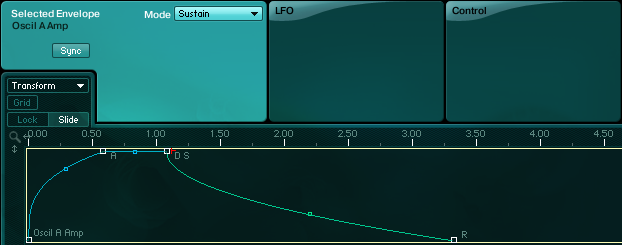
Set Osc A amplitude envelope to Sustain mode and its shape to something like in the picture below:
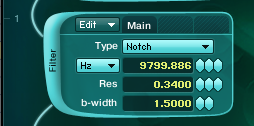
For the filter lets use Notch filter which works in opposite way as Band-Pass filter.
I have chosen Notch filter because we can now adjust the frequency content of the sound without affecting the high and low frequencies of the sound too drastically.
We could also use Allpass filter instead.
Set the filter to something like this for now:
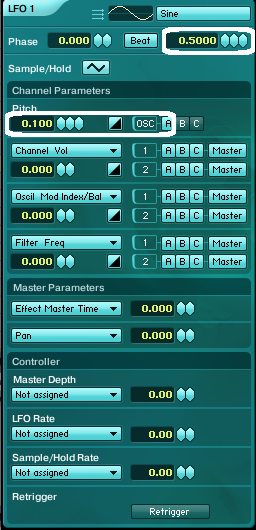
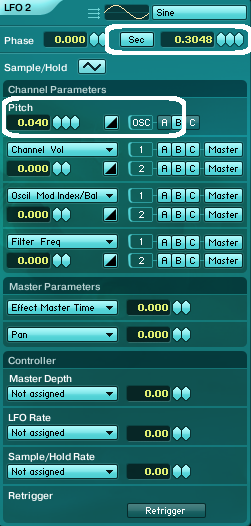
We should also use LFO1 to modulate the pitch of Osc A in an almost unnoticeable way just to add a little movement to the sound.
Enable LFO1 and set the modulation target to Osc A and set frequency to 0.500 in Beat mode.
Aetherizer Effect
Now we have our basic sound that doesn’t really sound much like a choir.
We will achieve vowel frequencies with using Absynth master effect called Aetherizer which is basically an advanced granular delay effect.
You can enable it by clicking on the effect tab in the Absynth and choosing the Aetherizer effect from the effect menu.
First let’s set the Wet mix to full and the Dry to minimum so we will hear only the effected signal. Also set the master effect settings like in the picture below:
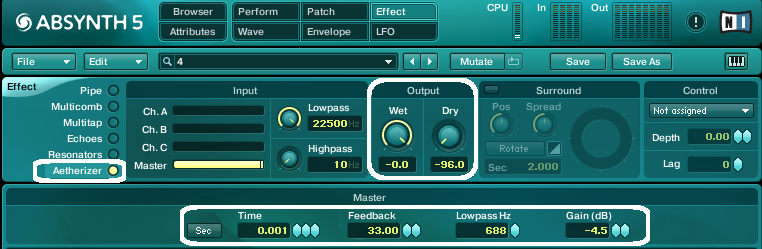
As you can see this effect is divided into two sections.
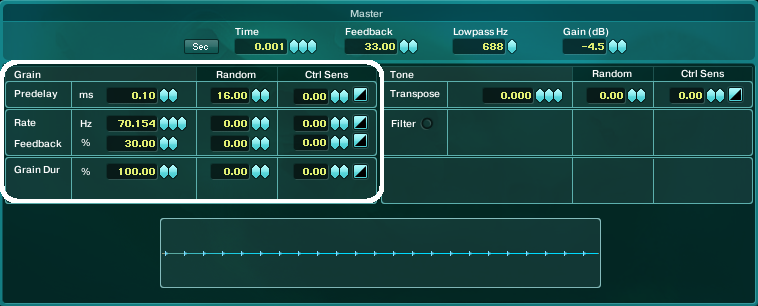
In first Grain section you can determine the overall shape of each grain which is basically a short snippet of sound you are running trough the Aetherizer effect.
You can vary the size of grain cloud with rate control which sets the frequency with which this grains occur. We shall set it too fairly low value around 70 Hz.
You can randomize any parameter in Aetherizer effect with Random control.
This changes the value of respective parameter for each grain generated.
Predelay defines the position in the incoming signal at which the grains are taken. Set it to 0.10 and the random amount to 16. This will introduce slight variation in the timing of the generated grains.
Set feedback amount to 30.
Also we want long overlapping grains to emulate the dense sound of the choir. So set the grain duration to 100.
Here comes the important part. In the second section of the effect you can control transposition of the frequency of the generated grains in semitones. With this you can control the harmonic relation of the grains to the original sound.
Set the transpose value to 12 semitones so the grains will be one octave higher.
We also want each grain to have its random frequency so we can very roughly emulate the complex frequency characteristics of human voice. Set the random parameter to around 7.
We can also filter these grains by enabling the filter button.
![]()
We can choose from comb and BP filter and the later works a bit better in this case.
Set the filter frequency to around 1100 hz for now and resonance to around 15.
Below there is a filter Quantize drop down menu.
Filter quantization means that the frequency at which grains are being filtered wont be random (if modulated) but it will be forced to frequency values determined by the various available modes.
We will choose vowel mode, so the grains will be filtered at a specific vowel frequency which is set with Vowel parameter.
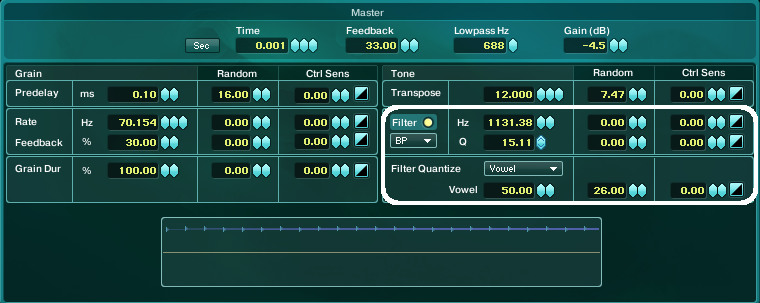
With Vowel parameter you can morph between various vowel frequencies. Set it to 50 and set random parameter to around 25 as you can see in the picture above so each grain will have a bit different vowel frequency.
You can also assign Vowel parameter to macro 1 so you can additionally morph the sound via Midi.
Also we should enable master filter and set it LP 2 Pole so we get rid of the highest frequencies in our sound in order to get it a bit more natural sounding.

As you can hear we went from this sound (without Aetherizer effect):
[audio:https://www.absynthtutorials.com/wp-content/uploads/2012/08/Sample-Choir-Raw.mp3|titles=Sample Choir Raw]to this:
[audio:https://www.absynthtutorials.com/wp-content/uploads/2012/08/Sample-Choir-Single-Osc.mp3|titles=Sample Choir Single Osc]
For bigger sound we could employ another oscillator.
Enable Osc B and Filter B and set it like this:
Set amplitude envelope of Osc B to roughly the sam shape as we did for Osc A.
Also set Osc B oscillator to dual mode. Choose Organ 3 waveform and transpose the oscillator Mod B for -12 semitones. Go to Uni tab of Osc B and set the voices to 3 and detune to 0.2 semitone like we have done with Osc A.
As with the previous oscillator let’s assign some slight variation in pitch by using LFO2.
Hope you have enjoyed this Absynth tutorial.
Next time we will be looking into making vowel lead with wave morphing technique.
If you have any question or comments feel free to leave them below.
