
Reaktor Tutorials
Using Multi Displays in Reaktor, Part II
CREATING AN ALPHABET WITH KNOBMAN
To create the graphics file we will be using in today’s tutorial, I used a program called Knobman, which can be downloaded here. Knobman is a program that can be used to quickly and easily create various interface components for Reaktor, that would be very difficult and time consuming to create with conventional graphics editors.
Since this is a Reaktor tutorial, I’ll keep the Knobman aspect to a minimum, but if you are unfamiliar with it, you can check out a beginner’s guide give you an idea of what it can do here.
I have uploaded a Knobman project file, Alphabet.knob, that can be used to export fonts from Knobman to a format that Reaktor can use. You can easily change the style and size of the font from inside Knobman, then export the file as a .tga for loading in Reaktor. You can download both the Knobman file I’m using today and the .tga it exports here.
Now, let’s use a Multi Display in Reaktor to rearrange the letters as we please and create custom labels.
SETTING UP THE MULTI DISPLAY
For starters, create a new macro, and load up a Multi Display module. There are many parameters of the Multi Display we must set properly before we can use it for our purposes (If you are ever having trouble getting a Multi Display to work, remember to make sure all of the properties are set properly).
Go to the FUNCTION tab of properties to start. First, set the ‘Always Active’ option to on. This makes sure the Multi Display works properly even if it isn’t connected to the larger structure in anyway (which it won’t be). Next, at the bottom, find the Ignore Obj, RGB and A options. Uncheck the Ignore Obj and Ignore A options. Having Ignore Obj unchecked allows us to have different types of objects (each letter will be treated as it’s own object type), and having Ignore A off means we can specify which letters are visible and which ones are not.
Still in the FUNCTION tab of properties, set the number of objects to 16, giving us a maximum of 16 characters per label. Directly beneath the number of objects box, there is a menu labelled ‘Picture’. Choose ‘Open from File’ in the list, and choose the Alphabet.tga file from above. The following box will appear: 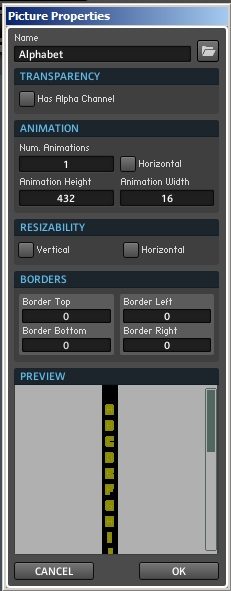 Okay, there are a few things we need to change here. First of all, our file does have an alpha channel, so select the ‘Has Alpha Channel’ option. Next, change the ‘Num. Animations’ box from 1 to 27 (the file I created has all 26 letters, and a 27th picture as a blank space if no letter is to be used in a spot).
Now, the box should look something more like this: 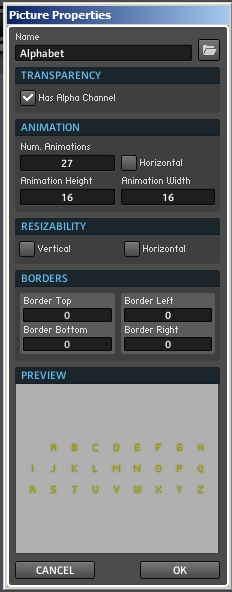 Press okay, then switch to the VIEW tab of the Multi Display properties. First, turn off the ‘Show Label’ option. Next, find the ‘Background Bitmap’ menu, and once again, load the Alphabet.tga file. As before, select the ‘Has Alpha Channel’ box and set the number of animations to 27. This time, however, select the box labelled ‘Horizontal’ in the Resizability area.
It should look like this: 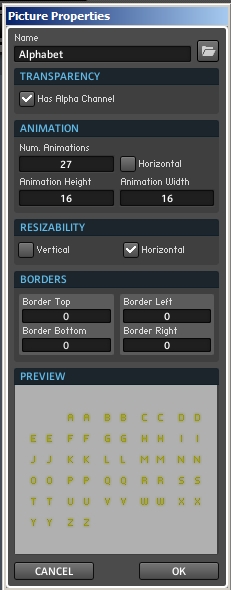 Select okay. What this has done is set the first animation in the Knobman picture to be the background of the text label. As it so happens, the first animation is the blank space I mentioned earlier – this is simply making the background of the Multi Display module transparent, so we can layer text over other elements if we desire.
Finally, loading the new background will change the size of the Multi Display module. The ‘Height’ parameter is now equal to 16 (which is good), while the ‘Width’ parameter has a question mark next to it! Don’t worry, we’ll set this up properly in a minute.
DISPLAYING TEXT
Now we have our preliminary work finished, let’s get down to business. To begin with, I created a Selector module and 16 inputs to the macro: 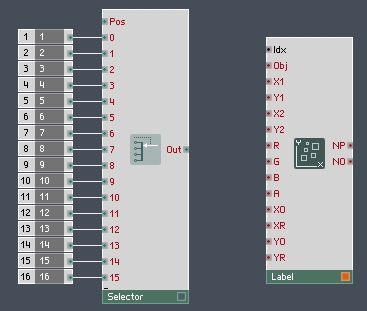 This Selector will store the values of up to 16 characters to display for our label. The next thing we need is to read all of the data into the Multi Display module. An Iteration module is perfectly suited for the job:
 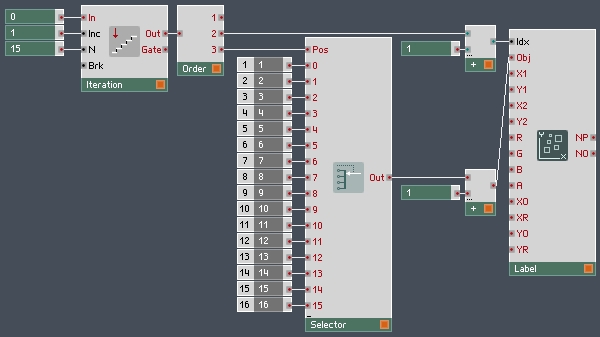 Now, when the ensemble is loaded, it will read through all of the indices and set each one to the letter it has been assigned to. Next, let’s add a way to set the X and Y values of each object:
 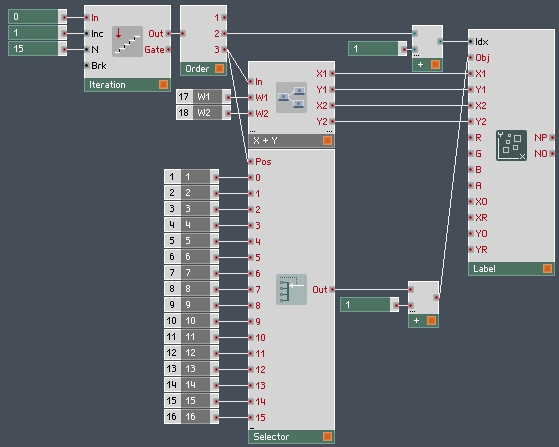 The structure of the X+Y macro looks like this:
 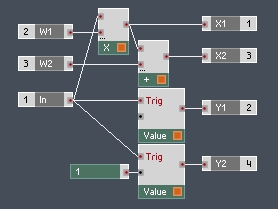 A few things to note here – first, the X values are being sent in terms of pixels. What this means, is that the X Range of the Multi Display module has to be equal to it’s width in pixels. There will be a bit more on this later. The Y Values are always 0 and 1, so the Y Range can be left alone (0 to 1 is the range by default).
The second thing to note is the W1 and W2 values. These are variables depending on the size of the font file you are using. W1 is the width of each letter (in my example file, 6 pixels), while w2 is the Width of the alphabet file (which has blank space to the right and left of each letter, in this case, 16 pixels). W2 should be easy to find, W1 can be found by trial and error. W1 controls the spacing between each letter.
If you set the X Range and Width in pixels of the Multi Display properly (they should be the same, as I mentioned before), at this point in time you can get a working label out of the structure provided. However, there are a few improvements we can add to make this whole process a lot easier.
For starters, we should have a Length input to the macro that tells us how many letters there are in the label. We should be able to use this in conjunction with the W1 and W2 values to get a good guess at what the X Range and Width should be. In fact, we can set the X Range automatically using the XR input.
This means once we supply the macro with the number of letters in the label, it will set the X Range for us, and the only change left for us to make is to set the Width to the same value. The last thing I would like to do is to make sure all objects above the length of the label are not visible, using the ‘A’ input of the Multi Display. All of these additions are easy to make: 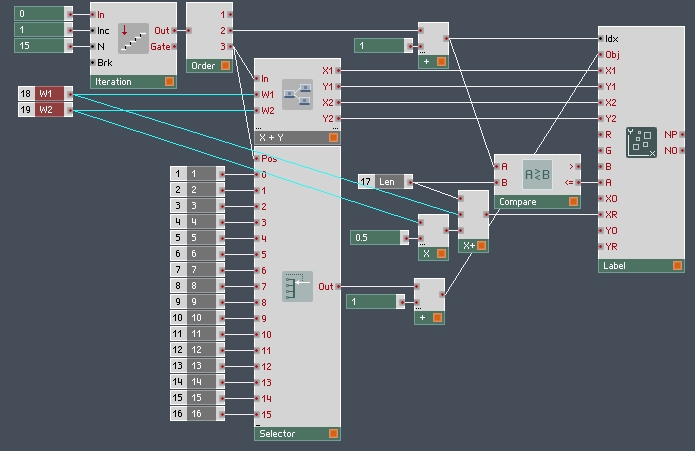 Now, you can set up a label like so:
 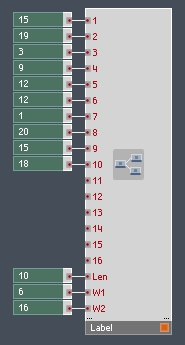 The numbers correspond to letters of the alphabet: 1 = A, 2 = B, 3 = C, etc. A blank space is set to zero, or simply left unconnected. The picture above says “Oscillator”. Once you have the letters and the length to their proper values, you can read the value going into the ‘XR’ input of the Multi Display. Set the width to the X Range, and you’re done! Here’s what it looks like on the Reaktor Panel:
![]() Of course, you can change the font, color, and size in Knobman to create something a little more exciting. One last note, this macro is made to load upon setup. When you edit it, the changes may not take place immediately. To fix this, you can trigger a Global Reset Event by turning the CPU button off and then back on.
Of course, you can change the font, color, and size in Knobman to create something a little more exciting. One last note, this macro is made to load upon setup. When you edit it, the changes may not take place immediately. To fix this, you can trigger a Global Reset Event by turning the CPU button off and then back on.
CONCLUSION
I find that creating a singular alphabet file and creating labels like this is preferable to creating each label custom in a graphics editor, for several reasons. The first is that Reaktor only has to store one copy of the alphabet file, and if you create dozens of labels it can make the .ens file substantially smaller. The second is that I don’t have to break my workflow to create new screen elements – I can do the work straight from Reaktor. Third, I can switch fonts midway through a project, and instead of having to re-create dozens of labels, I can simply re-do the alphabet file, and the rest will change automatically.
Here is a copy of the ensemble I made today.
I hope you have found this tutorial to be helpful. There are a lot of hidden steps in this one – stuff that takes place in the properties. I hope I have remembered each step, but please let me know if there is anything missing in the comments.
