
Reaktor Tutorials
Iterative Filters in Reaktor, Part II
In this tutorial I’ll improve upon the design of the iterative filter introduced in the previous tutorial. There are several improvements that can be made to improve the sound and efficiency.
You can find the previous tutorials about filter design here.
SOME QUICK CHANGES
To start, let’s make some quick and simple modifications. For instance, we can easily implement frequency modulation for our filter. We can simply add an audio rate input to our filter structure and add the new frequency to the cutoff pitch like so:
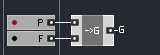

This allows us to use a filter envelope. This is nice because it allows us to easily test how the filter responds to fast frequency changes, which is often a failing of digital filters.
Next, we are taking the incoming Resonance value and multiplying it by 2 in each iteration of the filter. We might as well simply remove it from the filter iterations and calculate the value in the larger structure – this saves us seven multiplication calculations each time the Resonance changes, which may make a difference if the resonance is changing rapidly. This, too, is a simple change:
![]()
I chose to add the Res knob to itself rather than multiply by 2, since adding is a faster operation. This is a minuscule CPU savings of course, but there’s no reason not to do it this way. Now instead of receiving the resonance value, the individual iterations can simply receive the ‘k’ value directly.
FIXING THE SATURATION
The filter available for download in the last tutorial had only a single saturator in the final feedback path. In reality, there should have been a saturator included in every iteration of the filter.
The reason I omitted this is because I first attempted to implement the filter using a tanh shaper (which I have seen mentioned in texts pertaining to filter feedback a few times). The CPU hit was too much in my opinion, clocking in at 10% of my CPU with only 4 voices (while the filter I posted last week uses 4%).
A tip of the hat to Colin Brown, who suggested using a shaper included in the SVF filters in the Reaktor factory library, a macro named ‘Poly Sat 31’. This shaper is far more efficient than a tanh function, allowing it to be called used several times per sample without eating up too much CPU.
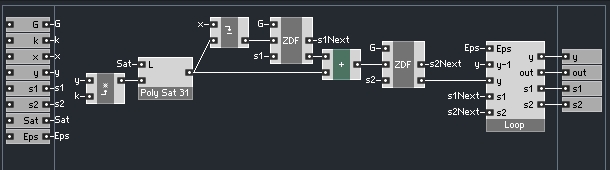
In my estimation, the correct place to insert the shaper is directly after the feedback value (y) is multiplied by the resonance (k). Therefore a single iteration of our filter looks like this:
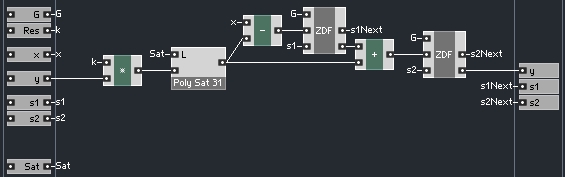
Meanwhile, the larger filter looks like so, after removing the shapers previously there:
I think things work best with a saturation value of 4.
This edit helps to substantially cut back on annoying ringing in the signal when both the frequency and the resonance are set to high values.
EXITING THE LOOP EARLY
Finally, I have added a method to exit the iteration sequence early once a suitable feedback value is found. This required editing each step of the iteration to check the incoming feedback against the outgoing feedback. If they are very close in value to each other, we can exit the loop.
This can save a substantial amount of CPU (because we are no longer calculating unnecessary iterations of our filter), which is nice because we added quite a bit of complexity to our filter in the last tutorial.
Let’s begin the process by editing a single iteration, then we can copy/paste that structure. The first thing I did was carefully replace the math modules within the filter with macros from the Modulation menu in the Expert Macro section.
In doing so, I was able to set up the iteration macro so that it only outputs a value when it receives an event at it’s ‘y’ input (all other values are used as parameter inputs to modulation macros, and wait until they are triggered).
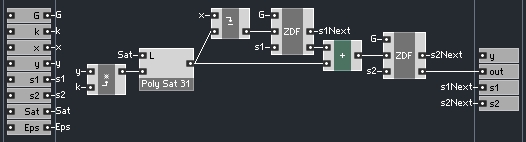
Once I had ensured that an iteration would only trigger if receiving a feedback value, I went about adding a way to choose whether to trigger the next iteration or stop the loop. To do so, I added a simple macro, called Loop:
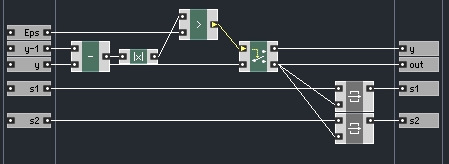
Here, the difference between the input feedback and the output feedback is compared a value, Epsilon. Epsilon has a very small value (I used 0.0001).
So, if the input and output are very close in value, the loop ends, and the y, s1 and s2 values are sent to an output to be stored for the next tick of the sample clock. Otherwise, the feedback value is sent to the ‘y’ output, which feeds into the next iteration of the loop.
So here is a single iteration of our loop:
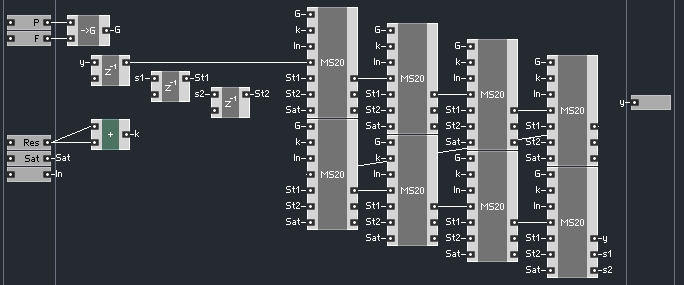
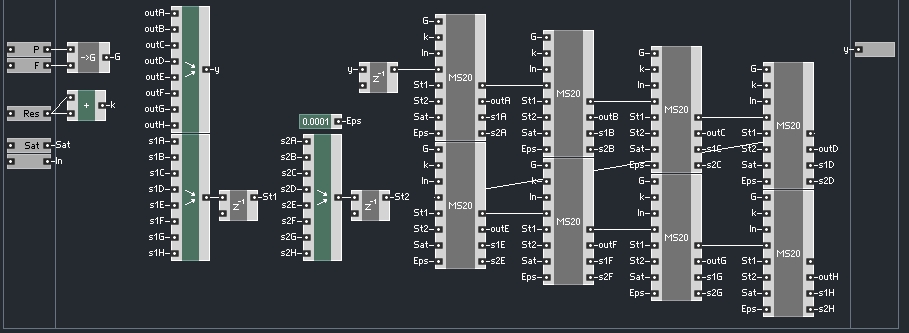
And the larger structure now looks like this:
Finally, the last iterator must be modified as well. There is a chance that even after 8 iterations, the loop has not found a feedback value that will end the loop. In this case, we simply end the loop regardless, leaving the last iterator looking like so:
In a case where all 8 iterations must be used, this actually has the effect of making the structure less efficient, since in that case the same amount of work must be done as before, with the addition of the extra ‘Loop’ macro in each iteration.
However, even with high resonance this is rare, and unless you push the filter well above self-oscillation, this version should usually shave a few percentage points off of the CPU.
CONCLUSION
You can download the newest version of the MS-20 filter here.
We improved the efficiency, as well as the frequency response, and also added the capacity to accept a filter envelope. If anything needs to be clarified in today’s tutorial, please feel free to ask in the comments!
There will probably be at least one more tutorial in this series that improves this work further, including the addition of high pass and band pass modes, and any other improvements I can find to make. Feel free to make any other suggestions.
