
Reaktor Tutorials
How to Build a Synth in Reaktor (Part III) - Event Processing
In the last tutorial, we added some simple modulation options for our synth: PWM and an LFO.
How to Build a Synth in Reaktor, Part III focuses upon improving the LFO and using the discussion as a way to introduce the new user to the concept of events in Reaktor.
AUDIO RATE VS. EVENT RATE
So far, our synth has been focused on audio processing. The envelope, oscillator, mixer, and filter modules we added are all examples of audio rate processing. These modules are constantly outputting values at a rate determined by your sound card (often 44.1 kHz).
Event modules work differently. Most of them do not continuously output values (there are a few exceptions, such as the LFO module we added during the last tutorial). Instead, event modules typically will output a value by having an input triggered, or by user stimulus (such as the turning of a knob).
This control paradigm is useful because it allows the user to process certain parts of the synth only when necessary, as opposed to audio rate objects which run at continuous rate regardless of whether their values are changing or not.
You can tell the difference by looking at the color of the inputs and outputs of a module. Many modules have both event and audio rate inputs and outputs.
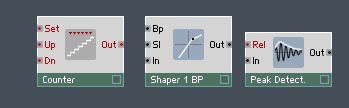
Event (left), Audio (middle) and mixed (right)
The event inputs/outputs are red, the audio inputs/outputs are black. There are also some modules with inputs and outputs that look like this:
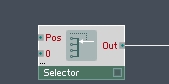
Instead of the red or black dot for the input, it is blue. These terminals can be used either as audio rate or event rate, depending on what they’re connected to:
Any blue terminal will turn to an event terminal if it is feeding an event input. Likewise, they will turn black if fed by an audio output.
A few rules:
– You cannot plug an audio output into an event input. The event rate inputs are not designed to accept audio signals.
– However, you can plug an event output into an audio input. In fact, you’ll see we’ve already done this several times in the previous tutorials. The audio rate input will simply change to the value of the event each time a new event is received.
KEY SYNC
Let’s use some event processing to add some more features to our LFO. We’ll start with a very basic structure, which replaces the simple MIDI Gate that currently feeds the ‘Snc’ input:
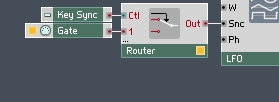
You can find the Router 1,2 object in the Built-in Module -> Event Processing Menu.
The Router module will only let events thru the ‘1’ input if the ‘Ctl’ input is set to 1. Hence, when the Key Sync button is off (equal to 0), the Gate events will not reach the LFO to restart it on a new keypress.
So this structure can act as a very simple Key Sync option for our LFO (before, the LFO operated as though Key Sync were always on).
TEMPO SYNC
Okay, so let’s build something a little more complicated. The ‘Freq’ knob in the LFO macro is a bit undesirable at the moment. For one, it can’t be synced to the tempo (an almost universal LFO feature), and the unsynced range of 0.1 to 12Hz could be improved upon as well.
To fix both of these problems, I created a macro:
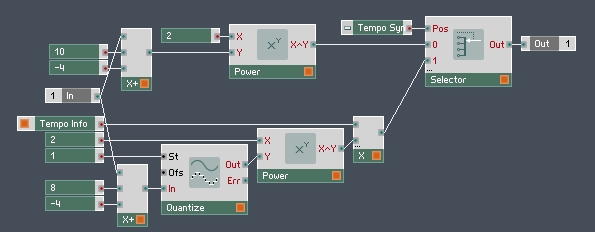
This macro accepts a value from 0 to 1, and performs a bit of arithmetic, then outputs either a free-floating value from 0.0625 to 64, or a tempo synced value ranging from 4 bars to 1/64 note, depending on the value of the Tempo Sync button.
Since this is the most complex structure we’ve built so far, let’s give it a closer look.
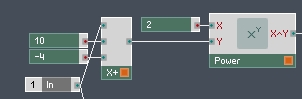
Let’s examine the top half first. The module labeled ‘X+’ can be found in the Built-in Module -> Math menu, it is called Mult/Add a*b+c. What this is doing is changing the incoming value from 0 to 1 to a new value ranging from -4 to 6.
Next, this value is used as the y component of a 2^y function, leaving us with a value range from 2^-4 (0.0625) to 2^6 (64). The x^y module can also be found in the Built-in Module -> Math menu.
So, this simple bit of math gave us a much wider range of values to work with, at the loss of a little precision at the upper end.
Next, let’s look at the bottom half:
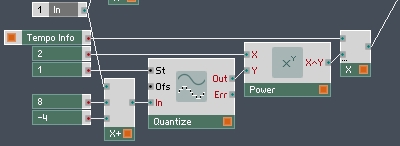
It’s actually quite similar to the top half. The Quantize module can be found in the Built-in Module -> Math menu, and in this case it is simple rounding any value it receives to the nearest whole number.
Essentially what this has done is give a knob ranging from -4 to 4, outputting only whole numbers. Now we again use a x^y function, and then multiply the output by the Tempo Info module (found under the Built-in Module -> Auxiliary menu).
The Tempo Info module outputs a value upon opening the Reaktor project, or any time the tempo changes. It’s output is equal to the Frequency length of a quarter note. For example, at 120 bpm, it will output 2. (120 beats per minute / 60 seconds per minute = 2 beats per second).
Therefore, we are simply taking the tempo frequency and multiplying it by a power of 2.
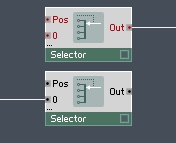
Finally, we take both of the values we just calculated and run them into a Selector/Scanner module, which can be found under the Built-in Module -> Signal Path menu. The Selector module will only accept events from one of it’s inputs, depending on the ‘Pos’ value, in this case controlled by a button:
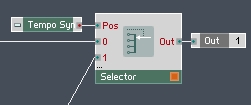
Set the number of inputs for the Selector module to 2 in the properties.
You may have noticed the Selector module looks and functions an awful lot like the Router module we used earlier. If you looked at the various types of Routers, the Selector is almost exactly like the Router M->1 module.
There are two minor but important differences between the two modules. The first is that Routers cannot accept audio signals, while Selectors can. The second is what happens when the Pos input changes.
When you change the Pos input to a Router, nothing happens. The Router will change which inputs it allows thru, but no event is sent to the output until it is received at that input.
When you change the Pos input to a Selector, however, the Selector outputs whatever value is currently available at that input.
In this case, this is an important feature because when we click on the Tempo Sync button, we need to calculate the new value immediately, not wait until the next time the user turns a knob and triggers an event at that input, which is what would happen with a Router.
Okay, so now we can just place the SYNC macro that we’ve made into the LFO like so:
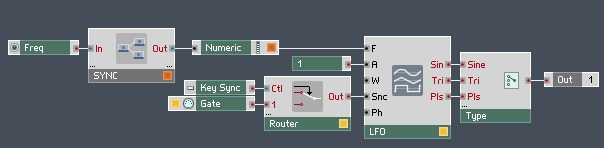
A few notes on this. First, make sure you change the Freq knob so it ranges from 0 to 1 instead of from 0.1 to 12.
Also, notice how the indicator light on the SYNC macro in my picture is orange instead of yellow? This is because I’ve marked the macro to be monophonic instead of polyphonic. You should make this change yourself by right-clicking on the macro and selecting ‘Mono’.
The reason for this is that we’re connecting the output of the macro into a Numeric Readout module (Built-in Module -> Panel). The Numeric Readout is itself a mono object, and we cannot connect a poly output into a mono input (try it, and you’ll see a red X on the input).
The difference between mono and poly will be discussed in full in the next tutorial.
Next, since the value of the Freq knob is no longer the actual frequency of the LFO, we can turn the value in the VIEW tab of the properties. Uncheck the ‘Show value’ box. We’re using the Numeric Readout module to display the current frequency instead.
Turn of the label of the Numeric Readout in the properties, uncheck the ‘Show label’ box in the VIEW tab. Next, you can move the value into position underneath the knob so it looks like any other.
RAMP AND SAW LFO
Although it is not immediately obvious, the LFO module can also output Ramp and Saw waves, two important LFO types that should not be left out of our project.
We can coerce these waveforms out of the LFO by using the ‘W’ input and the triangle output. With the ‘W’ input set to 1, the Tri output becomes a ramp wave, and when the ‘W’ input is set to -1, the output becomes a saw wave.
Here’s a simple way to add this functionality to our LFO:
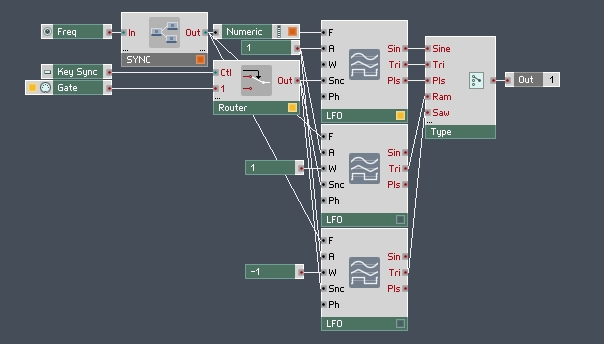
Simply duplicate the LFO module twice, set the ‘W’ inputs, and connect them to the ‘Type’ switch.
You can dynamically add more inputs to a Switch module (or any other module with a variable number of inputs) by holding down the CTRL key and dragging a wire onto the module. Alternatively, change the number of inputs in the Switch properties.
KEY TRACKING THE FILTER
Finally, let’s make a very quick change to our FILTER macro (I meant to include this in the last tutorial but I forgot). I modified the Pitch controls of the macro to look like this:

What this is doing is adding a simple keytracker to our filter. This makes the filter values follow the notes being played, bringing the cutoff value down on notes below 60, and up for notes above 60 (60 is the MIDI value for middle C).
There are many ways to implement such a system – we can replace the value 60 with a knob, invert the value when a button is pressed, multiply by a depth knob after subtracting, etc. For the time being, I simply added a default keytracker that can easily be replaced or upgraded for future use.
CONCLUSION
Our LFO is quite a bit more useful now, but it’s stil only modulating one parameter. Over the next few tutorials we’ll work on expanding the modulation capabilities for tremolo and other effects.
Next time we’ll also focus on the difference between mono and poly and build a simple voice controller for mono, and unison modes.
Download my work for this tutorial here, in case anything was difficult to follow. Please leave any questions in the comments. Thanks for reading!
