
Reaktor Tutorials
How to Build a Synth in Reaktor (Part II) - Adding An LFO and Pulse Width Modulation
I will be working on some basic improvements to the synth I detailed in part 1 of this tutorial tutorial: How to build a synth in Reaktor – a beginners guide.
ADDING AN LFO
An LFO (Low Frequency Oscillator) is a basic part of most synthesizers. So basic, in fact, that I would have included it in last week’s tutorials had it not already been so long.
As the name implies, an LFO is an oscillator that runs at very low frequencies, often synced to MIDI tempo. Since LFOs often run at rates so low that they are inaudible, they are not used directly as sound generators, but rather as modulators of other parts of the sound.
For the purpose of this tutorial, I made an extremely simple structure based around the LFO module (under the Built-in Module -> LFO, Envelope menu). You can add the constant value of 1 either by using the Built-in Module -> Math menu, or by right-clicking the A input of the LFO and selecting ‘Create Constant. The rest of the modules should look familiar.
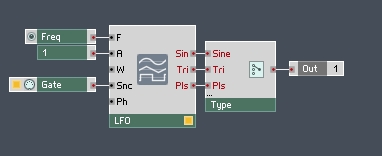
The Gate module syncs the LFO so that it re-starts on a new MIDI note.
This is about as basic and boring as an LFO can get. Over the course of the next few tutorials we’ll spruce it up considerably, as we get into event processing and other subjects.
For now, however, we can use it to modulate the Cutoff value of our filters, a very common sound usually used to make wobble basses, and a very easy illustation of how LFOs work and what they are for.
Editing the filter to accept a Cutoff modulation is a fairly simple task:

Here, the LFO, which is oscillating between the values of -1 and 1, is being multiplied by another value (from 0 to 24), which controls the depth of the ‘wobble’, then the result is added to the filter cutoff.
For example, with the LFO Mod knob turned up to 24, the cutoff range will be modulated by +/- 24. Turn it down to 0 and the LFO will not affect the sound at all. I’ve included a few snapshots with this week’s upload that show off the wobble bass sound.
Good synths always include a plethora of modulation possibilities, to create complex and evolving sounds. Over time, we’ll work on a method to allow the LFO to modulate more parameters, to have a tempo sync function, some more wave types, etc.
PULSE WIDTH MODULATION
The next topic we’ll cover is using an oscillator to modulate another oscillator. There are many ways to do this – ring modulation and frequency modulation being two common methods. For today, however, we’ll focus on Pulse Width Modulation (PWM).
PWM is achieved using the ‘W’ input of the Pulse module. You can see on an oscilloscope how the waveform is affected by various values of W.
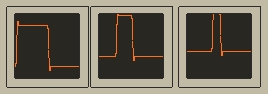
From left to right: W = 0 (squarewave), W = 0.5, and W = 0.75
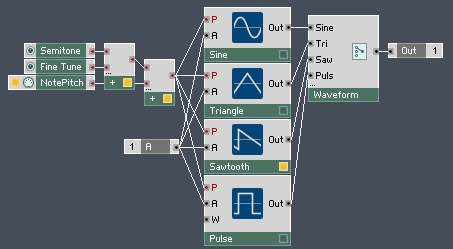
Let’s use the output of OSCILLATOR 1 to modulate the pulse width of OSCILLATOR 2. This requires only a quick edit job to OSCILLATOR 2:
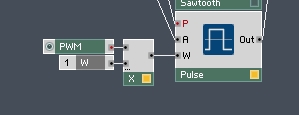
PWM is a knob ranging from 0 to 1. Connect the output of OSCILLATOR 1 into the new W input we just created.
Now, anytime OSCILLATOR 2 is set to use the pulse oscillator, you can use the PWM knob to control the depth of the modulation effect. If OSCILLATOR 2 is using any other oscillator type, the knob will do nothing.
ADDING ANOTHER ENVELOPE
I like to have the option to use a seperate envelope for each oscillator when programming sounds, so let’s add an extra envelope.
This is especially useful with the PWM capabilities we just added, as we can now use one oscillator solely to control PWM and the other to actually make the sound, so it makes sense for them to have seperate envelope controls.
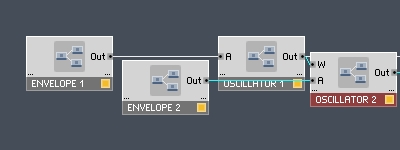
Duplicate the ENVELOPE macro and connect it to OSCILLATOR 2, replacing the connection from the first envelope.
Simple. Now, considering that each oscillator now has it’s own envelope controlling the amplitude, I think we can get rid of the Amp knobs in the OSCILLATOR macros. Simply run the A input of the macro into the A input of the oscillators and delete the knobs altogether:
Repeat this process for both oscillator macros.
You can still control the relative volumes of the oscillators using the Mix knob. However, there is no way to just turn a sound down now. Therefore, mixing the signals, I think it makes sense to add a volume control that functions as a master volume, like this:
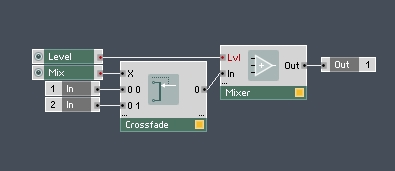
As usual, create the Level knob by right-clicking and selecting Create Control. You may notice that it creates a fader instead of a knob. You can change it to a knob, if you wish, in the VIEW tab of the properties.
Before, each oscillator had it’s own Amp control, then you could to mix them with the Mix knob. This is slightly convoluted compared to the newer method of mixing the two signals and then using a single knob to control the overall volume.
Basically, we replaced two knobs with one.
WRAPPING IT UP
If you had trouble following along or wanted to check something that was left unclear, I uploaded my work for this tutorial here. I’ve programmed a few new snapshots to show off the new capabilities of the synth.
Next time, I’ll introduce some event processing modules and use them to improve our existing macros. Also, we’ll look at a method to add tempo sync to the LFO (a very basic feature that I opted to leave out today for the sake of simplicity).
Thanks for reading, please feel free to ask any questions or provide feedback in the comments!
