
Reaktor Tutorials
Building Effects, Part III - Comb Filters
In this tutorial I’ll show how to build a comb filter in Reaktor. Comb filters can be used for a variety of effects, most commonly to create a sound similar to flanging or to remove unwanted standing waves. There are two types of comb filter: feedforward and feedback. We’ll create a version of each.
I will also use this tutorial as a starting point for discussing more complicated filters, which I will focus on in full in later tutorials.
FEEDFORWARD COMB FILTER
In general, designing filters is very complicated and involves quite a bit of math. In contrast, a simple comb filter can be designed very easily in Reaktor. In fact, we can get all of the information we need out of the Wikipedia page on the subject. While the page is full of advanced mathematics, all of the information we need to make a comb filter in Reaktor can be found in two simple diagrams:
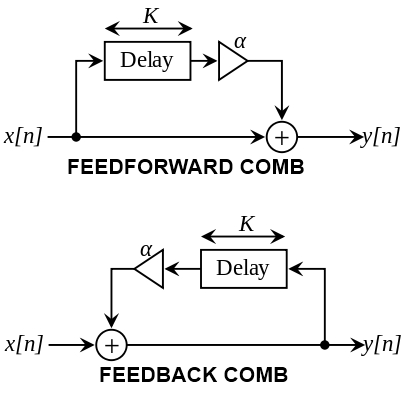
Let’s implement the feedforward structure first. In this diagram x[n] refers to the incoming audio signal, and y[n] is the output of the comb filter. The add symbol simply adds together the signals at it’s inputs, of course.
The little triangle with the α symbol next to it is a commonly used representation of an amplifier. In other words, we multiply the input of the triangle by the value, α. Finally, the Delay box simply outputs the value of x[n-K] – IE, it delays the signal x[n] by K samples.
Here’s how I implemented the feedforward comb filter in Reaktor:

It should be quite apparent from my above description how I ended up with this result. For the value of the Depth knob (filling in for the α variable in the diagram) I used a range from -1 to 1. The only thing that is not a direct translation of the diagram is the math around the Freq knob.
Instead of using a knob K that delays the input by a certain number of samples, I’ve opted for a more intuitve control scheme – specify the frequency rather than the number of samples to delay, then translate the frequency into milliseconds, which the delay line accepts as an input for the Dly input.
Translating frequency into time is easy. The reciprocal (1/x) of the frequency is the length of one period in seconds. For example, a sine wave with a frequency of 100 Hz repeats every 1/100 of a second. Obviously we can translate from seconds to milliseconds by multiplying by 1000.
The audio smoother module placed after this bit of math is there for fast sweeps of the Freq knob. Without the smoother, the filter will sound ‘crackly’ if the Freq knob is turned quickly. Using an audio or event smoother is a common tactic to avoid this type of effect.
This filter is referred to as a feedfoward comb filter because the input to the delay line is from the input, or the x[n] signal from the diagram. The delay line in a feedback filter would receive y[n] as an input (IE the output feeds back into the input, hence the name), as we will see below.
Feedforward filters are also referred to as Finite Impulse Response, or FIR filters. Feedback filters are referred to as Infinite Impulse Response, or IIR filters. The comb filters in this tutorial are special cases of FIR and IIR filters. I will talk about these concepts more in the next tutorial.
FEEDBACK COMB FILTER
Well, after completing the feedforward filter, implementing the feedback is a piece of cake, As you can see from the diagrams from the Wiki page, they have the same elements, just rearranged. I simply duplicated the first filter and edited it like so:

I left the add module highlighted so you can more easily see how everything connects. As you can see, the output of the filter (IE, the result of the add module) also feeds back into the delay module.
The other thing I changed was limiting the value of the Depth knob from -0.5 to 0.5.
CONCLUSION
Testing whether a filter is working as desired can be tricky without the right tools. I made a slight modification to the EzFFT Analyzer ensemble (a part of the EzFFT package released by Native Instruments), named EzFFT Filter Analyzer.
The Filter Analyzer creates a waveform that is flat across the frequency spectrum, then runs that waveform through a filter supplied by the user. The frequency response of the filter is then displayed on the panel, like this:

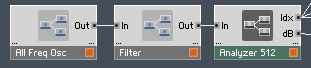
To use EzFFT Filter Analyzer to check the frequency response of any Reaktor filter, simply place that filter in between the All Freq Osc macro and the Analyzer 512 macro like so:
You can download EzFFT Filter Analyzer here, with the two comb filters from today’s tutorial included. For the purpose of using the filters with the analyzer, I marked them as mono, but if you want you can set them to polyphonic as well, they’ll still work just fine.
In the next tutorial I’ll talk more about FIR and IIR filters, and how to use the FIR and IIR structures to make more traditional filter types such as a low pass.
I hope you found this tutorial to be useful, please leave and questions or suggestions in the comments below. Thanks for reading!
