Reaktor Tutorials
Building an Envelope in Reaktor Core, Part I
In this tutorial series, I’ll focus on building an envelope in Reaktor Core. Readers of this series should have a decent understanding of the Core environment. You can read this series of tutorials to get yourself up to speed if necessary.
ENVELOPE FUNDAMENTALS
To begin with, let’s take some time to talk about what an envelope is and how it works. Obviously this is the first step to building just about anything from scratch in Reaktor. In this tutorial we’ll be focusing entirely upon a standard ADSR envelope design. This section will probably be incredibly boring if you have a strong knowledge of envelope architecture!
While envelopes can be used for several purposes, such as modulating the cutoff frequency of a filter, they are most commonly used to control the amplitude of another signal, generally audio oscillators.
The first phase of an envelope, called the Attack phase, is triggered by the start of a new MIDI note. The amplitude of the envelope at the beginning of a new Attack stage should simply be the last value output by the envelope. This may seem counter-intuitive, as generally the Attack stage is thought to start from an amplitude of zero and rise to the maximum amplitude, which is controlled by the MIDI gate.
However, there is the possibility that a new MIDI gate arrives before the previous envelope is finished with it’s Release stage. In this instance, restarting from zero will create a ‘click’, which sounds distinctly like a digital glitch (and not a good one), as the envelope jumps from it’s previous value directly to zero. So, we re-start the envelope from it’s most recently sent output, which should usually be zero anyway.
The Decay stage simply decreases from the maximum amplitude to the amplitude chosen by the Sustain knob. Since the Decay stage only begins at the end of the Attack stage, it is quite simple to implement.
Not as simple as the Sustain phase, however, at which point the envelope simply outputs the value given by the Sustain knob.
Finally, we have the Release section, which is sort of an inverse of the Attack phase. The Release section is triggered by the release of a MIDI note. It travels from the most recently output value (often the Sustain value) back to an amplitude of zero. While the Release is usually thought of as starting from the Sustain value, it is quite possible that the MIDI note is released before the envelope reaches that stage, so we can simply use the last value output from the envelope as the start of the Release stage.
The last thing I want to cover in this section is the four knobs that the user uses to interface with an envelope – Attack, Decay, Sustain, and Release. The Attack, Decay and Release values control the length of each section in time (we’ll be using milliseconds). The Sustain knob, meanwhile, is an amplitude value.
CORE IMPLEMENTATION
We should be able to implement all 4 envelope stages using a single time counter, as outlined in Part III of the Introduction to Reaktor Core series:
This counter counts the number of ticks of the sample rate clock. I have modified from the previous version to deal with integers only. This is not strictly necessary, but it is slightly faster.
This counter restarts from zero at every incoming event to the ‘Reset’ input. When we connect the incoming MIDI gate to the Reset input, the counter will restart every time a new MIDI note is pressed, and every time those notes are released.
We can then use the state of the gate input in conjunction with the output of the counter to decide where to route the counter value. For example, if the gate is on, we know that the value needs to be routed to either the Attack, Decay, or Sustain stages. If the gate is off, we know it can go directly to the Release stage:
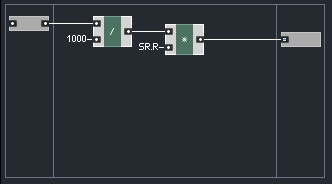
Next, we’ll take the Attack and Decay times, and calculate their length in samples. For example, if the Attack is 100 milliseconds long (1/10th of a second) and the sample rate is 44100, there are a total of 4410 samples in 100 ms (1/10 * 44100):
I rounded the output to the nearest integer value, this way each stage takes a certain number of sample ticks, with no annoying fractional values, such as an attack time taking 101.45 samples.
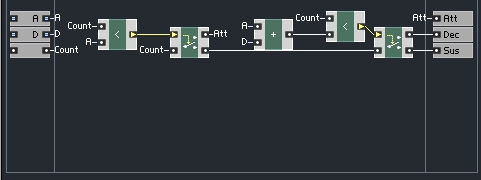
If the gate is on, we can use these value to determine which stage is currently active. If the counter is less than the number of samples in the Attack stage, then the Attack stage is active. If not, we check if the counter is less than the Attack stage length + the Decay stage length.
Using this information, we can choose which output to send the counter value to:
The counter value will be used as a clock for whichever macro receives it. In the next tutorial, we’ll design the envelope stages so that they only output a value if one is received to the clock input. Then we can simply merge together the outputs of the stages and we’ll have a functioning ADSR envelope.
CONCLUSION
It may feel as though we’ve accomplished very little, for the length of this tutorial, especially given that the counter was mostly done in the Introduction to Reaktor series. However, we have accomplished much in that we have outlined the problem and have a large view of how to solve it.
The reality is, we’re quite close to being done! Join us next time, where we’ll get into designing a function that can be used for the Attack, Decay and Release sections. Thanks for reading!
Have a Question or Comment About This Tutorial?
Want to ask a question about this tutorial or perhaps you have something to add?
Click through to our forum post about this tutorial and join the conversation!


 YOUTUBE