
Reaktor Tutorials
Adaptation in Reaktor
This tutorial series will focus on the adaptation of work found in other formats, such as C++, signal flow charts, and Max/Msp. I’ll explain the basics of each format and how we can easily translate them in Reaktor. Today, we’ll start with signal flow charts and C++.
There is a boundless wealth of free DSP code on the internet, waiting to be implemented.
C++
Translating from C++ to Reaktor can be tricky, especially for things that Reaktor doesn’t handle well, like nested loops. The easiest C++ code to work with is short, self-contained functions, which we can translate into simple Reaktor macros.
Here is a website with some basic interpolation types implemented in C, such as the following:
double LinearInterpolate(
double y1,double y2,
double mu)
{
return(y1*(1-mu)+y2*mu);
}
If you’ve never used a text-based coding language before, the syntax of languages like C++ can be intimidating. On the plus side, once you learn the syntax of one language, most of the popular computer languages share many traits in common.
The above code creates a function called LinearInterpolate, that receives 3 values: y1, y2, and mu. The top 3 lines of code give this information, in the function header.
The word ‘double’, which can be found several times in the header, gives the data type for the value. Even the function itself has a value, which it will return to the code that calls it. In C++, the most commonly used types are float, double, and int. When you see one of these words, it means that there is a value of that type to keep track of.
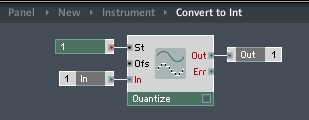
In Reaktor Primary, we generally only have access to floats. The good news is that doubles are very similar to floats, only with twice the precision, hence the name. Often the extra precision simply does not matter that much, this case being a good example. Integers can easily be approximated as well, simply by using the quantize module to round to the nearest whole number, like so:
For the purpose of this tutorial, though, using Core makes much more sense – it is designed to work much more like a typical programming language than primary, and has access to floats, doubles and integers – simply use a 32 bit value for a float and 64 bit value for a double.
In between the braces ({ and }) is the body of the function, which says that the function will return a value equal to (y1*(1-mu)+y2*mu).
In C++, after creating such a function, you can call it from other pieces of code. You might say something like
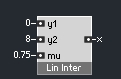
x = LinearInterpolate (0, 8, 0.75);
This will set the value of x to 6.
In Reaktor, you would instead create a macro like this:
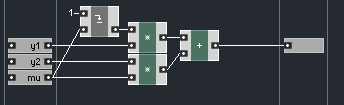
Now all that is left is to implement the equation. Many people get intimidated by math such as this, but it’s really very simple – just addition, subtraction and multiplication.
However, it is important to keep in mind the order of operations when working with code – if you don’t know how that works, the wiki article is quite instructive.
So, we must make sure to calculate (1-mu) first, the multiplications next, and finally add the two products together.
Let’s take a look at the insides of the macro:
For more on this interpolation and how to use this macro effectively, check out this tutorial. There are solutions to the cosine and cubic interpolators there as well, if you’d like to check out some more examples. Nothing too complicated.
SIGNAL FLOW CHARTS
Signal flow charts are perhaps the easiest thing to translate into Reaktor, since the design is very similar and the most common elements are simple Reaktor modules. Here’s a typical flow chart describing a DC Trap, which is used to remove DC Bias from a signal:
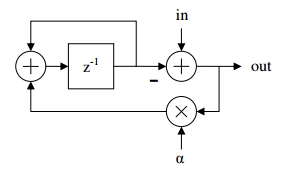
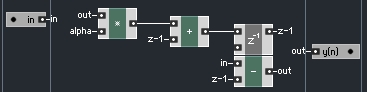
This example has only 4 elements, each of which can easily be modelled in Core – add, subtract, multiply, and z^-1. It should be clear what the first three do, and if you are unfamilliar with the z^-1 macro, you can find it in the Expert Macro -> Memory menu.
z^-1 is a common element of DSP that simply delay a signal by a single sampling period. They are ubiquitous in filter design, and as it turns out, the DC Trap is a special type of filter, designed to remove elements of the signal at 0 Hz, which is what DC Bias is.
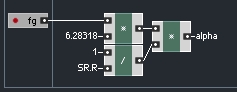
Other than these four elements, there is an input, an output, and a variable, α. From the text, we find that α is equal to
![]()
Where fs is the sampling frequency, and fg is a variable that determines the speed of the DC trap, with 5 given as a good default.
We can calculate α easily:
From there, implementing the flow chart from above is easy – we have all of the elements we need at our disposal:
There is a world of filter and oscillator designs available in the text using similar flow charts. If there are questions on how to implement any of them, please just ask in the comments!
CONCLUSION
The most important thing when translating work into Reaktor is to not be intimidated by large equations – simply recognize that they can be broken down into smaller elements and implemented quite easily most of the time. WolframAlpha.com is a good source for help with algebra if you need it.
You can download a copy of the DC Trap here.
The interpolators are available from the interpolation tutorial.
