
FM8 Tutorials
Quick and Easy FM8 Dubstep Wobble Bass (FM8 Preset Included)
How to create an FM8 dubstep wobble bass with native instruments FM8.
Today we’ll be making this sound
[audio:https://www.fm8tutorials.com/wp-content/uploads/2012/02/FM8-Easy-Dubstep-Wobble-Sample-Track.mp3|titles=FM8-Dubstep-wobble]First, load up a new sound in FM8 if you haven’t already (Click ‘File’ –> ‘New Sound’).
Then, go to your Master section and make sure to turn on ‘Mono’ under Polyphony. Set the number of voices to 1.

On the Navigator under ‘Expert’ click ‘Ops.’ You will see your six operators (A-F), a noise generator (X), and a filter (Z).
Operator ‘F’ will be already on as a sine wave, outputting to the master at a level of 80. Sine waves are the most basic element of all sound and are not very aggressive, although traditional FM synthesis only uses sine waves. Along with a basic sine wave, FM8 has 31 other types of waveforms to choose from. This is an amazing part of the synthesizer’s power.
Change this sine wave to a more interesting waveform. For this tutorial I used “1+3+5 Square.”
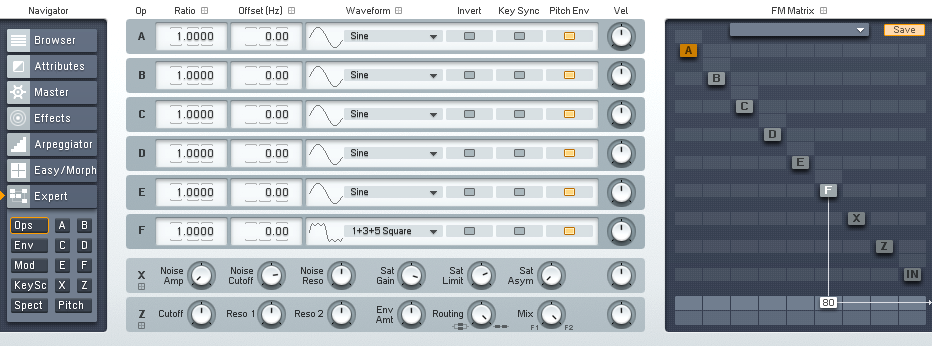
Change Operator 'F' to "1+3+5 Square"
The wave doesn’t sound too aggressive when we load it up, but when we incorporate feedback it comes to life. Click and hold your mouse in the square above operator ‘F’ in the FM matrix, then drag the feedback level up to somewhere around 35-40. Using feedback is a staple of FM synthesis that is amazing for creating more interesting and aggressive sounds. Check out the Spectrum Display on the Application Control Bar for a visual representation of what is happening to the sound as we change it.
Feedback Operator 'F' to a level of 35-40. Notice how the Spectrum Display changes
Ok. First operator done.
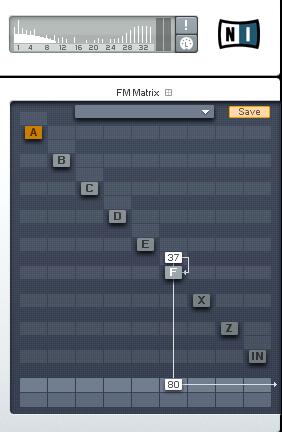
Next, right-click on operator ‘E’ in the FM Matrix to turn it on (right-clicking in the FM Matrix turns A-F, X, Z, and IN on or off). Again, it will have a sine waveform as a default, which is…BORING! Let’s change that to a more interesting wave. For this tutorial I used “2nd formant.” I’m a big fan of the formant waves as they can induce some really nice high-end harmonics.
Set the ratio of this wave to 2.0000, which will make it an octave higher (the next octave up would be 4.0000, then 8.0000 etc.). Instead of routing this operator to the output of the FM Matrix, we’re going to use it to modulate operator ‘F.’ In FM synthesis terms, operator E would be the ‘modulating waveform’ and F would be the ‘carrier waveform.’ In the square under operator ‘E’ and to the left of ‘F,’ drag the level up to a little over 50. This is when you can hear the patch getting more aggressive.
Modulate Operator 'F' with Operator 'E'
Ok, one more operator to go.
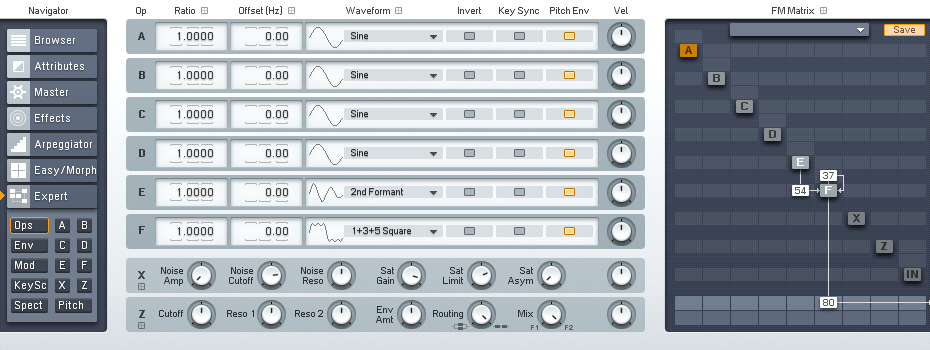
This one is simple. Right-click on operator ‘D’ in the FM Matrix to turn it on. Change it to ‘TX Wave 5’ and set the ratio to 2.0000. Feed it back around a level of 20 and route it to the master output at a level of 80. This gives the sound a little more tone.
Operator 'D' gives the patch more tone
Ok, so the operators are done and now we have to get the wobble or “wub-wub” effect. This is done using the LFO and Modulation Matrix Window.
Click on the ‘Mod’ button under ‘Expert’ in the Navigator to see the Modulation Matrix. We are going to use LFO 1 to modulate Operators D, E, and F. Much like we did in the FM Matrix, click the squares below LFO 1 and to the left of D, E, and F and drag the modulation level all the way up to 100.
Make sure that under LFO 1 the ‘Delay,’ ‘Key Scale,’ and ‘Vel Scale’ are all at 0. This is to ensure the LFO is the same speed for every note and velocity value.
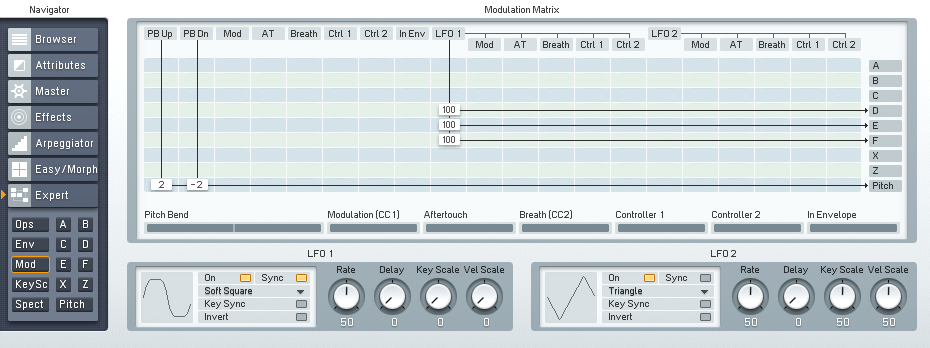
This is what your Modulation Matrix should look like for this patch
Adjust the rate of the LFO to taste. Clicking the ‘sync’ button will sync the LFO time to match your session’s BPM. Change the default ‘triangle’ LFO wave to a ‘sine’ or ‘soft square’ for a smoother wobble. I prefer the ‘soft square.’ For a standard sound, make sure that LFO 1 is not inverted. FM8 has the LFO inverted as a default, so change this by clicking ‘Invert’ twice. Feel free to experiment with the ‘Invert’ button on the LFO.
So there we have it – a quick and easy dubstep wobble bass made with FM8. Experiment with different waveforms and try out some of FM8’s effects to beef up your sound. The timbre part of the Easy/Morph section can also provide some cool changes to your patch.
Also, you can try assigning the speed of LFO 1 to a MIDI controller to alter the speed of the wobble while you play. I like to use my MIDI keyboard’s modulation wheel. This is done in 3 steps:
- Click ‘MIDI learn’ on the Application Control Bar (located underneath the ‘Panic’ button)
- Click the ‘Rate’ button on LFO 1 in the ‘Mod’ window
- Move your MIDI controller knob/switch.
Done!
Listen to the Sound here:
[audio:https://www.fm8tutorials.com/wp-content/uploads/2012/02/FM8-Easy-Dubstep-Wobble-Sample-Track.mp3|titles=FM8-Dubstep-wobble]