
FM8 Tutorials
Making A Solid Kick Drum With FM8
A kick is usually composed out of two different components, the main body and a noisy, clicky attack part, which pronounces and defines a whole kick sound and is equally important as the boom of the kick.
First we need to create the main body of our kick.
This will be a simple sine sweep from a very high frequency to a low, fundamental one, which usually sits somewhere between 35-60Hz, depending on the genre.
There is some complex mathematics involved with FM synthesis and calculating the resulting pitch of a sound is quite a complex task. To remind you, pitch in FM synthesis is the the sum of all interactions between our operators and we won’t go into this.
Instead we will use spectrogram to determine our kick’s fundamental frequency.
I will be using the Voxengo SPAN audio spectrum analyzer plug-in for this which is an excellent tool and the best of all – its free!
You can download it here.
First, enable F operator. Set its audio output to 100.
Play a few notes on the lowest key on your FM8 internal keyboard. Trough out this tutorial we will always monitor our kick sound on this specific note. We will adjust the fundamental frequency of our kick later on.
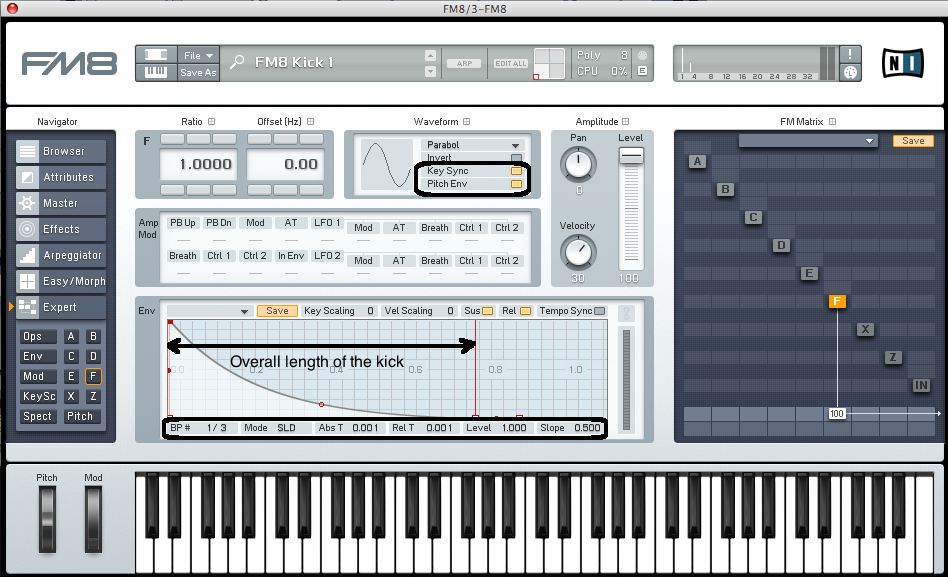
Set operators waveform to parabol which is very similar to sine wave but works a bit better in this case.
Turn on Key Sync button. This will ensure that our oscillator waveform will always start from the same position when note is triggered.
Also turn on Pitch Env button below.
Adjust the envelope to the desired overall length of your kick or you can copy mine settings for now and adjust them to your liking later. This will act as our main volume envelope of the kick.
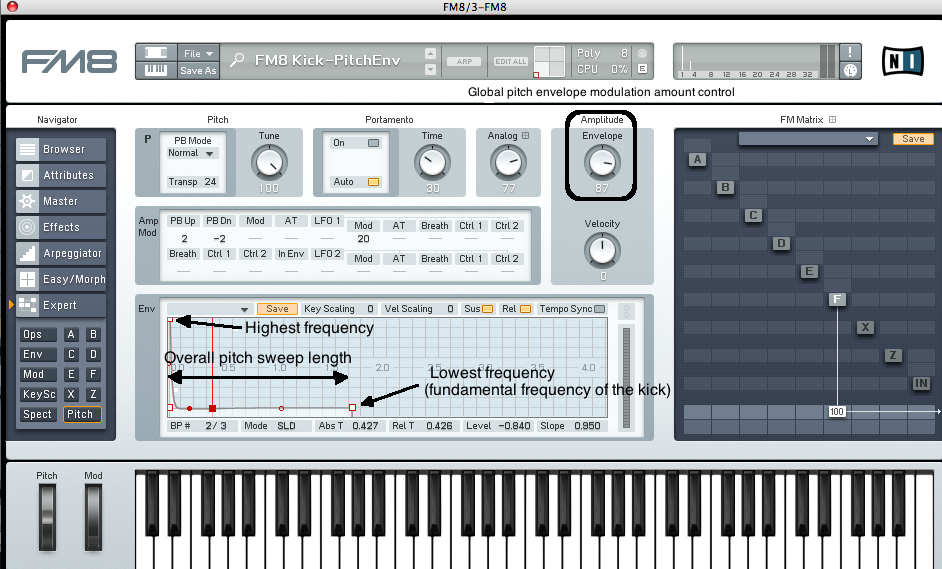
Go to the pitch section of the synth. Here you see the envelope, which affects the pitch of our operators.
You can choose which operator will be affected with pitch envelope button found in operator page (underlined in picture above).
In default state all pitch envelope buttons are turned on.
Also this envelope is somehow special and differs from all other one found in the FM8 synth because it is bipolar.
It can sweep from positive to negative values. The amount with which is affecting the operators is set with this global pitch envelope modulation amount control (see in the picture below).
So the highest positive peak of the envelope will represent the highest frequency in our kick and the lowest (negative) point represent our fundamental kick’s frequency.
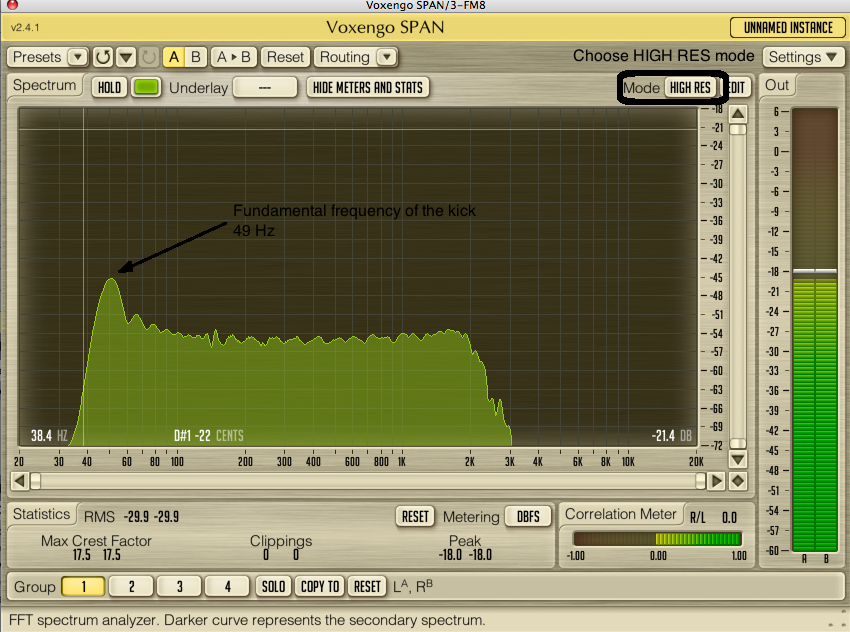
Now insert Voxengo spectrogram on your audio track and set it to high res mode so we will be able to clearly see the loudest frequency peak which represents the fundamental frequency of the kick.
Now raise the global pitch envelope modulation amount control and adjust it to the desired fundamental frequency of the kick.
I’ve chosen it to be somewhere around 49 hz (frequency of the G1 note).
Remember, we are still using the lowest note on FM8 internal keyboard to monitor our kick sound.
Ok, so far, this is what we have:
[audio:https://www.fm8tutorials.com/wp-content/uploads/2012/02/Kick1.mp3|titles=Kick start]Now we need to work on the clicky portion of our kick.
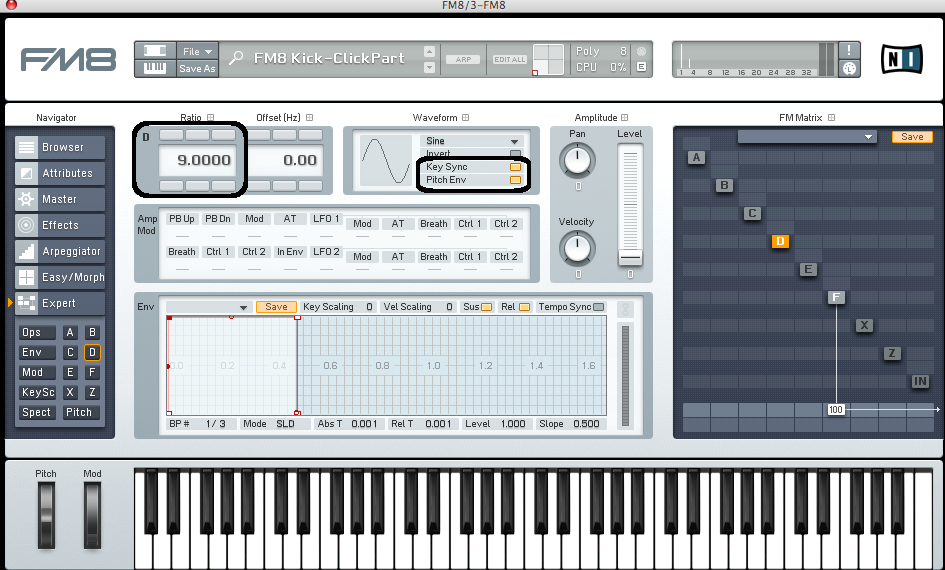
Enable the D operator. We need it to be very high in pitch so set the ratio to 9.
We will use it as a modulator for operator E.
Also turn on Key Sync and Pitch Env buttons as we did before.
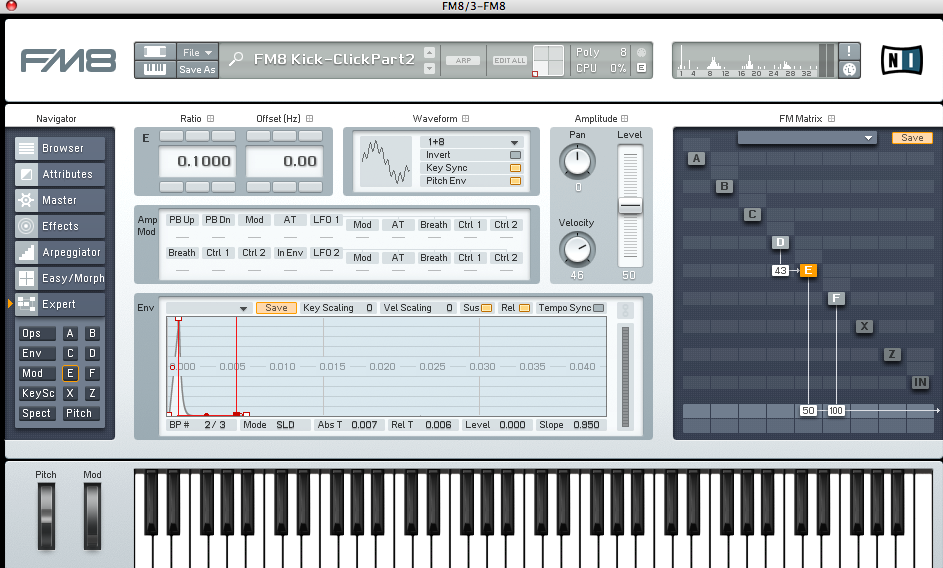
Enable operator E.
Set its envelope to a smallest possible attack and set slope to 0.950 (the envelope in the picture is zoomed to its fullest possible amount), ratio of operator to 0.1000.
Change the waveform of an operator E to 1+8.
Turn on Key Sync and Pitch Env buttons.
Set the audio output of the operator E to 50 for a start.
Set D to E modulation amount to 43.
By now we should also hear the click part of our kick, like so:
[audio:https://www.fm8tutorials.com/wp-content/uploads/2012/02/Kick2.mp3|titles=Kick click]From here on, it all depends on your personal preferences.
In techno and similar genres kicks are usually more thumpy with shorter overall pitch sweep time and the frequency sweep starts in much lower frequency than in trance for instance. As for psy trance genre the frequency sweep usually starts from a much higher frequency.
We can control that by adjusting the highest peak of our pitch envelope.
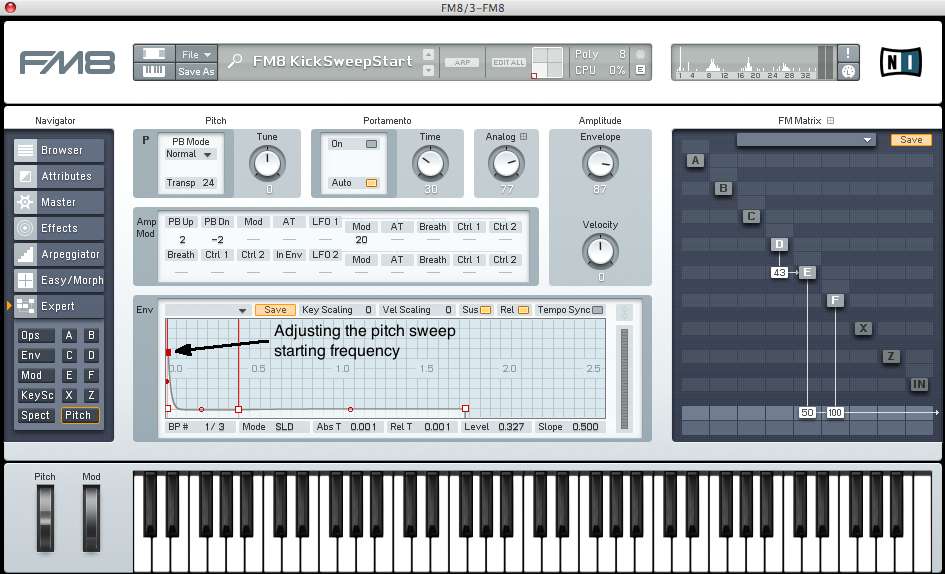
Here are few version of the same kick with different pitch sweep starting frequency and different overall length of a pitch sweep:
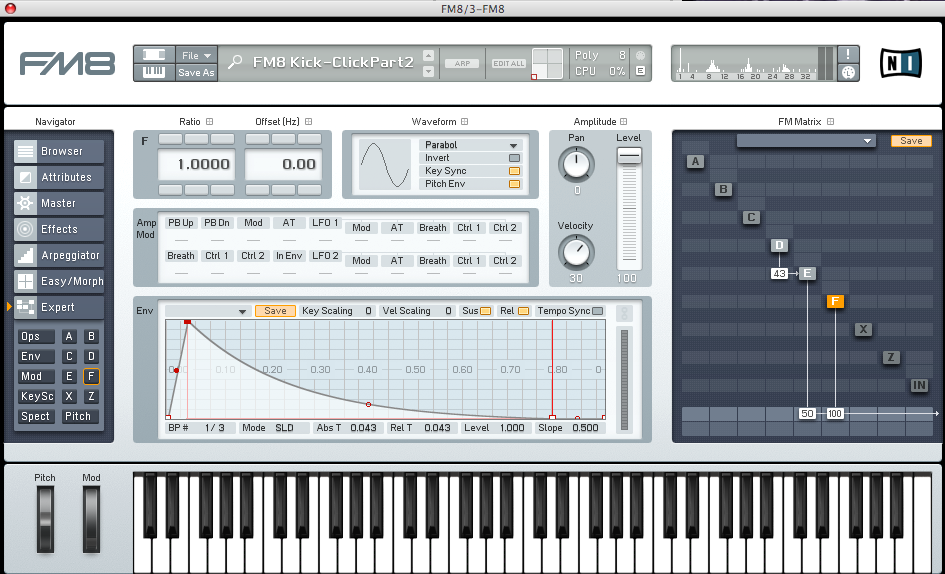
[audio:https://www.fm8tutorials.com/wp-content/uploads/2012/02/Kick3VARIOUS.mp3|titles=Kick pitch sweep variations]The same goes for our amplitude envelope of the kick which is represented by operator F amplitude envelope.
So in techno one would normally require a bit softer attack (see the picture below) while in trance and especially in psy trance the attack would be much more aggressive.
You can adjust that by changing the attack of the amplitude envelope in the operator F.
Here is how that sounds
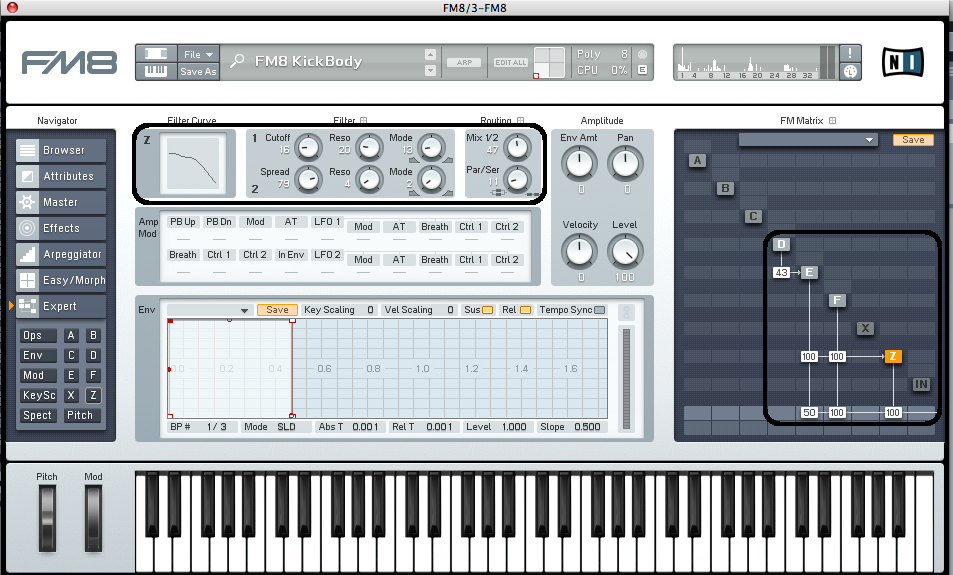
[audio:https://www.fm8tutorials.com/wp-content/uploads/2012/02/Kick4VARIOUS.mp3|titles=Kick envelope attack variations]The next optional trick we should look at is to route both of our carriers, operators E and F to the Z (filter) module of FM8 synth.
Adjust the filter to low-pass and set it like in the picture below.
Set audio output of the Z module to full its fullest value.
You can clearly hear how the body of the kick is now more pronounced which makes our kick much more heavier and defined.
Here are few versions of the same kick, again, only pitch sweep starting frequency, overall pitch sweep length and amplitude attack are different:
[audio:https://www.fm8tutorials.com/wp-content/uploads/2012/02/Kick5-Body-VARIOUS.mp3|titles=Kick body variations ]Sometimes we want to have a very strong snap in our kick so it cuts trough the mix. This can be achieved by injecting even more noise in the attack portion of our kick.
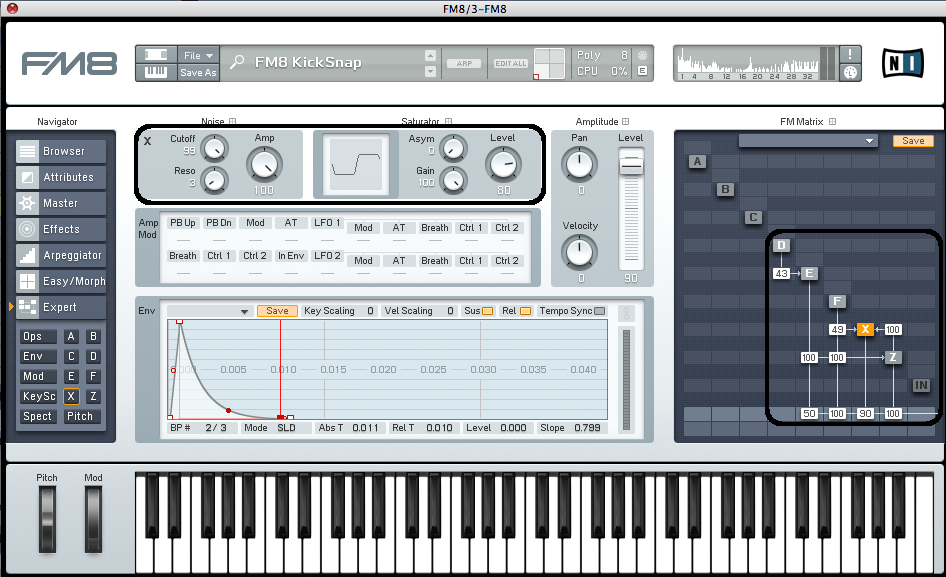
Enable noise module X. Set its envelope like in the picture below (the envelope is zoomed to its fullest possible amount).
Set Cutoff of the noise section of the module to its full value, Reso to 3, Amp to 100.
Next, set the saturator Gain to 100, Asym to 0, Level to 80.
Set audio output of the X module to 90.
Now route the output of the Z module to the X module to its fullest amount.
Also route the F output to X module with the value of 49.
You can hear a loud snap in the beginning of the kick.
If you lower the decay value of the X module envelope, there is a strong click which adds bite to it and if you raise it it sounds almost like kick and snare combo.
If you raise it even more your kick gets dirtier almost distorted like. Play with envelope settings to get the desired snap.
Here are again few versions of the same kick.
The same parameters as above are changed and also the X module envelopes settings are different resulting in a different snap character.
[audio:https://www.fm8tutorials.com/wp-content/uploads/2012/02/Kick6-SNAP-VARIOUS.mp3|titles=Kick snap variations]I hope you enjoyed this tutorial – please leave a comment!
