
FM8 Tutorials
Creating FM8 Dubstep Leads Part 2 - Weird & Nasty!
Since dubstep leads are highly dependable on your creative vision and personal preferences I won’t be doing another step by step tutorial but I will rather show you a way how to experiment inside FM8 to get some really weird and nasty sounding leads.
This is a second part of the FM8 dubstep lead tutorial.
Part 1 of the FM8 dubstep lead tutorial can be found here
So everyone will get a bit different sounding result and I will post the samples just as a guidelines and not as a final target sounds.
Here is an example made with this technique.
No external effects, distortion, re-sampling or automation were used. Only x and y parameters of the morph square were changed on the fly.
I have also used duplicated midi track with an one octave higher sine wave for the bass.
[audio:https://www.fm8tutorials.com/wp-content/uploads/2012/02/Audio-Sample-Introduction.mp3]Ok, so let’s get to work.
In our first tutorial we have created a standard FM8 dubstep lead sound, nothing groundbreaking really but it will act as a good foundation for our further tweaking.
At this point I strongly recommend you go through the first tutorial (which can be found here) and even more importantly that you know your way around the FM8 synth and understand the main principle behind frequency modulation synthesis or else this tutorial will probably get a bit overwhelming for you.
Download the FM8 Lead sound here
We will use this patch as a starting point.
Make a simple dubstep lead sequence in your midi track. Also I recommend you have some simple drum sequence going along with it.
LFOs are fun
Here are some general tips on LFO tweaking.
Go to the modulation page of the synth.
Here you can see our two modulation sources (LFO1 and LFO2) assigned to control operator D and E amplitudes.
With mod wheel you control the amount of the LFO1 and with ctrl1 you control the amount of LFO2.
In the modulation bar below raise the modulation amounts for both of our modulation sources and listen to it’s effects on sound.
Don’t forget you can apply velocity and key scaling to both of our LFOs to control the rate.
This is a very useful trick.
You can get some really cool dynamic variations with carefully applying these two controls.
Also there is a Delay parameter which is great for delaying the whole LFO effect which gets more pronounced at longer notes.You can tweak it on the fly (via midi controller) while you play your sequence.
Play with these settings, LFO rates, key and velocity tracking parameters…
Effects
Re-open the patch you have downloaded.
Go to the effects section and disable Overdrive and Tube amp effects.
We will do this in order to more clearly hear the timbrel characteristics of our sound.
But have in mind trough out this tutorial there is no distortion applied to our sound which is very important in dubstep leads resulting be a bit weaker and thinner sound.
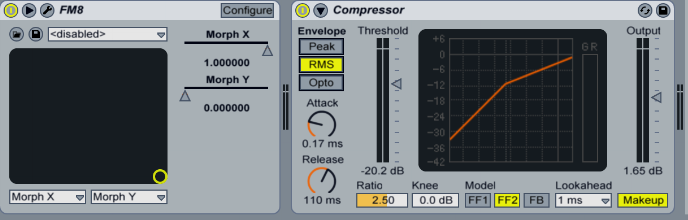
Also you should use compressor to limit the peaks of the sound. We will be drastically changing the timbre of our sounds which will cause volume peaks and drops.
As a guiding point here are compressor settings I have used in Ableton:
The Real Deal
Now to the real work.
Go to the Easy/Morph section of the FM8.
This section of the synth is some kind of a global parameter page
By changing this various parameters on this page you are changing you pre-existed group settings of parameters inside a patch.
So for instance if you are changing the timbrel envelope you are changing a group of all operators envelopes in your patch.
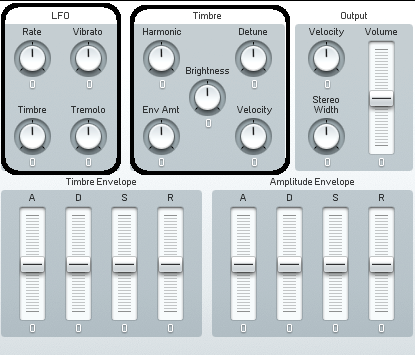
Timbre Controls:
Harmonic
Changes the harmonic content (by adjusting the Operator Ratios). Depending on the patch, the changed harmonics may be somewhat atonal.
Detune
Changes the pitch slightly of different oscillators in a multi-oscillator preset, which creates a fatter sound.
Brightness
Increases the sound’s high frequency content by increasing the connection amounts in the FM-Matrix.
Envelope Amount
Sets how much the timbre envelope influences the sound.
Velocity Sensitivity
Determines the extent to which changes in timbre correlate to the dynamics of your playing.
LFO parameters:
Rate
Changes the LFO1 and LFO2 speed. Positive values increase the speed, negative values decrease it.
Vibrato
Alters how much the LFO1 modulates pitch. Positive values increase the amount of pitch modulation, negative values reduce it.
Timbre
Determines how much the LFO2 modulates the frequency response. In an analogue synth, this is equivalent to altering the amount of filter modulation from an LFO2. Positive values increase the amount of timbre modulation, negative values reduce it.
Tremolo
Sets the extent to which the LFO2 modulates amplitude of operator F. Positive values increase the amount of amplitude modulation, negative values decrease it.
For further information on an easy morph page please refer to FM8 user manual (pages 66-69).
Mutating the patch
We will use this Easy Morph page as a mutator for the patch you have downloaded.
Again, the resulting sound will be highly dependable on even the smallest tweak you make in the Easy/Morph page, so don’t be surprised if you end with something completely different from my audio examples.
That is the beauty of this technique actually.
Working with Easy/Morph page
Working with Easy/Morph page is really intuitive so I don’t have any specific technique to share with you.
Start with Brightness parameter, Harmonic and Detune.
A rule of thumb would be, that you apply these changes in a moderate way and carefully listen what it does to the sound.
Avoid really extreme changes for now.
You’ll hear when you will stumble on something that will attract your attention and when you do, stay with those settings and try to pronounce it with careful tweaking the other Easy/Morph parameters.
So again, any changes you make will affect a whole group of parameters of your synth patch.
After you have made few tweaks you are satisfied with you can apply this changes to your patch.
When you do this you apply all the new modulation amounts, oscillator ratios, envelope values to your patch and all the parameters of Easy/Morph page will reset to its default values:
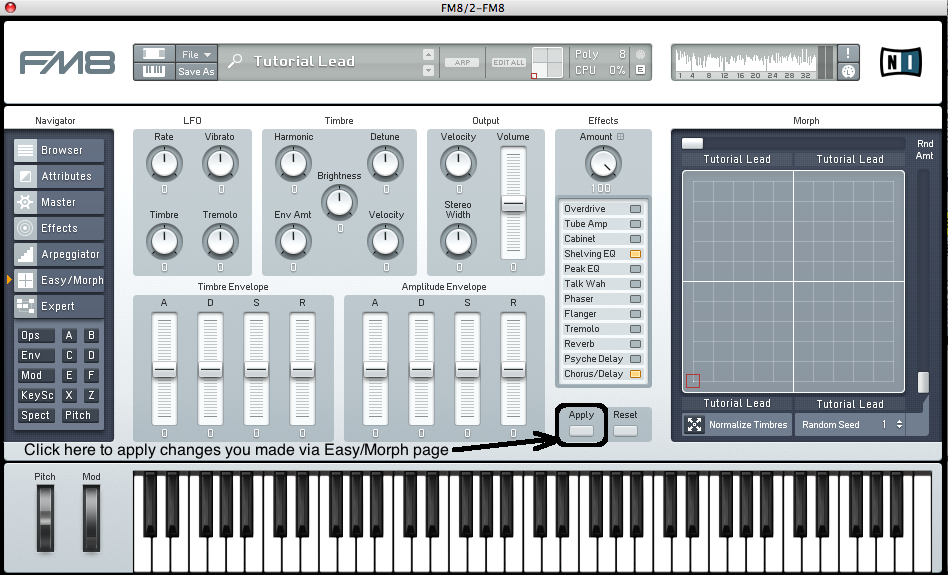
You will end with similar or even completely different version of your starting patch.
Also note that these changes made in Easy/Morph page apply to all parameters of FM8 synth globally so in case you have few different version set in FM8 morph squre, the changes you have made in Easy/Morph section will be applied to all four of them resulting in some unpredictable timbres.
In the patch we are using there are already all four morph corners activated so move trough them to see how you have changed them.
Unless you are really lucky there are some nasty frequencies in at least one of the morph square corner you haven’t monitored when you were changing the Easy/Morph page parameters.
Don’t worry that is normal. In order to get rid of them you must first identify the problematic section in operator modulation matrix and lower modulation amount of that problematic operator.
Which one depends on your tweaks you made so you should go trough each of them and first try lowering modulation amount by little and listen which one is causing you problems.
This way you make further changes to your patch and you will stumble in many sound nuances and variations which you can use.
Also, if your sound gets to high or too low in pitch identify the problematic operator ratio setting and adjust it to you liking.
You can also compensate that by lowering the audio outs of problematic operators and this way you can end with some cool screaming high pitched tones.
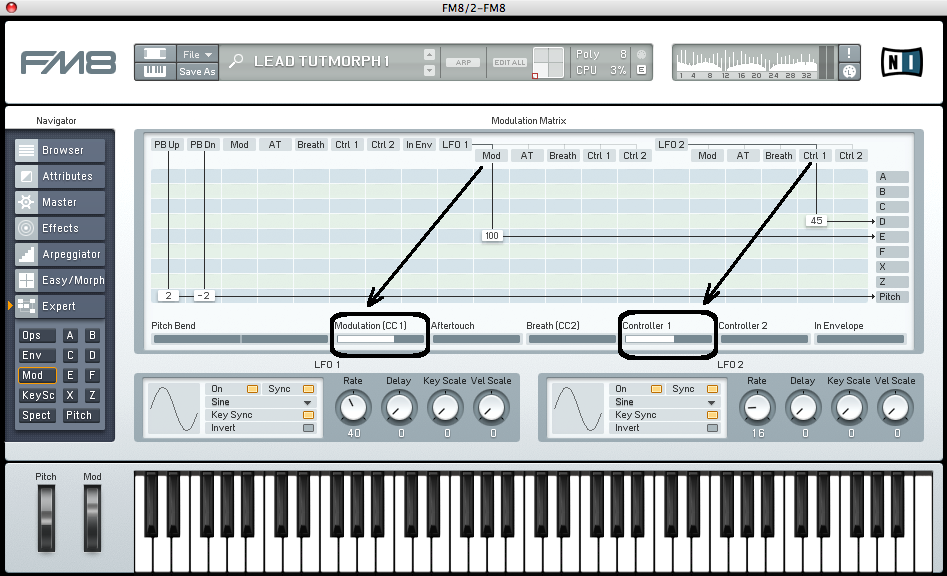
Modulation matrix
In this picture you can see the the effects of Easy/Morph LFO section parameters tweaks on your modulation matrix.
Yours will be a bit different of course:
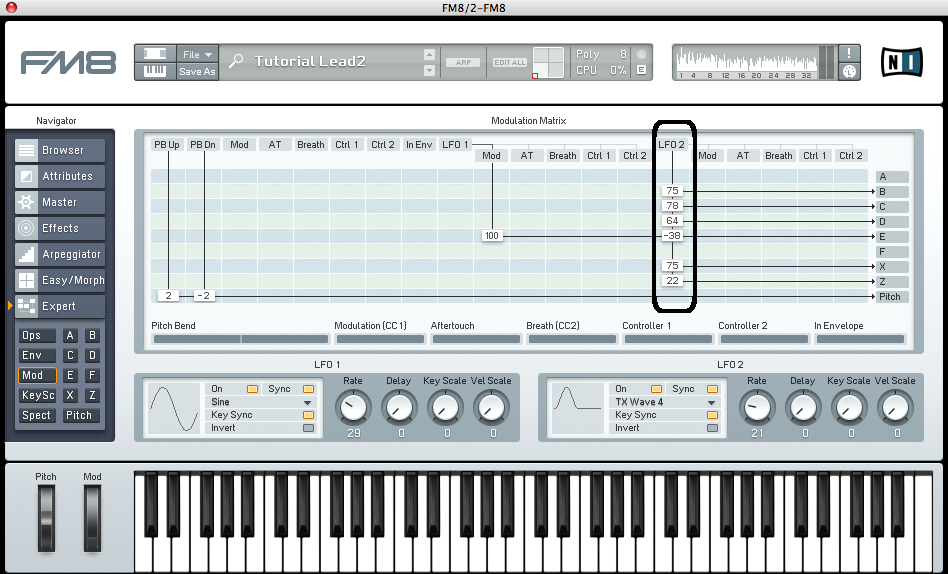
I’ve started from the same patch you did and after applying these tweaks to Easy/Morph LFO section you can see that the situation in our mod page is quite different from what we have started with.
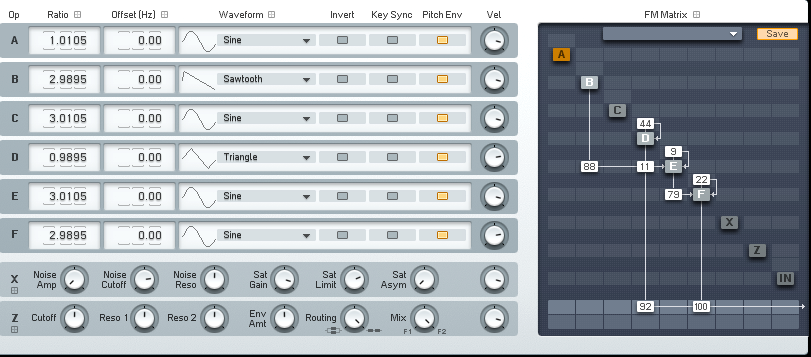
In the original patch there were only two modulation destinations activated as we saw in the beginning of this tutorial.
The tweaking of the Timbre parameter in the Easy/Morph section linked LFO2 to all the possible modulation destinations except to operator F which is usually used as a main carrier of the patch.
This is avoided since we normally don’t want to modulate the amplitude of the main carrier since this results in tremolo.
You have separate Tremolo control in the Easy/Morph section, which controls the amplitude modulation of the F operator exclusively.
I suggest you always use the F operator as a main carrier in any of your patches because of this reason.
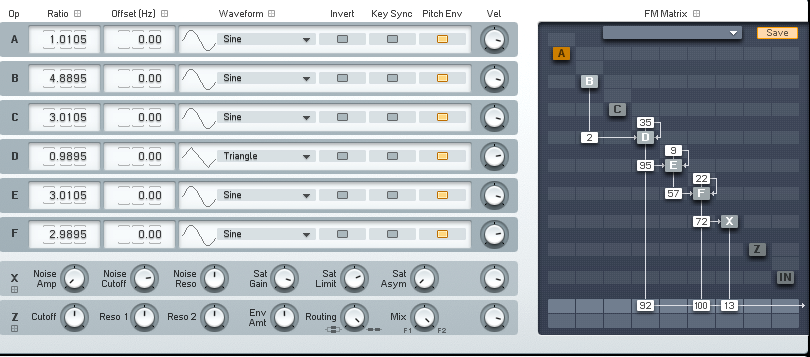
All the other operators and even filter and wave-shaping modules X and Y are affected by this new modulation amounts even if they are not activated in the original patch we have used.
You are probably thinking this is not necessary since there is no sound coming out of them but its actually a good thing.
You can now adjust the operator modulation amounts for each morph corner manually, you can activate and route other operators which were turned off until now to various destinations in you operator matrix.
Further manual tweaking
All of the operators now have unique ratio, envelope settings resulting from our tweaks in the Easy/Morph page.
Now you can apply further, manual changes to the LFO amount settings in the mod page, you can change the routing inside operator matrix, operator modulation amounts, ratios LFO’s and operator’s waveforms, rate, velocity and keyboard controls… There are no specific rules really just listen to what sounds good.
Again If you stumble upon something you really like, normalize timbres in you morph square and repeat the procedure by changing the mentioned parameters manually or even repeating the Easy/Morph procedure again.
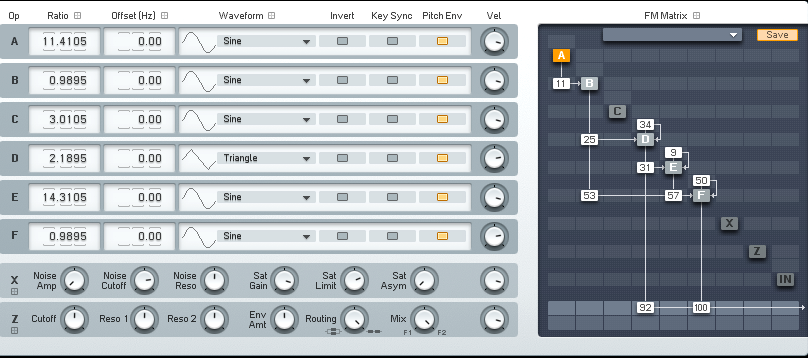
Here is an example of my changes I’ve made to patch after Easy/Morph experimenting. You can see I have utilized few other operators which were not active in the original patch.

Here are few sound samples I made using this technique made from the patch I have provided you with. Again, no external effects, distortion, re-sampling or automation was used. Only changing the morph square x and y parameters on the fly.
Each 16 bars represents one patch. After that I have changed the settings of the patch either manually or by tweaking the Easy/Morph section of the synth again. This way you can mutate your patches over and over again.
[audio:https://www.fm8tutorials.com/wp-content/uploads/2012/02/Audio-sample-example-1.mp3] [audio:https://www.fm8tutorials.com/wp-content/uploads/2012/02/Audio-sample-example-2.mp3]Here are few more extreme mutations of the patch and some of the sounds probably aren’t very useful in musical context but they will give the idea what can be done with this technique:
[audio:https://www.fm8tutorials.com/wp-content/uploads/2012/02/Audio-sample-Extreme.mp3] [audio:https://www.fm8tutorials.com/wp-content/uploads/2012/02/Audio-sample-Extreme-variation-2.mp3] [audio:https://www.fm8tutorials.com/wp-content/uploads/2012/02/Audio-sample-Extreme-variation-3.mp3]There are some quite random factors in this technique but the beauty of it is that you can stumble upon sound you wouldn’t have if you would be applying all this changes manually. Since frequency modulation synthesis is based of inter-modulation and interaction between its internal elements it can be quite unpredictable and the planning of every aspect of the sound is somehow impossible. We should use that to our advantage and I hope this tutorial will help you in getting some unique sounds.
Stay tuned for the third part of the FM8 dubstep lead tutorial series where I will cover few other modulation tricks and some useful effect settings.
Have fun!!
