
FM8 Tutorials
Ambient Effects in FM8
In this tutorial, Tonko Sekulo demonstrates how to make Ambient Effects using FM8. He will show how to use FM8’s amazing filter capabilities, and will also take a look at using FM8’s Key Scaling features.
Key Scaling is an important part of FM Synthesis, and it is one that has a great impact on the timbre of the sound. Since you can control the output of any operator relative to the pitch of a MIDI note, learning to use this feature is highly important.
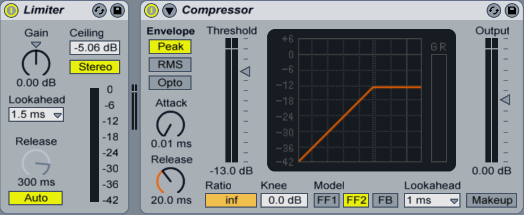
Before we start, I strongly suggest you use a limiter on your audio track. We will be working with high resonance settings and in combination with delay and reverb, this can cause some really loud and unpredictable volume peaks and noise bursts which can damage your speakers and more importantly your hearing. Please monitor the sound at a moderate level and use the limiter. Or if you don’t have a limiter, you can use a compressor with very high ratio setting and lowest possible attack.
Just in case there is someone who is new to these things, here are settings for the limiter and compressor in Ableton Live:
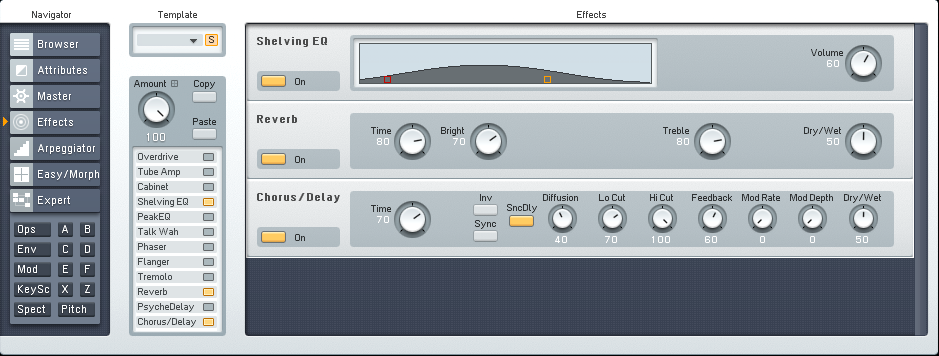
First we will set the effect section. Since we are working on Ambient Effects, we need some generous amounts of reverb and delay. Insert Reverb and Delay/Chorus effect in the FM8 Effects page. Set it like in the picture below. Also, insert a Shelving EQ and cut the highest and lowest frequencies. We will do this to avoid any sudden volume peaks in this region because of the high resonance settings later on.
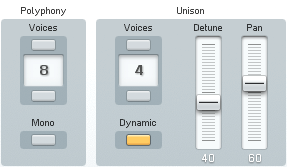
In the Master page of the synth set polyphony voices to 8, Unison voices to 4, detune to 40 and Voice panning to 60.
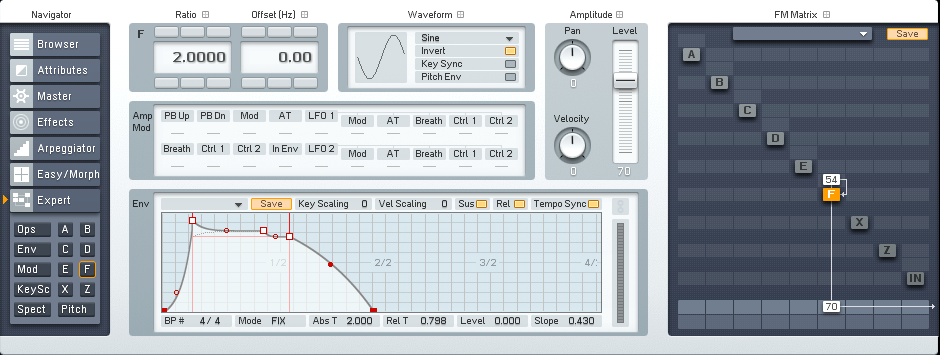
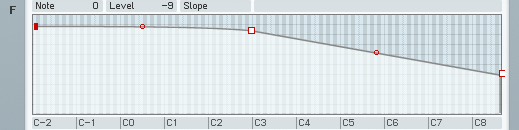
Activate operator F, and set it’s Ratio to 2 and audio output to 70. Also set it’s self modulation amount to 54 and Invert the waveform. This will add an almost unnoticeable effect until later on when we add more oscillators.
Tempo sync the envelope and set it like this:
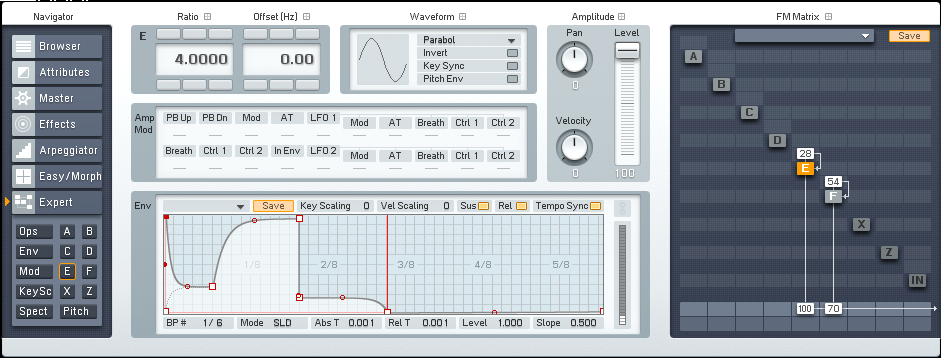
Activate operator E. Set it’s ratio to 4 and choose Parabol waveform. Set the audio output to 100 and self modulation amount to 28. Sync the envelope and set it like this:
Listen to what we have for now.
[audio:https://www.fm8tutorials.com/wp-content/uploads/2012/02/Sample12.mp3|titles=Sample1]As we can hear, when there are some high notes played in the beginning of the sample, the high frequencies in our sound get a bit overwhelming. We can fix that in a KeySc page of the FM8.
Here you can scale the amplitude of any operator and also the X and Y modules relative to the notes played. In general, this is a very useful feature in FM synthesis. Not only does it allow you to modulate the modulator and carrier amounts, relative to the pitch, but it can also help you in cases when you need to scale down certain frequency ranges for the sound to be playable over the complete range of MIDI notes.
Go to the KeySc section of the operator F and E and adjust the envelope so the amplitude of these operators will get lower the higher when the note is played. You can draw your own shapes, and I strongly recommend experimenting with this since it has a major effect on the sound as you will hear later on.
This sound is an example with the key scaling applied to it. As you can hear, the higher frequency are now less overwhelming.
[audio:https://www.fm8tutorials.com/wp-content/uploads/2012/02/Sample1KeyScaling.mp3|titles=Sample1KeyScaling]Here are my key-scaling settings for each operator:
Also enable D operator, set it’s ratio to 3.0100 and waveform to 1+2. Set self-modulation value to 21 and audio output to 63. Route operator D to modulate operator E with amount of 23 and also operator F with amount of 63. Then set operator E to modulate operator F with an amount of 25. Also, invert the operator’s D waveform, tempo sync it’s envelope and set it like in the picture below:

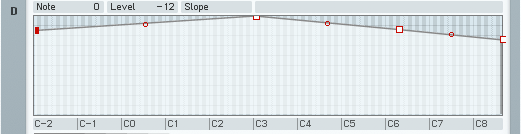
Also set the key-scaling of operator D to something like this:
You should readjust the key scaling for each operator to fit your preferences. This will have a major effect on the sound. Here are four different examples of more extreme key scaling settings.
[audio:https://www.fm8tutorials.com/wp-content/uploads/2012/02/Sample2-Keyscaling.mp3|titles=Sample2 Keyscaling]Setting the filter
Go to filter module Z. Set global envelope modulation to -50. Set it to serial routing and Mix to filter 2 output only. Set filter 1 to a value of 0 and filter 2 to 100.
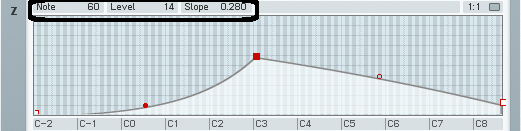
Now before we start to play with resonance, we should go to the KeySc of the synth and limit the highest and lowest frequency regions, else, there will be some feedback overload at some point resulting in a very loud burst of noise. Set the filter key scale envelope in the KeySc page of the synth like in the picture. Try to copy the envelope settings as accurate as you can.
Now set the resonance of filter 1 to 80, and resonance of filter 2 to 85. Cutoff to 70. This produces sharp bandpass filter.
Sync the envelope and set a long loop (mine is 16 bars, but you can go a bit shorter) and set it to something like this.
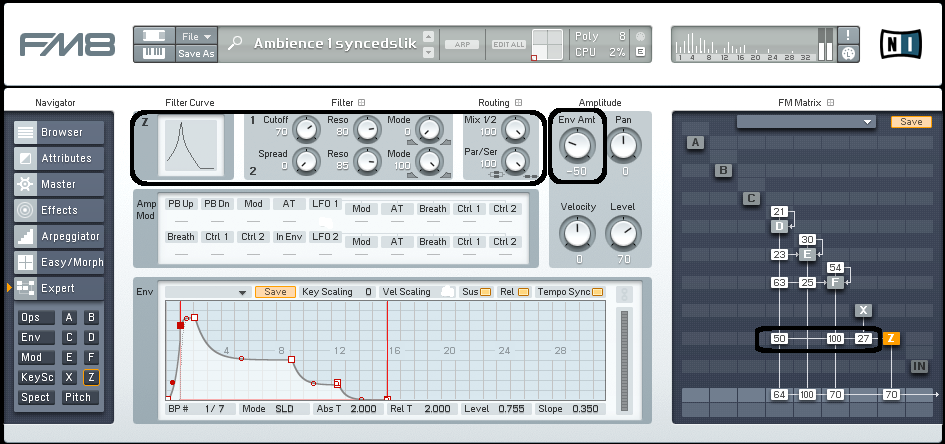
Lower your speakers volume at this point. Now route output of operator D to filter module Z at a value of 50. Also, route operator F at a value of 100 and noise module X (which we will set in a minute) at 27. You should hear strong resonating tones:
[audio:https://www.fm8tutorials.com/wp-content/uploads/2012/02/Sample3-Filter.mp3|titles=Sample3 Filter]Let’s add some background noise now. Set the module X parameters like this:

Setting the LFO
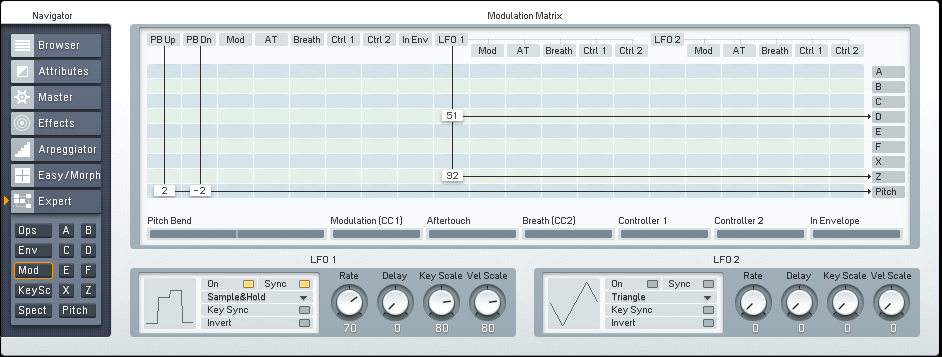
Go to the mod section of the FM8. Chose sample&hold waveform of the LFO. As the name suggests, this samples a waveform of your LFO and holds the sampled value at the output for the length of one cycle which is set by Rate control of the LFO. This will produce some cool bubble effects on our highly resonant BP filter, and we will also use it as an amplitude modulation for operator D, which is our main modulator to further animate our sound.
Activate LFO1 and enable Sync button. Set it’s rate to 70, Delay to 0, Velocity and Key Scale both to 80. Set the LFO modulation amount to operator D at 51 and to Z module to 92.
Here we go, you should hear something like this.
[audio:https://www.fm8tutorials.com/wp-content/uploads/2012/02/Sample42.mp3|titles=Sample4]Try to experiment with key scaling a bit further:
[audio:https://www.fm8tutorials.com/wp-content/uploads/2012/02/Sample4-KeyScaling.mp3|titles=Sample4 KeyScaling]Also be sure to try changing the detune parameter of the operators, since it has a very strong effect on sound.
[audio:https://www.fm8tutorials.com/wp-content/uploads/2012/02/Sample4-Detune.mp3|titles=Sample4 Detune]Here I’ve changed the Brightness parameter in the Easy/Morph page from zero to full during the 32 bars. Brightness controls all the modulation amounts of every operator in a patch. At the end of the sample you can hear almost distorted guitar like timbre.
[audio:https://www.fm8tutorials.com/wp-content/uploads/2012/02/Sample4-Brightness.mp3|titles=Sample4 Brightness]Hope you enjoyed this tutorial. Have fun!!
Have A Question Or Comment About This Tutorial?
Want to ask a question about this tutorial or perhaps you have something to add ?
Click through to our forum post about this tutorial and join the conversation!
Visit: Ambient Effects in FM8
